This article is work in progress. I have installed picframe3 a number of times now and have not run into any issues, but it has not been battle-tested over years the way the old frame has. So if you hit any quirks, please let me know.
I bought my first digital picture frame almost twenty years ago and have been a fan ever since.
Everything on this website since then has been built on one piece of software: Pi3D PictureFrame. It has been on my wall for years. It still works.
But the Raspberry Pi has moved on. The operating system has moved on. And the way we have been installing that software — a compositor, an X compatibility layer, console autologin, three hand-written config files and a pasted Samba block — has quietly become a tower of workarounds for one simple wish: give me an easy solution.
So last weekend I rebuilt it.
Well. Our AI overlords rebuilt it. I made the coffee and had the opinions.
The result is called picframe3, it is on GitHub, and this is the new build guide. Installation is now one command. The frame draws straight to the screen, with no desktop underneath it, on Raspberry Pi OS Lite — the current release, Trixie, or Bookworm before it.
If you have never built one of these, start here. And if you already have a frame running, moving it over is a piece of cake.
Standing on the shoulders of giants
Before anything else, the part that matters most to me.
None of this would exist without Helge Erbe, who built and has maintained picframe for years, patiently, in public, answering issue after issue from people like me. Without Paddy Gaunt, whose pi3d made smooth crossfading on a Raspberry Pi possible in the first place, back when everyone else said it could not be done. And without Jeff Godfrey, whose work on matting and metadata is the reason that every photo, regardless of its format, looks great on the frame.
picframe3 is a fork: picframe's ideas, carried onto a stack that matches the operating system as it is today. The matting. The metadata overlays. The portrait pairing. The Home Assistant integration. The whole notion of what a good picture frame actually does — all of that was worked out by Helge, Paddy and Jeff and the people around them, over years, and I simply took it as the specification and built to it.
Every good decision in picframe3 was theirs first. As always, I am standing on the shoulders of these giants.
There is one more name in the credits, and it is an odd one to find under an article about a picture frame: Claude.
I am not a programmer. I can read a configuration file and find my way around a terminal, but I could not have written ten thousand lines of graphics code by hand, and two years ago that would simply have been the end of the idea. It was not. I described what I wanted the frame to do, in plain words, and then spent a weekend arguing about the details with Claude until it was right.
Building a small piece of software used to take either years of practice or somebody else's budget. That is no longer true. If you have an idea sitting in a drawer because you cannot code, it is worth taking out and having another look at.
And a thank you to everyone in the issue threads and to the readers who have written to me over the years. This website has over a hundred articles, and a good half of them exist because somebody asked a question I could not answer.
What is actually new
Let me keep this short and non-technical. If you want the engineering, it is in the repository. Here is what you will notice.
Installation is one line. No compositor. No autologin. No autostart file, no rc.xml, no service file to paste into an editor. Raspberry Pi OS Lite, one command, a handful of questions, done. The old guide had about thirty steps; this one has four.
It is on the wall in about twenty seconds. From plugging it in to the first photograph. There is no desktop session to bring up, no compositor and no login — the frame starts before anyone logs in, because it is the only thing running. The old setup took considerably longer to get to a picture, and you watched it boot.
The frame does nothing while a photo is on screen. Not "almost nothing" — nothing. The picture sits on the panel and the Pi goes quiet until it is time to change. The old approach redrew the same unchanged image dozens of times a second, around the clock. Your frame runs cooler.
New photos appear within seconds. Not at the next timed walk through the folder. You drop a picture in, and it is in the rotation.
Nothing gets deleted without a record. When you remove a picture from the frame, the frame writes down what it was, where it came from, and which button asked. There is a Removed tab with a "Put it back" button on every row. And a picture you removed stays removed, even if the file turns up again from a backup or a sync — unless you say "Show this again".
It tells you when something is wrong. picframe3 doctor checks the hardware, the drivers, the permissions and your photo library, and prints the exact command that fixes whatever is missing, in plain words, instead of a Python traceback. The frame also reports its own temperature, load, free space and — the one that matters — the Raspberry Pi's undervoltage flag.
It looks after itself. If the Wi-Fi drops, it notices and mends the link rather than sitting there showing the last picture it had while Home Assistant quietly loses it. And there is a shutdown button in the web interface and in Home Assistant, so you can power the frame down from the sofa and pull the plug without risking the SD card.
Photos can arrive on their own. The setup offers Syncthing alongside the classic file share. Pair it with your phone once and a photograph you take this afternoon is on the wall this afternoon, without passing through anyone else's server.
Updating is as easy as ever. Run the same one-line installer again. It upgrades the frame in place, leaves your configuration, your index and your photographs exactly where they are, and you are back on the wall in a minute. There is no uninstall-first, no fresh card, nothing to write down before you start.
All the little helpers are built in now. Over the years I bolted a lot of small scripts onto my own frame. One published the CPU temperature to Home Assistant on a cron job. One counted the images in the folder. One watched the Wi-Fi and restarted it when it dropped, which on my frame was several times a day. And the Samba config had to be pasted in by hand and got exactly right, which is its own article on this site.
All of that is now part of picframe3 itself: the health check, the Wi-Fi recovery, the library with its filters and its trash, the Syncthing setup and the file share. The installer sets them up and the settings page manages them. No cron jobs, no scripts sitting in your home directory, and nothing to rebuild from memory the next time you start with a fresh card.
What you need
- A Raspberry Pi 4, 400 or 5. Which one to get is its own article.
- A microSD card, 16 GB or larger. Which card matters more than people think.
- A display on HDMI, or an official DSI panel. A 24 or 32-inch screen, ideally 4K, is where this project really pays off.
- Raspberry Pi OS Lite (64-bit) — Trixie, the current release, or Bookworm.
About the Pi 2, 3 and Zero 2 W
They will not work, and I want to be upfront about why rather than let you find out at the end of an installation.
picframe3 renders with OpenGL ES 3, which the graphics chip in the Pi 4, 400 and 5 provides. The Pi 2, 3 and Zero 2 W have an older chip that stops at ES 2.0. Supporting both would have meant writing and maintaining two versions of every transition, and I decided against it.
The setup warns you, picframe3 doctor fails the graphics check, and starting the frame stops with a message naming the reason.
If you have a Pi 2, 3 or Zero 2 W, use my 2025 Bookworm and Wayland guide instead. It is still a good frame. It is the frame that has been on my own wall for years.
About video
Photographs look identical on a Pi 4 and a Pi 5. Video does not.
| Pi 4 / 400 | Pi 5 | |
|---|---|---|
| H.264 | hardware, up to 1080p60 | software (the CPU is fast enough) |
| HEVC / H.265 | hardware, up to 4Kp60 | hardware |
| In practice | video up to 1080p | video up to 4K |
A 4K panel showing 4K video therefore means a Pi 5. Still photographs are shown at full 4K on both boards, and 1080p video plays smoothly on a Pi 4 — on a 4K panel too.
picframe3 doctor tells you which board it is on and what that board will play, and the log names any file that is too big for it by name.
Step 1 — Write the SD card
Download the Raspberry Pi Imager.
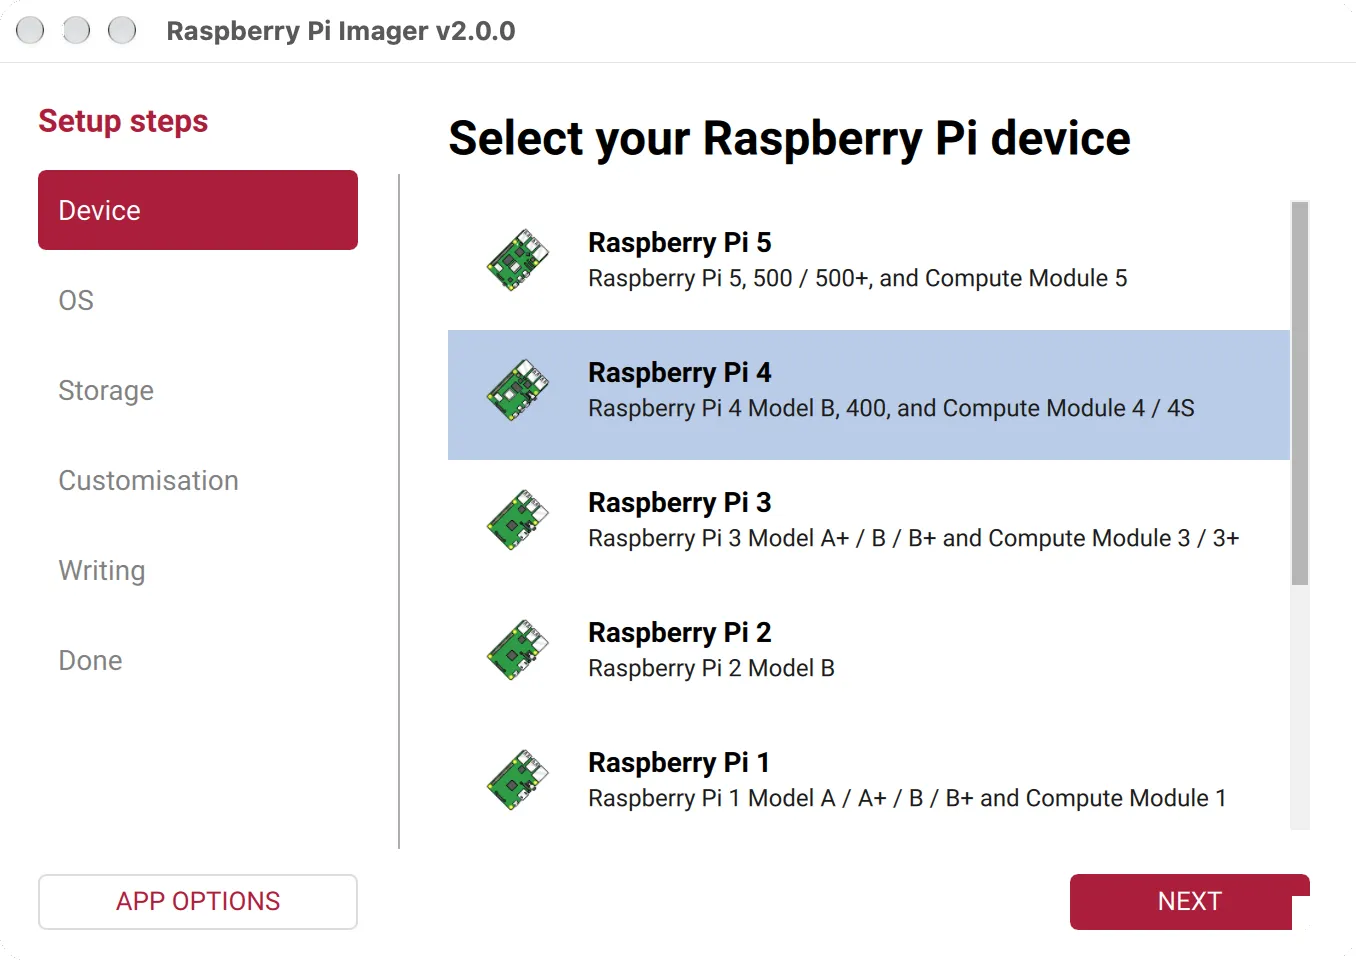
The Imager walks you down a list of setup steps on the left: Device, OS, Storage, Customisation, Writing.
Under Device, pick your Pi — Raspberry Pi 5, or Raspberry Pi 4 for a Pi 4, 400 or Compute Module 4.
Under OS, choose Raspberry Pi OS Lite (64-bit). It describes itself as "a port of Debian Trixie with no desktop environment", which is exactly what you want. Lite is the right image, and this is a change from the old guide: picframe3 draws to the screen itself, so a desktop would only take memory and get in the way.
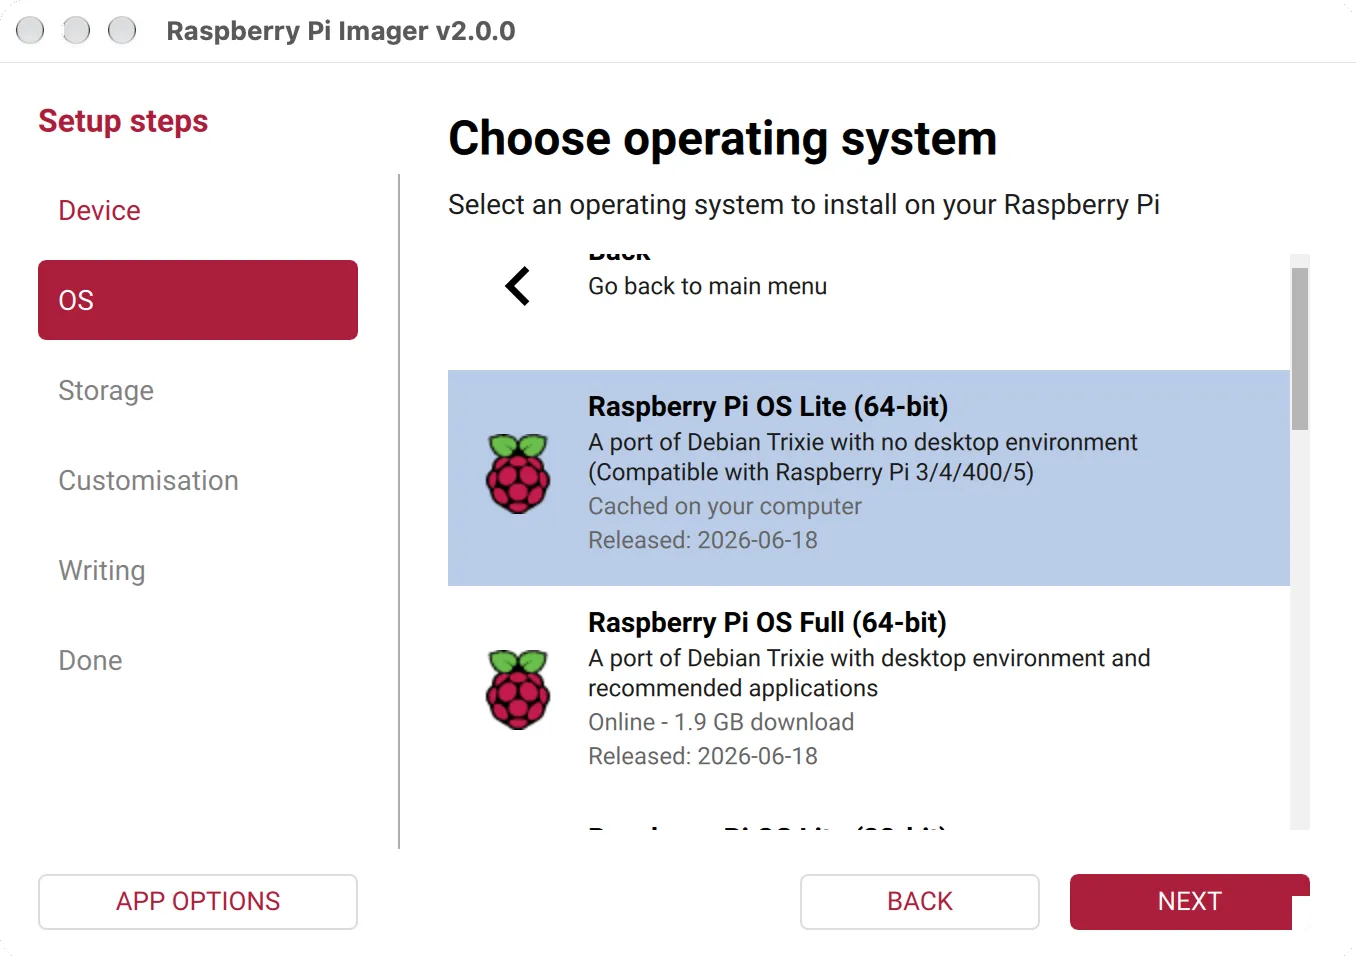
Under Storage, select your SD card. Then work through Customisation, which has a section for each thing you need:
- Hostname:
frame— the frame's page will then be athttp://frame.local:9000/ - Localisation — your language, keyboard and time zone
- User — this guide assumes
pi, with a password you choose - Wi-Fi — your network and country
- Remote access — switch SSH on. Do not skip this one.
The last screen sums up what it is about to do. Check that it says Lite, that SSH is enabled, and that the storage really is your card.
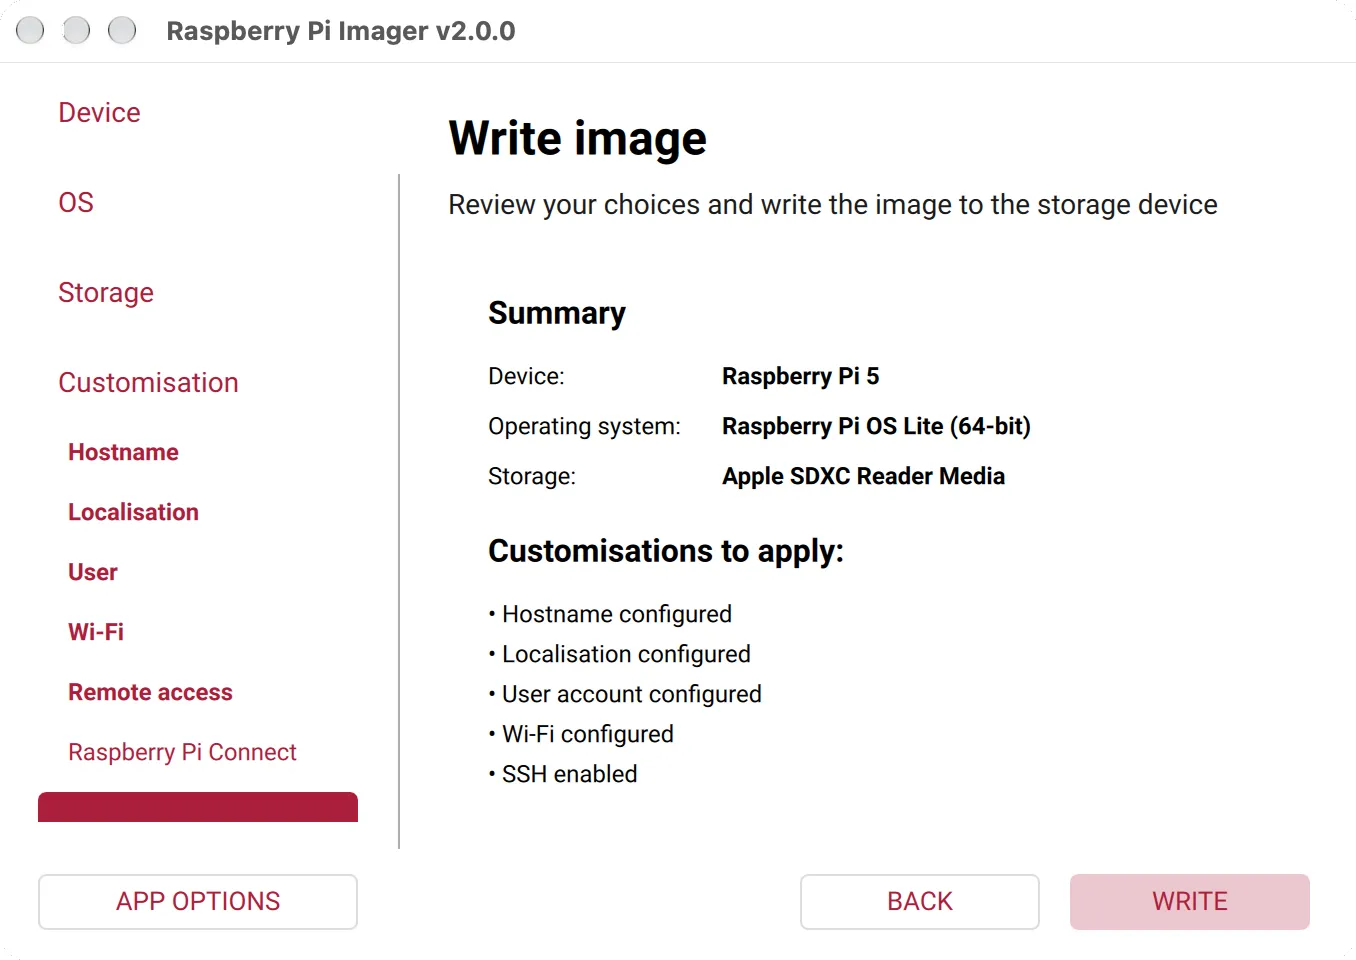
Write the card, put it in the Pi, connect the display, plug it in, and wait about two minutes.
If any of this is new to you, my original Raspberry Pi setup article goes through it much more slowly.
Step 2 — Log in over SSH
Open a Terminal on your Mac, PC or Linux machine. If you have never used one, start here.
You no longer have to go hunting for the Pi's address. On the first boot, before anything else takes over the screen, Raspberry Pi OS prints it on the display the Pi is plugged into, just above the login prompt:
My IP address is 192.168.178.74
So read it off your own screen, and then:
ssh pi@192.168.178.74
Because you named the Pi frame in the Imager, this usually works too, and saves you the numbers:
ssh pi@frame.local
Step 3 — Install picframe3
This is the whole installation:
curl -fsSL https://raw.githubusercontent.com/sapnho/Digital-Picture-Frame-Pi-2026/main/packaging/install.sh | bash
The installer fetches the libraries, creates a Python virtual environment, installs picframe3, puts you in the groups it needs, tidies the boot options so no console text appears over your photographs, and then asks you eight questions:
1. This machine            confirms the Pi model and the display it found
2. Where your pictures are
3. Getting photographs onto the frame   Syncthing, a file share, or both
4. Controlling it from your phone       the web interface and its port
5. Home Assistant                       optional MQTT
6. How it should look                   interval, transition, mats,
                                        Ken Burns, clock, night-time off
7. Place names                          optional GPS to place names
8. Starting automatically               the systemd service
Every question has a default in brackets. Holding down the Return key is a perfectly valid way to get through it, and nothing here is destructive — picframe3 setup runs the whole thing again any time you change your mind.
Then reboot, so the new group memberships take effect:
sudo reboot
That is it. No labwc. No xwayland. No libsdl2-dev. No wlr-randr. No console autologin. No autostart file, no rc.xml, no .service file to write by hand. The frame owns the screen and starts before anybody logs in.
Step 4 — Get your photos onto the frame
Question 3 offered you two ways of doing this, and you can have both.
Syncthing
Syncthing pairs the frame with your phone, your Mac, your PC or a NAS once, and then keeps a folder in step by itself. A photograph you take this afternoon is on the wall this afternoon, wherever you took it. Nothing passes through anyone else's server — the devices talk to each other directly.
After the setup, the frame prints its own device ID and the address of Syncthing's page on it:
http://frame.local:8384/
To pair, add that device ID in Syncthing on the other machine, or paste the other machine's ID into the frame's settings page under Getting photographs onto the frame. That same card shows you what Syncthing is doing, and can install it later if you said no during the setup.
One thing worth knowing: the frame's folder is send and receive by default, which means a photograph you Remove on the frame is also removed from the phone that sent it. There are two safety nets under that — Syncthing keeps its own copy of anything deleted for 30 days, and the frame's own Removed tab can put a picture back. If you would rather the frame never sent anything back at all, set "Which way photographs travel" to Receive only.
A file share
This is the classic route, and the good news is you no longer have to configure Samba by hand. The installer sets it up, and it sets it up properly for macOS, so Finder's metadata goes into extended attributes instead of scattering a ._DSC1234.jpg beside every photograph.
- macOS: Finder → Go → Connect to Server →
smb://frame.local/Pictures - Windows: Explorer →
\\frame\Pictures
Or, with neither:
scp -r ~/Photos/Italy2025 pi@frame.local:~/Pictures/
Indexing is automatic
There is nothing to run. The frame watches the picture folder and notices new photographs within seconds, whether they arrived over Syncthing, over the share or on a USB stick. The first few thousand take a minute or two to read; after that only new and changed files are looked at.
The web interface
Open http://frame.local:9000/ on your phone. This is where you will actually live.
- Now playing — what is on screen and where it was taken, previous / pause / next, brightness, interval, and a button to turn the screen off.
- Library — search, browse by folder, tap a thumbnail to jump straight to that picture. The filter panel at the top previews how many pictures a filter selects as you type, and applies it when you leave the box.
- Removed — every picture you have taken off the frame, with the date, where it came from and which button asked. "Put it back" on each row. "Delete for good" if you really mean it, which keeps the note even after the file is gone.
- Settings — this is the part I am most pleased with. Instead of one long list of fields, the page opens on the eleven jobs people actually come to do: how fast pictures change, how a picture sits on screen, what is written over it, where the photographs come from, getting them onto the frame, how a video clip plays, when the screen turns off, the panel itself, naming where a photo was taken, control from elsewhere, and the buttons. Each card tells you what the frame is doing right now — "35 seconds each · fade over 10.5 s · shuffle, every picture once" — and opens onto the three or four settings that job needs. Nothing is hidden: the complete list of every setting is one click away at the foot of the page.
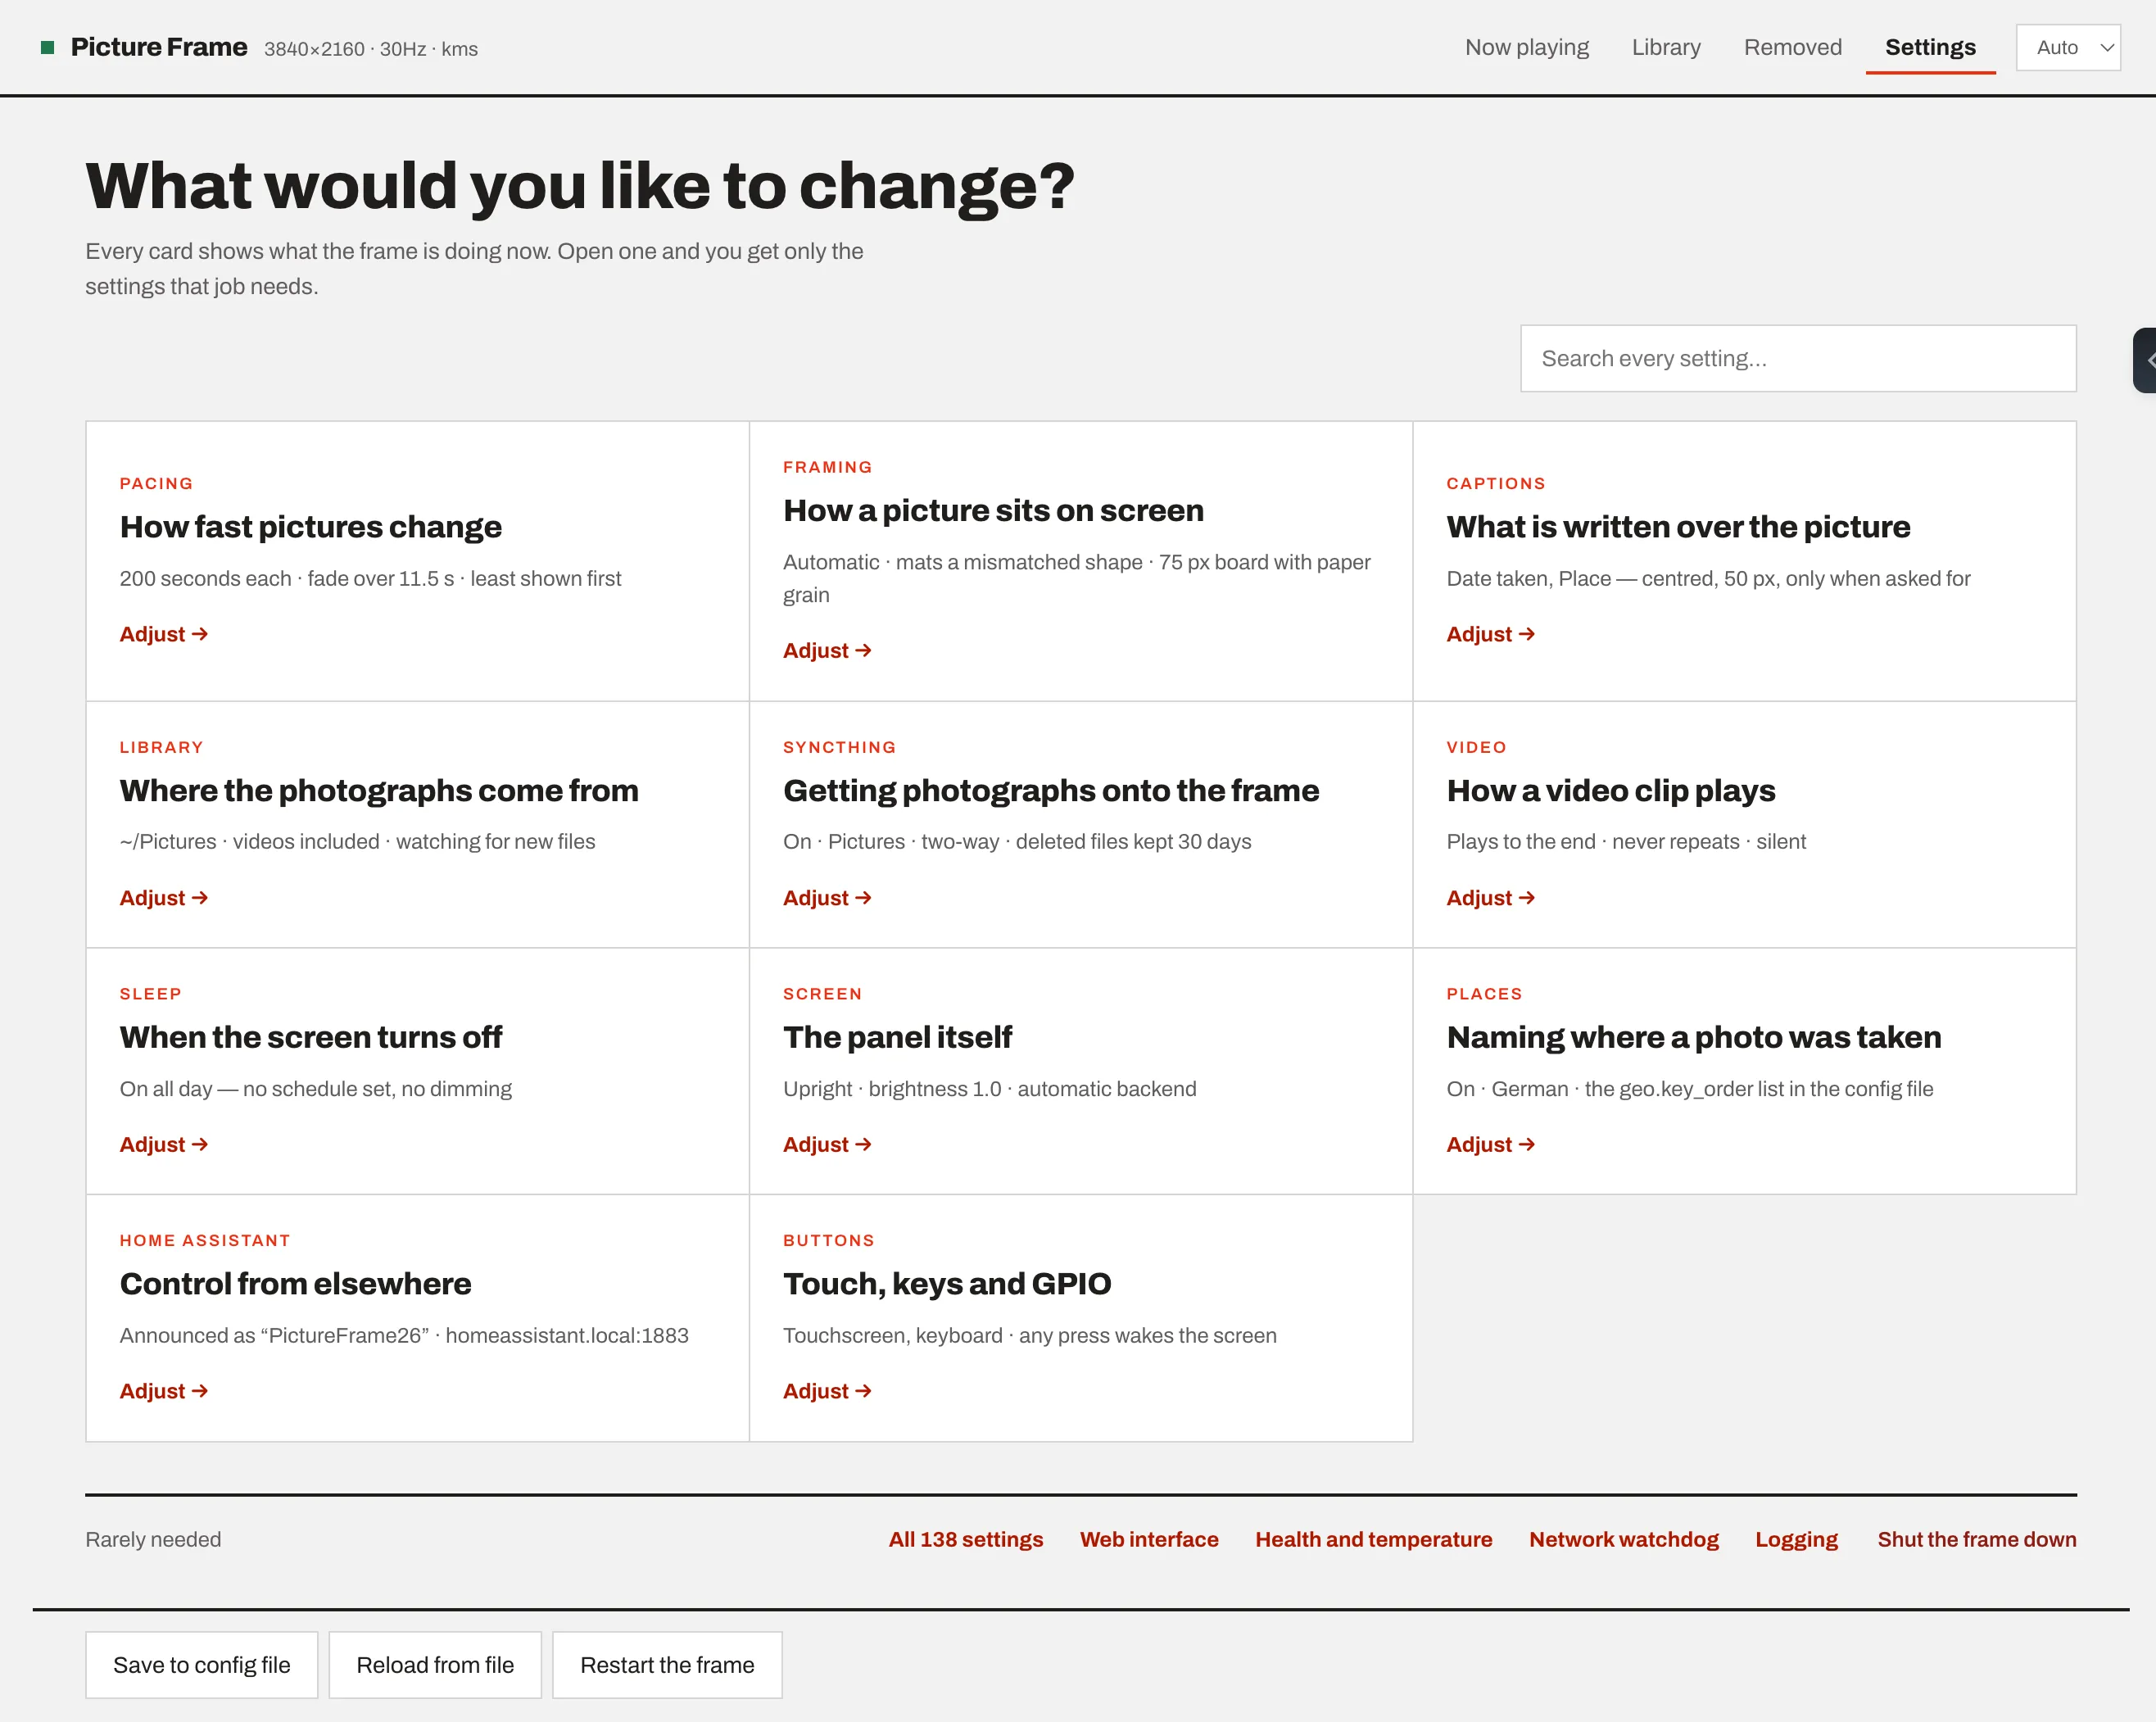
Open a card and a sheet slides in with just that job's settings — here, what gets written over the picture and for how long.
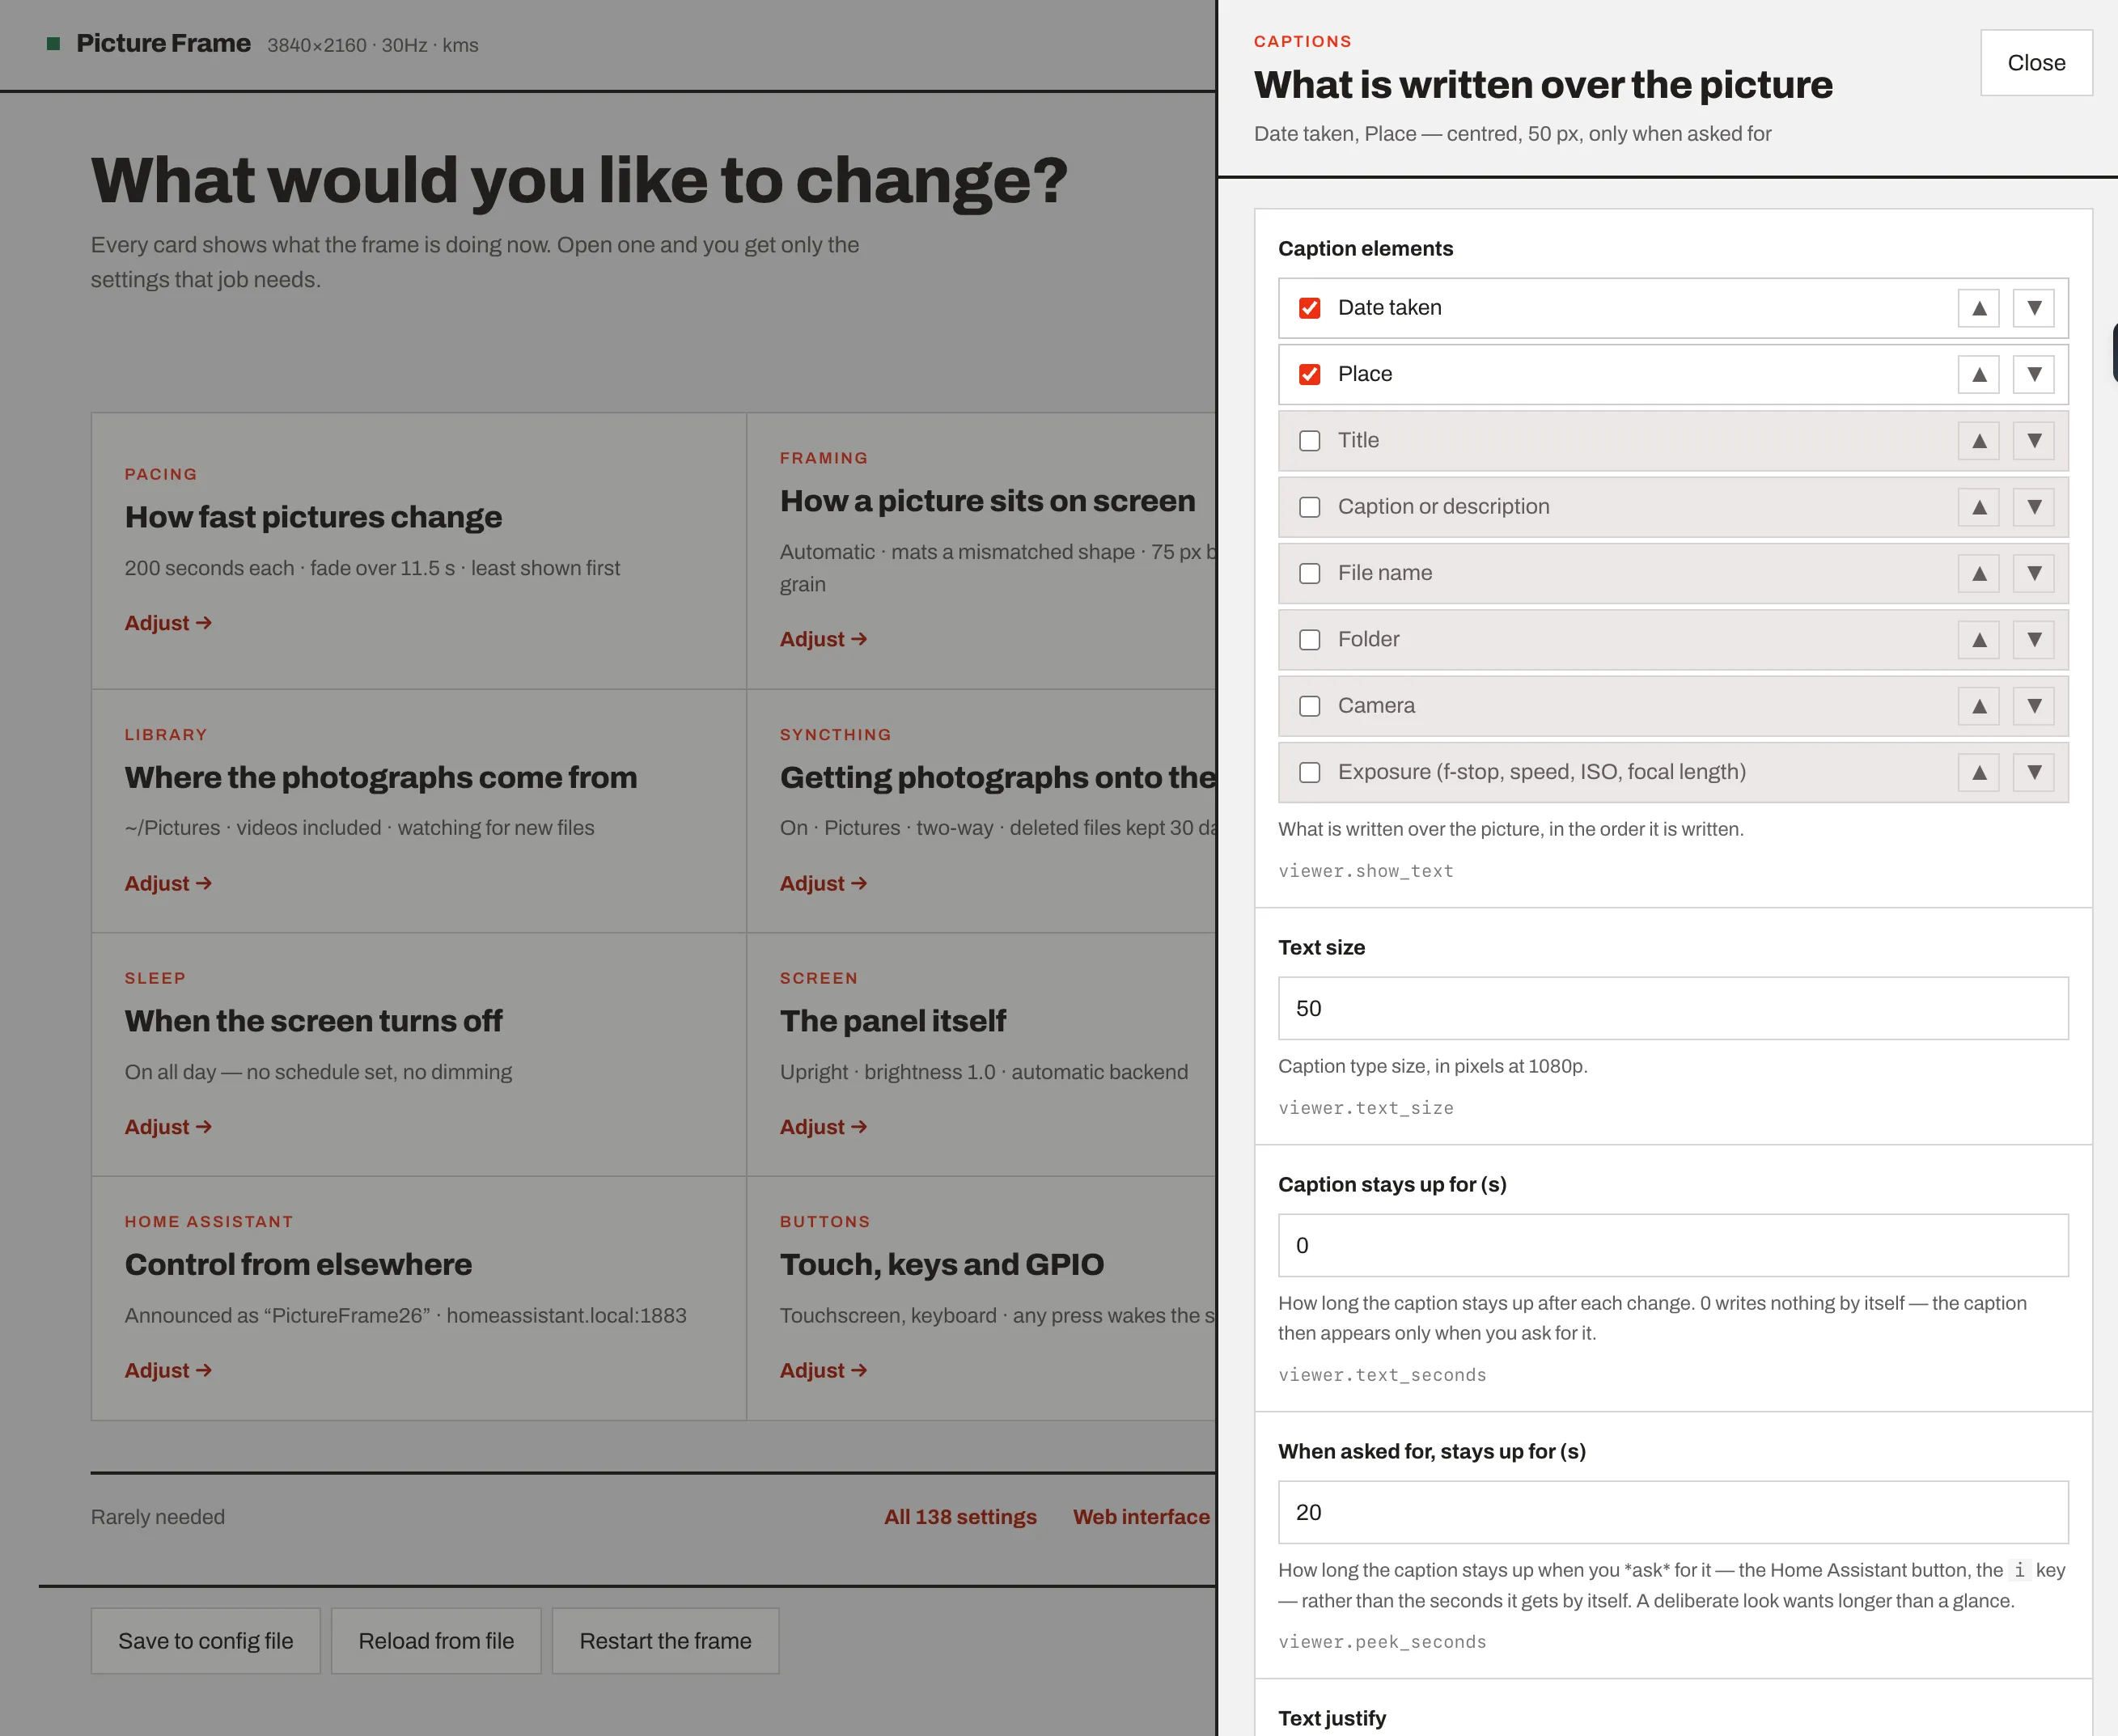
Settings apply to the frame the moment you change them. The bar at the bottom of the screen tells you whether they have also been written to the config file, and turns red when they have not.
At the frame itself, a keyboard works — → next, ← previous, p pause, i info, o screen off, c clock — and a touchscreen understands swipes and taps.
Home Assistant
Say yes at question 5 of the setup and give it your broker details, and that is the whole integration. No YAML on the Home Assistant side.
If you do not have an MQTT broker yet, my recommendation is to run it on Home Assistant — the Mosquitto broker add-on, two clicks in the add-on store — rather than putting one on the frame. It is one less thing running on the Pi, it keeps working when the frame is switched off or being reinstalled, and every other device you add later can share it. I do have an older article on installing a broker on the frame itself and it still works, but this is the way I would do it today.
The frame turns up as one device with a light for the screen, a pause switch, next / previous / rescan / remove buttons, the interval, the transition and the play order, and sensors for the picture that is on the wall — title, date, place, tags, camera, folder.
Two of them are new and worth calling out.
The photograph itself is published to Home Assistant as an image entity. A picture-entity card on your dashboard shows what is on the wall, with no Generic Camera to set up, no URL to type and nothing shared over the network. If you have been using the old trick with a camera entity, you can throw it away.
type: picture-entity
entity: image.picture_frame_picture
show_state: false
show_name: false
The date filters are buttons. Today, last 7 days, last 30 days, last 90 days, last year, last 3 years, on this day, all dates — eight of them, created automatically, no input_datetime helpers and no template scripts. And they are rules, not dates: "last 30 days" stays last 30 days tomorrow morning, because the frame re-resolves it at midnight by itself.
Here is the card on my own dashboard: the photograph currently on the wall, where and when it was taken, the transport buttons, and the date presets underneath.
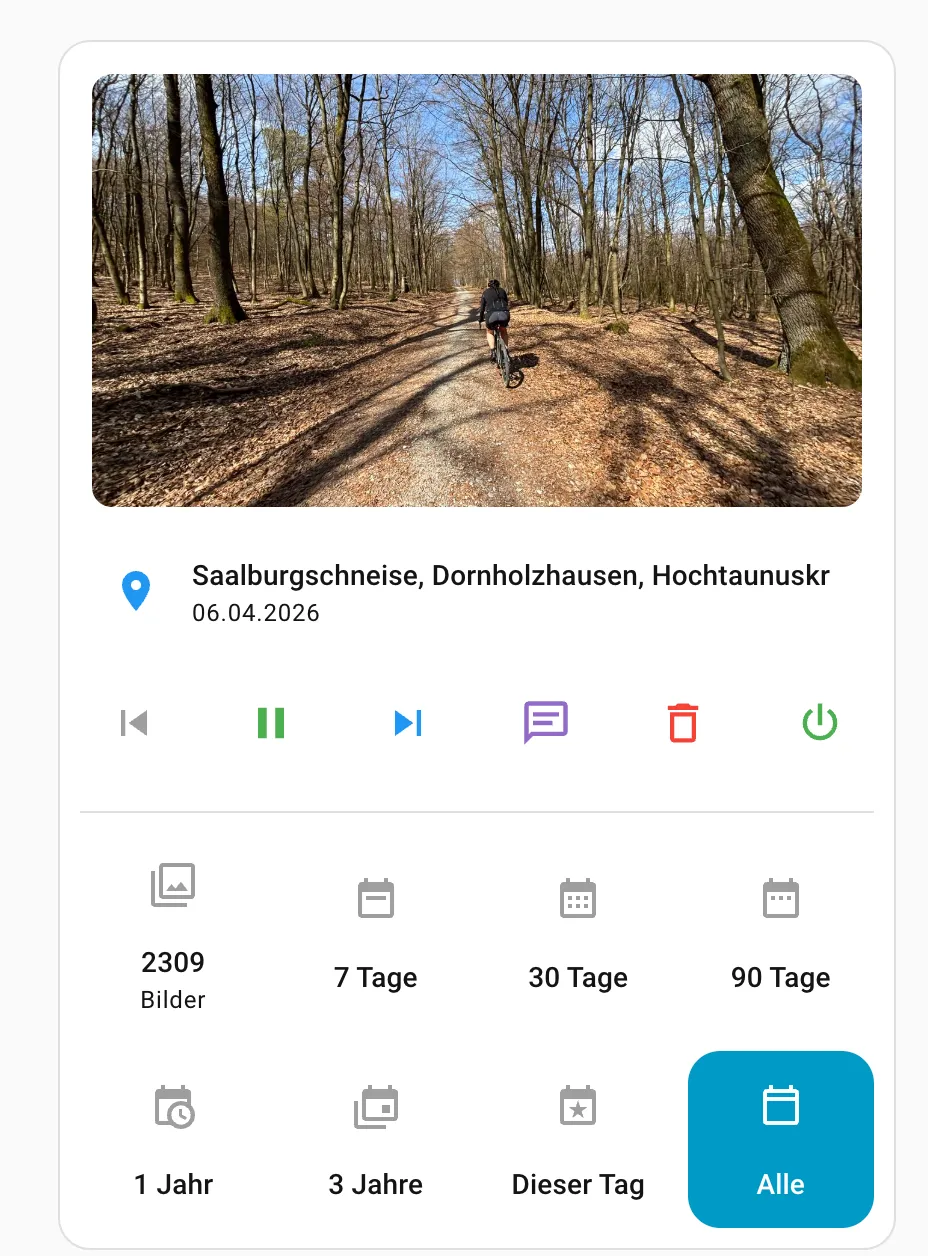
There are also filter entities for folder, tags, place and a free date range, health sensors for temperature, load, memory, free space and undervoltage, and a shutdown button.
If you are coming from my older Home Assistant article, the entity names have changed. The frame publishes under its own device now, and your old scripts will need pointing at the new entities once.
Updating
Updating is as easy as ever: run the same install script again. It upgrades in place and leaves your configuration alone.
curl -fsSL https://raw.githubusercontent.com/sapnho/Digital-Picture-Frame-Pi-2026/main/packaging/install.sh | bash
sudo systemctl restart picframe3@pi
Coming from a Pi3D PictureFrame
If you already have a frame built the old way, the move takes about thirty minutes.
Convert the configuration first. It reports exactly what it carried over and what it dropped:
picframe3 migrate ~/picframe_data/config/configuration.yaml
systemctl --user disable --now picframe
picframe3 scan
sudo systemctl enable --now picframe3@pi
Note the --user on that second line. The old guide installs picframe as a user service, so sudo systemctl disable picframe fails with "Unit picframe.service does not exist" — which reads like "it was already gone", and it was not. The old frame then comes back at your next login and the two fight over the screen. Only one program can own the display.
These are no longer needed and can go:
| No longer needed | why |
|---|---|
labwc, wayfire |
there is no compositor; the frame is the only thing on the screen |
xwayland |
nothing X11 is involved |
libsdl2-dev |
SDL was pi3d's window layer |
wlr-randr |
screen power is handled internally now |
~/.config/labwc/autostart and rc.xml |
nothing to autostart inside a session |
~/.config/systemd/user/picframe.service |
a system service starts at boot instead |
| console autologin | no login is needed for the frame to appear |
Honestly, though: a fresh SD card with Raspberry Pi OS Lite is cleaner and takes twenty minutes.
When something goes wrong
Run this first. Every line is a tick, or a cross with the exact command that fixes it:
picframe3 doctor
And when that is not enough:
journalctl -u picframe3@pi -n 50
A few things that come up:
Nothing on screen, the service keeps restarting. If the log says "could not become DRM master", something else owns the display — you are on the desktop image, or an SSH session is running picframe3 run at the same time as the service. Stop the other one. On a desktop image: sudo systemctl set-default multi-user.target && sudo reboot.
"Permission denied" on /dev/dri/card0. You have not rebooted since the installer added you to the groups.
Black screen, no errors. The display is asleep. Check your power.schedule, and try curl -XPOST localhost:9000/api/display_on.
iPhone photos are skipped. Install HEIC support — picframe3 doctor prints the command with the right path for your frame.
Videos do not play. picframe3 doctor says whether it can see GStreamer.
A video stutters. Check the board and the clip against the table above. On a Pi 4, anything above 1080p stutters and no setting will fix it. Re-encoding those clips to 1080p, or moving the frame to a Pi 5, are the two ways out.
Place names never appear. They need geo.enabled and an email address in geo.contact, which OpenStreetMap's terms require. They then fill in a few at a time while the frame runs.
If you get properly stuck, my FAQ covers most of the rest, and the issues page on GitHub is open.
Conclusion
Congratulations — you have just built the best digital picture frame that no money can buy.
A big thank you, once more, to Helge Erbe, Paddy Gaunt and Jeff Godfrey, and to everyone in the forums and issue threads who worked out, one question at a time, what a good Raspberry Pi picture frame should do. picframe3 is their ideas on a new foundation.
picframe3 is MIT licensed, like picframe. The code is on GitHub, and I would love to hear how it runs on your wall.
Was this article helpful?
Thank you for your support and motivation.