
In this article, I will show you how to build a 32 inches, 4K pixel resolution digital photo frame using a Raspberry Pi 4. As image viewer software, I will again use Pi3D PictureFrame with wonderful crossfading transitions.
I will refer to some of my earlier articles that deal with parts of these instructions in more detail throughout the text.
Tested with: Raspberry Pi OS March 2021 version, Raspberry Pi 2, 3, and 4, Pi3D 2.43, PictureFrame 2021.03.20, 1080p and 4K displays.
4K is finally here
The wait was finally over. On June 24, 2019 the Raspberry Pi foundation officially released its latest marvel: The Raspberry Pi 4 Model B. Among the many new features, a 4K HDMI output with a pixel resolution of 3840 x 2160 px.
4K HDMI output was indeed a feature that some competitors like ODROID had offered years before. But with the whole Raspberry Pi ecosystem and developer support, I decided to wait.
When the Pi 4 was finally introduced, the Raspberry Foundation even offered two 4K outputs instead of just one.
What 4K actually means
“4K resolution” refers to a horizontal display resolution of approximately 4000 pixels. While there are slight variations, the dominant standard for computer displays is 3840 × 2160px, called 4K UHD. The aspect ratio is 16:9. The size of the screen has nothing to do with 4K or not. You can get them from 24 inches to larger than 80 inches “Las Vegas-style” screens.
To compare: My first home-brewed digital picture frame had an ASUS 24 inches screen featuring a resolution for 1920 x 1200 (16:10), called the WUXGA resolution.

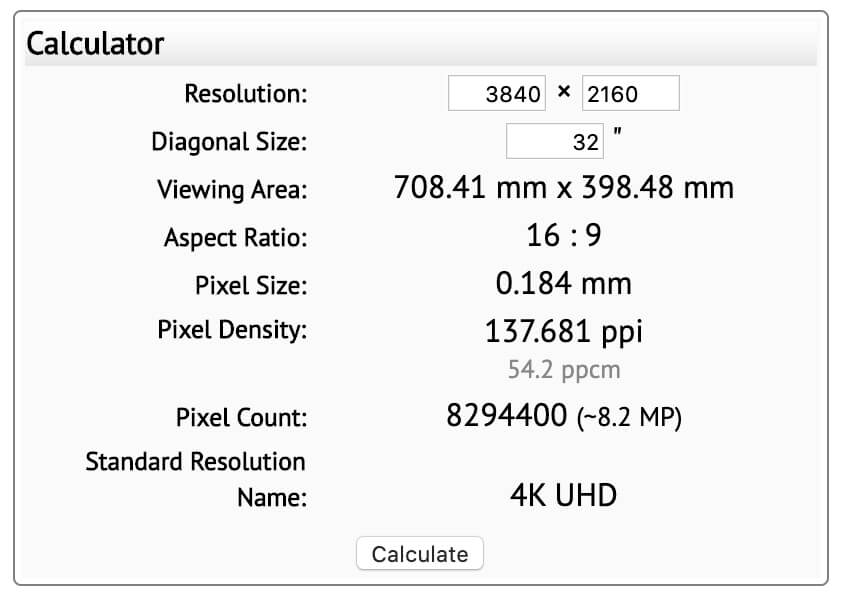
So, moving from 24 to 32 inches means a 360% increase in pixels from 2.3M to 8.3M. And a screen real estate going from 167 cm2 to 282 cm2, an increase of 69%.
As you can see, the pixel increase is much higher than the surface increase which means that the sharpness increases A LOT!
The one (huge) downer of 4K displays for photo frames
There is one reason why I have held back until now with a 4K project. I was still hoping for a 16:10 formatted 4K display.
But almost a year later, I gave up that hope. The display manufacturers are too focused on video content and might not ever go back to any less wide format than 16:9.
The reason why this is important especially for photographers is that the aspect ratio of photo cameras is typically 3:2 or even 4:3. Pulling them up on a 16:9 screen will either result in pillar boxing, those black bars left and right, or almost 20% cropped space. Neither is very desirable if you like great photo art.
There is a workaround to this (which I will explain further down), but it would require a rather large matte (Passepartout) to which my beloved wife vigorously objected to (for the time being), so I grudgingly accepted that I would have to re-crop all my images in Adobe Lightroom to not look too bad on a 16:9 screen.
Why I picked the BenQ PD3200U
It had almost been five years since I had made a significant hardware update to my digital picture frame installation in our living room. Yes, I had exchanged the Pi 2 for the Pi 3 two years ago, but the screen and the frame had remained unchanged.
On the software side, I had added voice control, integration in our Home Automation system, easier maintenance of the photo library, and a number of tidbits here and there. But it was still the same old 24 inches 1920 x 1200px frame. And I really want a larger and sharper screen.
So, I took a deep look for computer monitors on Amazon and bare bone displays with controller cards from Chinese vendors on Aliexpress.
I wanted to avoid having to take a computer monitor apart by buying a naked display but price-wise there wasn’t much of an advantage if you factor in shipping to Europe, VAT, and import duties. Also, the delivery times can be very long.
So, I gave up on that idea (at least for now) and went back to looking for a suitable computer monitor on Amazon. My list of criteria from my earlier article “Read these 10 essential tips for picking the right monitor for a digital picture frame” was my evaluation guide.
I ended up ordering the BenQ PD3200U, a 32 inches UHD 4K IPS display with 100% rRGB colors. Yes, you can get cheaper computer monitors or TVs in that size and resolution but I wonder if the screen quality is the same. The BenQ display looks stunning.
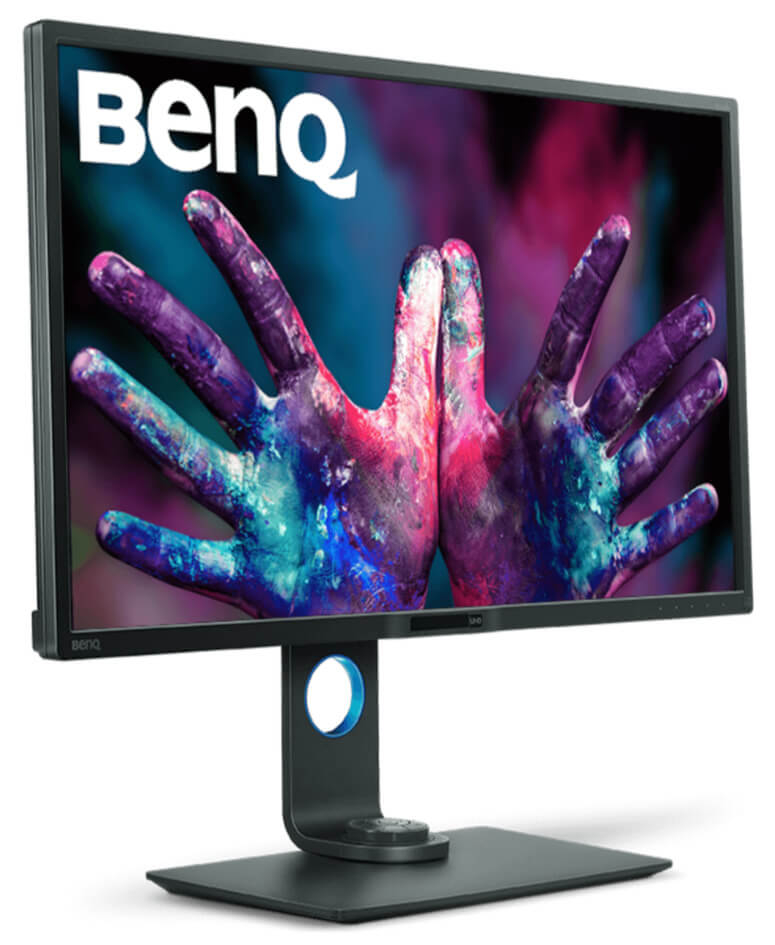
When the monitor arrived, I was a little bit surprised how heavy it was with 12.5kg. When you put this monster up the wall, you definitely need an industrial wall mount to hold it tight!
A comparable IPS display panel on Aliexpress weighs about 3.5 kg but you need to add in the power supply, the LCD controller board, and the wall mount.
The weight is important when you think about the structure of your frame and the material you are going to use.
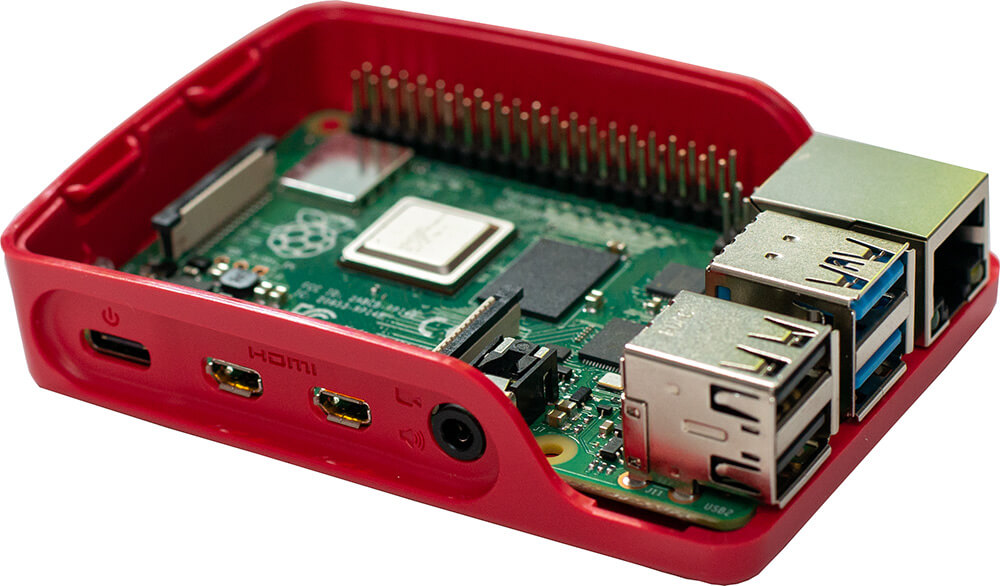
The Raspberry Pi hardware
For this project, I used a Raspberry Pi 4 with 4GB of RAM, a 32GB Samsung SD-card, and the official 5V power supply. It would probably work will less RAM, but the price differential between the 2GB and the 4GB version is not big, so I recommend to go with the 4GB model.
As the Raspberry Pi is much more powerful than its predecessor, you need to make sure that it is cooled properly. As you don’t want to install a noise fan, have a look at the Flirc case.
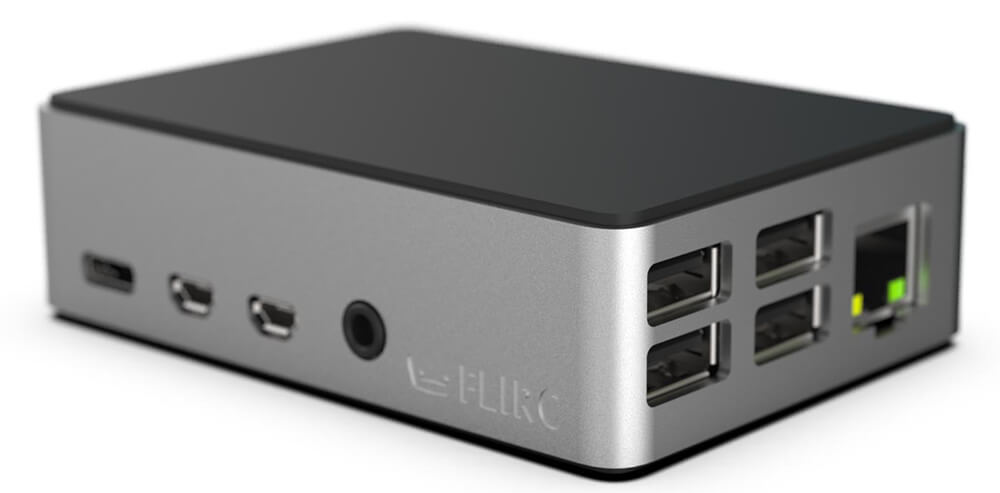
It is an aluminum enclosure that provides passive cooling that will keep your Pi below 60 °C (140°F) which is perfectly fine.
You also need a decent HDMI cable with a micro HDMI plug on one side and a normal full-size HDMI plug on the other. I say “decent” because the overall consensus seems to be that with 4K it is safer to use a solidly built HDMI cable and not the cheapest one you can find.
The basic software configuration of your Raspberry Pi 4
Next, I set up a fresh image of “Raspberry Pi OS with Desktop”, configured with WiFi, and Samba. You can find the step-by-step instructions in my post “How to configure the software for your digital picture frame in 60 minutes“.
If you haven’t done so already, you should check out Pi3D PictureFrame in “How I added crossfading slide transitions to my digital picture frame using Pi3D“.
Also, add a few test images to your /Pictures folder.
The Pi3D PictureFrame parameter settings
Open the configuration.yaml file with a text editor. For a full description, look here.
Look for these lines and enter:
  auto_resize: False                       # default=True, set this to False if you want to use 4K resolution on Raspberry Pi 4.
                                          # You should ensure your images are the correct size for the display")
As stated above, to avoid any reduction in image quality, we found that images should have the same pixel size as your display.
When you define the values for the delay between images and the length of the transition effect, be aware that for some reason, the transition with a 4K monitor is longer than specified. I found that a value of three seconds corresponds to about ten seconds on a 1080p monitor (1920 x 1200 or 1080px).
Save and close the file.
Connecting the 4K display and performance indicators
Make sure that the display is attached to the HDMI port adjacent to the USB-C power input (labelled HDMI 0).
Reboot the Raspberry Pi and start PictureFrame
To automatically start Pi3D PictureFrame at boot, look again here.
On a side note, I looked at the CPU load and the temperature and compared it with my Raspberry Pi 3 powered photo frame.
Despite a firmware upgrade that was pushed out a few months after the original launch, the Pi 4 gets a bit warmer than its predecessor. In all fairness, it is also a much more powerful system. Despite this, I did not feel the need to install cooling fans or heatsinks.
| (Running Pi3D image viewer) | Temperature | CPU Load | Memory Utilization |
| Raspberry Pi 3, 1GB @ 1920x1200px | 64°C | 3-18% | 33% |
| Raspberry Pi 4, 4GB @ 3840x2160px | 78°C | 1-5% | 5% |
Using feh as an alternative image viewer
Should you not need crossfading, Exif filtering, MQTT control, geolocation, or any of the other wonderful Pi3D features, you could also use the feh image viewer.
Installation is with
sudo apt install feh -y && sudo raspi-config nonint do_boot_behaviour B4 && sudo rebootand the command then is
export DISPLAY=:0 && feh -qrYzFD120 --zoom fill /home/pi/Pictureswhereby -q = quiet mode, r = recursive, Y = hide pointer, z = randomize, F = full screen, D120 = delay of 120 seconds and –zoom fill = fills your screen.
For more information, please have a look at the this page.
Even with the 4K resolution, feh only showed a CPU load of around 1% and kept the CPU/GPU temperature at around 76°C degrees.
The difference in display quality
So, how big is the difference between the old 24 inches 1920 x 1200px and the new 32 inches, 3840 x 2160px frame?
It’s a bit of an unfair comparison. The old ASUS 24” was priced around €200 back then, the new BenQ 32” has a street price of €700.
I like to compare the viewing experience to the time when Apple introduced “Retina” screens that had four times as many pixels as the normal displays back then. At first, you don’t see much of a difference.
But after getting used to the high definition display for a while, moving over to the lower screen quality feels like there is something wrong with your glasses. The difference is huge!
Power consumption went up quite a bit from about 20 Watts for the 24 inches version to 44 Watts for the giant 32 inches 4K BenQ. So make sure, that you follow my energy saving tips.
Source material matters
It is important to note that you need high definition source material if you want to enjoy the full quality of a 4K screen.
3840 x 2160px equals just about 8 Megapixels which modern mobile phone lenses provide these days.
I took most of my images with a Nikon D800 with 36 Megapixels which leaves room for 5K or even 8K displays in the future.
By the way, if you are using Adobe Lightroom, you should export all your photos with exactly the right dimensions of your frame. By doing this, you are fully optimizing your pictures to your frame size.
The average image size went from 3MB to 12MB to account for the larger screen size. So instead of 3GB storage space on your SD-card, you now need 12GB. No sweat. SD-cards are cheap.
Troubleshooting 4K
You can download a 4K test image here created by Dan Car to test if your image is being displayed correctly.
I also heard from a reader that he needed to turn on the “just scan” feature on his LG OLED display in Settings > All Settings > Picture > Aspect Ratio > Aspect Ratio > Just Scan > “On”.
Make sure that the “auto-resize” value in the config script is set to “False”.
Frame craft
I have not yet built an artistic housing for the new 4k frame because I wanted to be sure first that the combination of Raspberry Pi 4, Pi3D, and BenQ PD3200U was working just fine.
In terms of material, I will be looking again at a metal frame, as the heavier weight of the 32 inches display requires a sturdy structure. But if you are experienced with woodwork, you can probably build a similar degree of robustness into a wooden frame as well.
You also need to look into the wall mount structure which needs to support at least 5kg. And don’t forget to hide the power cord so that you don’t ruin the visual experience and make it blend into the living room.
Outlook
I haven’t forgotten about building a photo frame with an aspect ratio of 3:2 or 16:10. This requires some magic whereby you limit the width of the screen and cover it up with a matte (Passepartout).
If you happen to be an owner of a 32 inches Memento frame, you may not know that you have a 40 inches display inside, which is matted off about 3 inches from both the right and left sides. Unfortunately, the Canadian company ceased operations a few years ago, but the idea was clever.

So I might try this at home one day myself. Still, a few things to figure out but if the industry does not come back to at least 16:10 screen models, there is no other way for genuine photo aficionados that want to see their full 3:2 image and not a 20% cropped version of it.
Have a look at the story of how our reader Josh’s built a great 3:2 frame using the same trick. He didn’t use a 4K monitor but there is a lot to learn in his post for 4K digital frame builders!
So, if you are interested in this approach, stay tuned and subscribe to the blog updates in the footer of this page.
Conclusion
A large 4K digital picture frame doesn’t come cheap but is worth every penny. The display quality is absolutely stunning.
Amateur photographers invest thousands of Euros or Dollars in cameras, lenses, flashes, and all kinds of equipment. And then, you are sending your photos via WhatsApp to show up on a mobile phone screen? Surely, your photos deserve better.
Let me know what your experiences are with 4K digital photo frames!
(Photos: BenQ, Memento, Flirc.tv, Pixel calculation by LCD Tech, Kerry Givens, Unsplash, Wolfgang Männel)
Was this article helpful?
Thank you for your support and motivation.
Related Articles
- How I added smooth crossfading image transitions to my Raspberry Pi digital picture frame (OS Buster Edition)
- Why the Raspberry Pi is the best choice for your digital picture frame project
- Which Raspberry Pi model should you get for your digital photo frame?
- How to build a gorgeous digital photo frame with a Raspberry Pi (OS Bookworm Edition)