The recent 2023 Raspberry Pi operating system update Bookworm has introduced several breaking changes that required a complete rewrite of the instructions.
I am very grateful that the developers of Pi3D PictureFrame, Paddy and Helge, have taken on the challenge.
This article is still somewhat a work in progress as not all subtleties of Bookworm and Pi3D PictureFrame have been figured out yet, especially how to turn off the screen, which at this point doesn’t work yet. If you want to have a fully working system, look at my original article and use Buster. If you want to be at the bleeding edge of tech, read on!
For more background, I recommend reading the original Raspberry Pi setup article and the background article on PictureFrame, the software that creates those wonderful image transitions.
Tested with: Raspberry Pi OS Bookworm Jan 2024, Raspberry Pi 3, 4 and 5, Pi3D: 2.51, PictureFrame 2023, Raspberry Pi Imager 1.8.4
Installation of Raspberry Pi OS
The easiest way to install Raspberry Pi is to download the Raspberry Pi Imager.
Select your Raspberry Pi model, and choose Raspberry Pi OS Lite (64-bit) under “Operating System” and “Raspberry Pi (other)”.
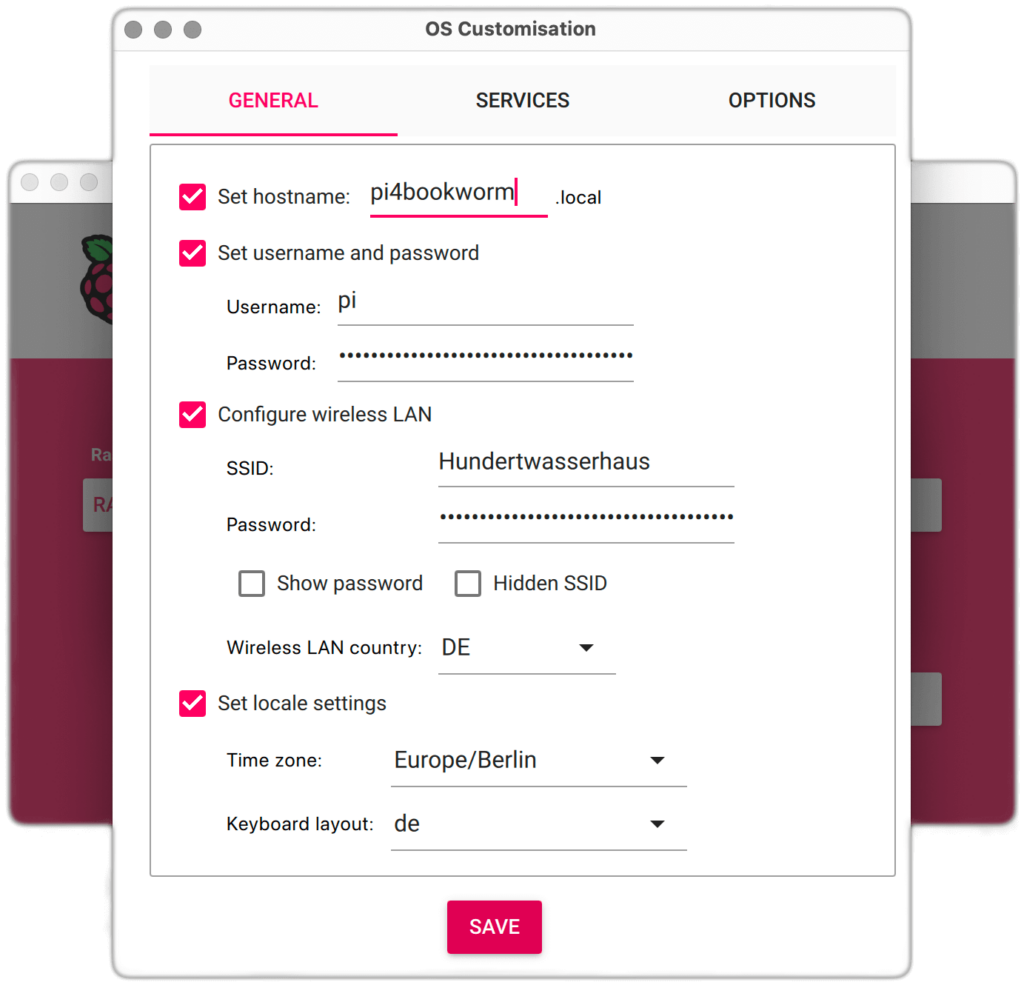
Under “Storage”, select your SD card. Click “Next”, add your OS customization data, and enter some default settings like the name of your pi (hostname), password, wifi, and language & time settings.
Finish by clicking on “Write”.
Once you’re done, remove the SD card from your Mac/PC and insert it into your Raspberry Pi. Connect your power supply and wait for the boot process to finish.
In my original configuration article, there are a lot more details, so if you are struggling with this part, go back and take the time to read it.
Launch Angry IP scanner to find out your IP address. Alternatively, just look up the device in your router.
Open a Terminal on your Mac or Windows machine and type:
ssh pi@192.168.178.xxwith “xx” being the last two digits of your device’s IP address.
The default password is “pi” (or whatever you specified in the Raspberry Pi Imager).
Enter
sudo apt update && sudo apt upgrade -yto run the latest updates and to install some Python libraries.
Then, open system configuration with
sudo raspi-configMake the following changes:
- Under 2 Display Options, choose D2 Screen Blanking and say “No”.
Go back, finish, and reboot. Connect again via Terminal.
Installing Samba network settings
Install the file-sharing software using the SMB (SAMBA) network protocol. This allows you to access your Raspberry Pi on your network to add images and program files easily and remotely.
In Terminal, install Samba, add a user and your password
sudo apt install samba -y
sudo smbpasswd -a pi
Change the SAMBA config file with
sudo nano /etc/samba/smb.confI recommend deleting every line by typing CTRL + K. Just hold down the keys until all lines are deleted.
Then, copy and paste this text into the file:
[global]
security = user
workgroup = WORKGROUP
server role = standalone server
map to guest = never

#The following seven lines is fine tuning for macOS users. I you are only using Windows, you don't need to include them. But they don't harm either.

vfs objects = catia fruit streams_xattr
fruit:metadata = stream
fruit:model = RackMac
fruit:posix_rename = yes
fruit:veto_appledouble = no
fruit:wipe_intentionally_left_blank_rfork = yes
fruit:delete_empty_adfiles = yes

[pi]
comment = Pi Directories
browseable = yes
path = /home/pi
read only = no
create mask = 0775
directory mask = 0775
Hit CTRL + O to write the file to disk, then CTRL + X to exit the editor.
If you have any troubles with the Samba configuration, please look at my more detailed article here.
Finally, restart SAMBA:
sudo /etc/init.d/smbd restartYou should now see the name of your Raspberry Pi in your network. Connect to it using your username “pi” (in our example) and your password.
Whenever you reboot your Raspberry Pi, file sharing will automatically start.
Note: If you have a problem editing the SAMBA config file, have a look at this article.
Two add-ons to extend your SD card life and improve your Wi-Fi connection
There are two add-ons that you can install later, but I would still recommend that you take a look at my respective articles:
If you want your SD card to last longer, then I recommend installing Log2Ram. You will find the instructions here.
And if you have problems with your Wi-Fi connection, doing this may actually help. It did, for sure, in my case.
Installing Pi3D PictureFrame
Now, install the best image viewer software that no money can buy, the one and only Pi3D PictureFrame!
You should definitely read the main article on this wonderfully handcrafted piece of software.
What is new with Bookworm is that it requires the use of a virtual Python environment to prevent any unintended spillover from PictureFrame onto other Python applications.
Install the Python virtual environment with
sudo apt install python3-venv git libsdl2-dev wayfire wlr-randr -y
mkdir venv_picframe
python -m venv /home/pi/venv_picframe
source venv_picframe/bin/activate
Now, install PictureFrame with
python -m pip install git+https://github.com/helgeerbe/picframe@sdl2
sudo apt install libopenblas0-pthread libgfortran5 libopenjp2-7 -y
Configuring PictureFrame
Now configure PictureFrame. You will be asked three questions for the basic configuration settings. Just hit Enter to keep the default for now. You can always change these settings later.
mkdir {Pictures,DeletedPictures}
picframe -i /home/pi/
When
This will configure  /home/pi/picframe_data/config/configuration.yaml
To keep default, just hit enter
Enter picture directory [~/Pictures]:
appears, just hit Return three times to accept the default. You can always change these settings later.
We need to make one change in the configuration file right away. Open it with
nano ~/picframe_data/config/configuration.yamlSearch for this entry (in the upper section)
use_sdl2: Falseand change it to
use_sdl2: TrueSave and close.
Autostarting PictureFrame
Starting PictureFrame is a bit more complex than before, but Helge did a great job hiding the complexity with a few scripts.
Enter
nano start_picframe.shand paste the paragraph below
#!/bin/bash
wlr-randr --output HDMI-A-1 --off
export SDL_VIDEODRIVER=wayland
source /home/pi/venv_picframe/bin/activate
picframe &
wlr-randr --output HDMI-A-1 --on
Save and close and make the file executable with
chmod +x ./start_picframe.shNext, enter
mkdir .config
nano .config/wayfire.ini
and paste this paragraph
[core]
plugins = autostart
xwayland = false

[autostart]
picframe = /home/pi/start_picframe.sh
Save and close. Then type
mkdir .config/systemd/user -pCreate yet another new file with
nano ~/.config/systemd/user/picframe.serviceand paste this paragraph
[Unit]
Description=PictureFrame

[Service]
ExecStart=/usr/bin/wayfire
Restart=always

[Install]
WantedBy=default.target
Enable the service and reboot. Don’t forget to connect your display before rebooting.
systemctl --user enable picframe.service
sudo reboot
If you can see the image below, you have installed Pi3D PictureFrame on Raspberry Pi Bookworm successfully!

Add a few pictures to the Pictures directory via the network from another computer (that is why you installed Samba), and they will appear after 200 seconds (the default setting, which you have probably not changed at this point.
Customize PictureFrame to your needs in the configuration.yaml file. For all the details about fine-tuning, read this article.
Et voilà, you got Pi3D Picture Frame running with the latest Raspberry Pi operating system, Bookworm!
As it stands, your picture frame installation is now complete. But for tinkering (it never stops), knowing how to manually control the app’s launch is helpful.
More on starting and stopping
Turning the picture frame script on and off is controlled by the systemctl service.
If you want to know more about how this works, I recommend my article, “The ultimate guide on using systemd to autostart scripts on the Raspberry Pi“.
Starting and stopping PictureFrame at boot
- Enable service
systemctl --user enable picframe.service - Disable service
systemctl --user disable picframe.service
This setting survives a reboot. If you choose the disable option, you will boot in the console only, and PictureFrame will not start automatically.
Manually starting and stopping PictureFrame
- Start service
systemctl --user start picframe.service - Stop service
systemctl --user stop picframe.service - Stop restart
systemctl --user restart picframe.service
Only one major issue still needs to be figured out to complete the full migration of Pi3D PictureFrame.
Still to be figured out
Currently, there is no way of blanking the screen, i.e., turning the HDMI output on/off via a software command. All the previous methods, and even those that I described here, fall short.
If you know of a way to turn the HDMI output off, please contact me!
A big Thank You to Helge, Paddy, and all the forum members who have made this migration happen.
Was this article helpful?
Thank you for your support and motivation.
Related Articles
- How I added smooth crossfading image transitions to my Raspberry Pi digital picture frame (OS Buster Edition)
- Which Raspberry Pi model should you get for your digital photo frame?
- Discover the complete hard- and software setup of my Raspberry Pi digital picture frame (December 2023)
- How I built a digital picture frame with a Raspberry Pi


