
File sharing is one of the basic functionalities of an operating system. But if you install Raspberry Pi OS on your Raspberry Pi, you still need to add the Samba software to make your Pi accessible in a Windows/macOS or Linux environment.
Although this is relatively straight forward, there are several things that have changed over time, and many tutorials on the web are outdated in this regard. After all, Samba has been around since 1992 to provide file and print services to all manner of SMB/CIFS clients.
The recent Raspberry Pi OS release and Apple’s shift from AFP to SMB has also brought about some changes, and this tutorial will explain to you primarily how to optimize your Raspberry Pi Samba setup for macOS computers in your network. All this will, of course, also work for connected Windows and Linux computers.
Preparation
You have installed the latest “Raspberry Pi OS” version on your Pi and are connected to the Internet. If you don’t know how to do that, you can look here.
I also assume that you are connected to your Raspberry Pi via ssh in a Terminal window.
Alternatively, you can do the same on your Raspberry Pi if you have a monitor and a keyboard connected to it. As many Pis are used as headless systems, ssh’ing into the Pi has become a popular way.
Before you install new packages, you should always run a system update with
sudo apt update && sudo apt upgrade -ySamba works with all Raspberry Pi models, but file sharing is much faster with the Raspberry Pi 3 (theoretically Gigabit but hampered by the USB 2.0 bus speed resulting in ~224 Mbps) and especially with the Pi 4 and its Gigabit ethernet port (over 900 Mbps).
If you expect decent file-sharing performance from your Raspberry Pi, get a Model 4 with 2 or 4 GB of RAM.
If you only need the occasional file exchange like for a digital picture frame, then the maximum speed doesn’t matter that much.
AFP, Bonjour and Avahi
As I mentioned earlier, there are many Raspberry Pi networking tutorials on the web that suggest installing several packages that you don’t need anymore. Let’s go through the most often mentioned ones.
Apple originally used AFP (Apple Filing Protocol) but moved over to SAMBA (SMB) in macOS 10.9 Mavericks released in 2016. You will still find many tutorials about installing AFP with Netatalk, but I don’t see any reason to stick with legacy technology.
SMB 3 (the latest version) is faster than AFP and provides all features you would need for your Mac (like Time Machine compatibility). Conclusion: Forget about installing AFP on your Pi. Use SAMBA instead.
Bonjour is Apple’s wonderful technology that automatically locates and displays devices and services like computers, file shares, or printers that are available on a network. It is built in macOS but also available for Microsoft Windows. To allow the Raspberry Pi to propagate itself across a network and to be recognized by Bonjour, you needed to install the Avahi package separately. The latest Raspberry Pi OS version includes this right out of the box, so no need for installing it.
To summarize: All you need for Raspberry Pi file sharing is SAMBA.
Installing Samba
In the Terminal window enter
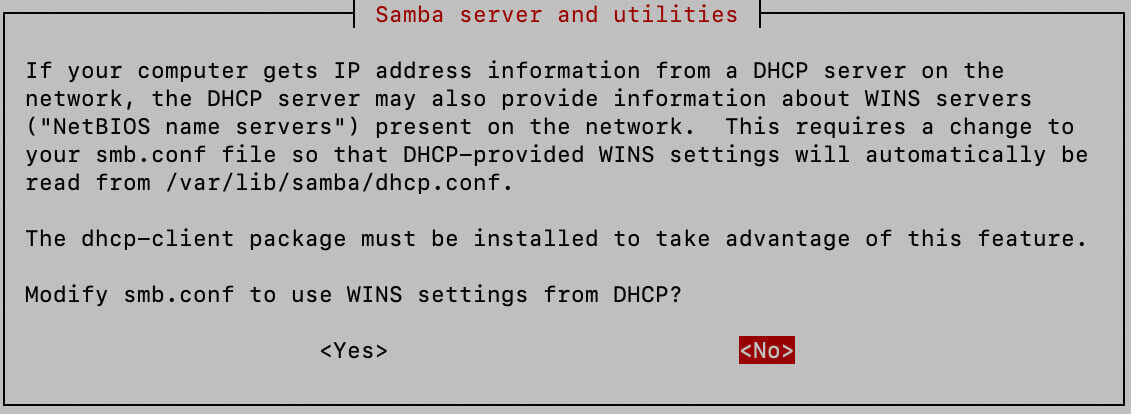
sudo apt install samba -yWhen this window comes up, choose “No”.
If you want to access other network computers from your Raspberry Pi, e.g., when you use it as a desktop computer, you will also need to install the CIFS tools. They were initially part of the Samba package but later split into their own package.
For an application like a digital picture frame where you don’t need to see other computers but just be visible in the network yourself, you won’t need to install this.
sudo apt install samba-client cifs-utilsInstalling a user
This is very easy. If your username is “pi”, type
sudo smbpasswd -a piJust replace pi with whatever your user name is, set a password, and confirm it. You can add as many users as you like.
The SAMBA config file
SAMBA comes with an elaborate config file that allows you to specify your network sharing exactly as you want it, but it can be a bit overwhelming.
Open the SAMBA config file with
sudo nano /etc/samba/smb.confI have heard from a few users who had issues with this configuration file and given all the comments in the file, it is not always easy to know your way around.
This is why I have slimmed down this file to a minimum which you can just copy and paste in your config file.
To delete lines in the config file, hit CTRL+K. With this command, you will be able to quickly empty the editor window completely before pasting in this text:
[global]
client min protocol = SMB2
client max protocol = SMB3
vfs objects = catia fruit streams_xattr
fruit:metadata = stream
fruit:model = RackMac
fruit:posix_rename = yes
fruit:veto_appledouble = no
fruit:wipe_intentionally_left_blank_rfork = yes
fruit:delete_empty_adfiles = yes
security = user
encrypt passwords = yes
workgroup = WORKGROUP
server role = standalone server
obey pam restrictions = no
map to guest = never
[pi]
comment = Pi Directories
browseable = yes
path = /home/pi
read only = no
create mask = 0775
directory mask = 0775
This config file creates a Sharing Directory in /home/pi with rights only for the logged-in user and includes some optimization for macOS computers. You can probably make it even shorter if you are a real networking expert!
You can restrict access to your folders in many ways. “0700” only allows the user to modify the files. For further study on this subject, I recommend this article.
For all full overview of the various settings in this segment, I recommend a look at this page.
When you are done pasting, hit CTRL + O to write the file to disk and CTRL + X to exit the editor.
To test the syntax of your config file or see a summary of the settings, enter
testparm /etc/samba/smb.confYou should see something along these lines:
rlimit_max: increasing rlimit_max (1024) to minimum Windows limit (16384)
Load smb config files from /etc/samba/smb.conf
rlimit_max: increasing rlimit_max (1024) to minimum Windows limit (16384)
Processing section "[pi]"
Loaded services file OK.
Server role: ROLE_STANDALONE
Press enter to see a dump of your service definitions
Pressing “Enter” will just show you again what you have entered in the config file.
Finally, restart SAMBA:
sudo /etc/init.d/smbd restartYou should now see the name of your Raspberry Pi in your network. Connect to it using your username “pi” (in our example) and your password.
Whenever you reboot your Raspberry Pi, file sharing will automatically start.
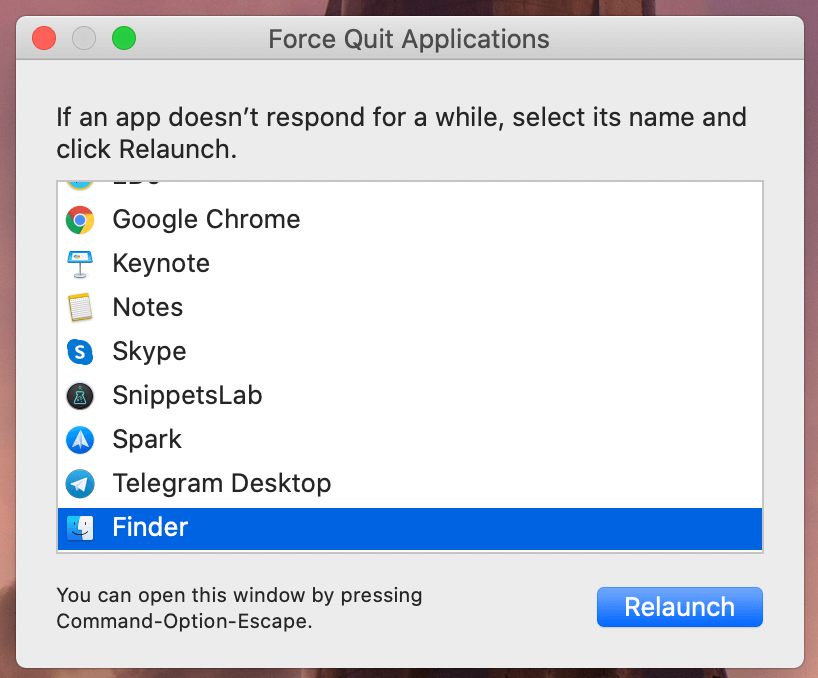
Networking is sometimes a bit slow to recognize changes. If you are using macOS and you don’t see your Raspberry Pi after you made some changes, I recommend relaunching the Finder (Apple Menu > Force Quit).
Conclusion
I hope this post was helpful for you to install SAMBA on your Raspberry Pi and to optimize it for the macOS machines on your network.
As always, I’d be happy to hear from you if you have any comments or suggestions.
Was this article helpful?
Thank you for your support and motivation.
Related Articles
- Screen sharing between a Raspberry Pi 4 and a macOS computer
- How to configure the software for your Raspberry Pi digital picture frame in 60 minutes (OS Buster Edition)
- Celebrate birthdays and anniversaries with auto-themed photos on your digital frame
- How to install Dropbox on your Raspberry Pi using rclone