Many Raspberry Pi installations run as remote systems, which means that you don’t have access to their screens. But sometimes, it may become useful or necessary to see what comes up on the display. This is what screen sharing is for.
It used to work without a hitch a few years ago, but then some changes were introduced either on the Raspberry Pi OS or the macOS side, and it stopped working for me.
In this article, I will show you how you can see your Raspberry Pi’s screen from your macOS computer without installing any extra software.
Read this first — September 2026. Two things have changed since I wrote this, and both of them matter.
The first is that Raspberry Pi OS no longer ships RealVNC. The VNC option in raspi-config now enables wayvnc instead, and none of the RealVNC commands in the Configuration section below exist anymore: there is no vncpasswd, no /etc/vnc/config.d/common.custom, and no vncserver-x11-serviced service. If you run them on Bookworm or Trixie you will get command not found. Whether macOS’s built-in Screen Sharing app talks to wayvnc the way it used to talk to RealVNC is exactly the sort of thing I would have to sit down and test before telling you it works, and I have not done that yet. So please treat this article as a record of how it worked on Buster and Bullseye, not as instructions for a current install.
The second is that there is now a much better answer for the actual problem. Raspberry Pi Connect is Raspberry Pi’s own remote shell and screen sharing service, it is out of beta, the personal tier is free, and it works from a browser without any of this configuration and without the Pi being on your local network. That is what I would reach for today.
One caveat before you get your hopes up: Connect’s screen sharing needs a Wayland session. A picframe3 frame runs on Raspberry Pi OS Lite and draws straight to the display with no desktop and no compositor at all, so there is no session to share. On a picframe3 frame you get the remote shell, which is the part you actually need for maintenance, but not the screen. If you want to see what is on the wall, picframe3 reads back its own framebuffer — one button in its web interface gives you a screenshot of the frame.
Preparation
Several articles on the Internet talk about the need to install extra VNC software, but this is not necessary. Both the Raspberry Pi and the Mac are shipped with all it takes.
Two important points upfront:
First, you can only see the screen of your Raspberry Pi if there is a screen connected to it. The monitor may be turned off but, the power supply of the monitor may even be unplugged, but you still need the normal HDMI connection between your Raspberry Pi and the monitor.
And second, your Raspberry Pi must boot into the desktop, not the console.
To check this boot setting, enter
sudo raspi-config
in the Terminal window and select (1) System Options > S5 Boot / Auto Login and then the desktop autologin entry. (The old menu numbering in this article was from the Buster days — boot behaviour moved to System Options, and the entries have been renumbered more than once since, so go by the names rather than the numbers.)
Configuration
While you are in the configuration module, select (3) Interface Options > VNC and enable the VNC Server. Close the configuration and reboot. On a current Raspberry Pi OS that switch enables wayvnc; on the Buster and Bullseye systems this article was written on, it enabled RealVNC, and everything from here to the end of this section is RealVNC-specific.
The VNC program of the Raspberry Pi requires a bit of a configuration before you can connect. I will describe how to do this remotely when you are ssh’ed into your Pi via Terminal.
If you don’t enter the commands below, you will get a message that “The software on the remote computer appears to be incompatible with this version of Screen Sharing”.
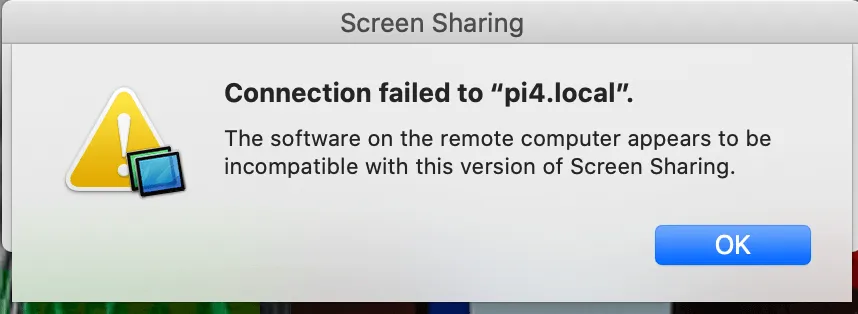
This is a tad confusing and may lead people to think that a special VNC viewer must be installed. But the fix is very easy.
Open a Terminal window and connect to your Pi. Generate a password for your connection. I believe it must have a minimum of six letters.
sudo vncpasswd -service
Open this file
sudo nano /etc/vnc/config.d/common.custom
and add this line:
Authentication=VncAuth
Now restart the VNC service.
sudo systemctl restart vncserver-x11-serviced
Again: these three commands are RealVNC’s, and RealVNC is not part of Raspberry Pi OS anymore. They are here because they are what made it work at the time, and because plenty of frames out there are still running Bullseye. This section needs a proper re-test against wayvnc before I can give you a current version of it.
Opening Screen Sharing on your Mac
Open the “Screen Sharing” app on your Mac. You won’t find it in the Applications folder but if you enter “screen sharing” in the search box, then the app will come up.
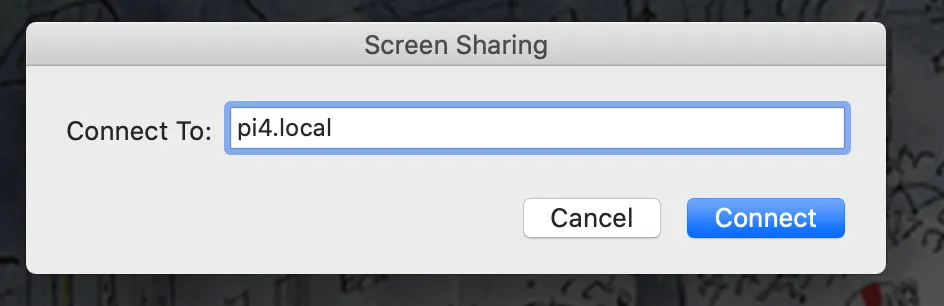
Enter the IP (or the hostname) of your Raspberry Pi, enter your password, and voilà!
Was this article helpful?
Thank you for your support and motivation.