
Dropbox, the world’s most popular file hosting and sharing service, unfortunately, does not offer a variant that runs on the Raspberry Pi. And the company hasn’t announced any support coming soon either.
But there is a simple workaround to synchronize a Dropbox folder with a folder on the Raspberry Pi.
It’s called rclone, and in this article, I will show you step-by-step how to install and configure it.
Dropbox rules
In the past, I have written about Syncthing and Resilio, two compelling software packages to keep folders in sync across several computers.
However, many people have Dropbox installed on their computers and would like to avoid installing another file-sharing software package.
During my research to connect my digital picture frame to all kinds of cloud services like Google Photos, Google Drive, or Microsoft OneDrive, I stumbled across rclone, which can sync local folders with Dropbox.
This means that there is no need to wait for a probably never arriving native Dropbox app for the Raspberry Pi. Instead, you install rclone which will sync with one or several Dropbox folders in the Cloud.
This is a great workaround that works perfectly and makes it super easy not just to administer your image folders but also allows other people – should you feel so generous- to add files to your photo frame.
This tutorial covers the following use case:
- You have a headless Raspberry Pi (headless meaning without a keyboard, mouse, or monitor) that you connect to via Terminal from your macOS, Windows, or Linux machine.
- There is a folder on your Dropbox (master folder) where you keep e.g., photos for your digital picture frame. You want the content of this folder to be cloned in a folder on your local Raspberry Pi. Cloning means that whenever you make changes to your Dropbox master folder, this will be mirrored on your Raspberry Pi. It is not a synching process! If you remove a file on your Raspberry Pi, the file will be added again as it is still in the (master) Dropbox folder.
Installing rclone on your Raspberry Pi
There are lots of options that you can use with rclone, and the software developers have meticulously documented them. However, the multitude of possibilities may be a bit overwhelming for the casual user.
Therefore, I have trimmed down the official instructions to the essential bits for a Raspberry Pi application and have added some clarifications where I thought that they might be useful.
If you feel like jumping into the geeky end, check this page.
Installing rclone on your Raspberry Pi is one line that you enter via Terminal:
curl https://rclone.org/install.sh | sudo bash
If you get a message like
rclone v1.55.0 has successfully installed.then you had a good start!
Now, before you proceed, we need to make another installation of rclone.
To authenticate rclone with Dropbox later during this tutorial, you need to have an installation of rclone with the same release version on your computer that you use to access the Raspberry Pi via Terminal.
Installing rclone on your macOS machine
Open another Terminal on your Mac (in addition to the one that you use to access your Raspberry Pi) window and copy & paste this line:
cd && curl -O https://downloads.rclone.org/rclone-current-osx-amd64.zip && unzip -a rclone-current-osx-amd64.zip && cd rclone-*-osx-amd64 && sudo mkdir -p /usr/local/bin && sudo mv rclone /usr/local/bin/ && cd .. && rm -rf rclone-*-osx-amd64 rclone-current-osx-amd64.zipInstalling rclone on your Linux machine
Open another Terminal (in addition to the one that you use to access your Raspberry Pi) window and type
curl https://rclone.org/install.sh | sudo bashInstalling rclone on your Windows machine
As I don’t have a Windows machine, I was not able to test this, but the documentation says to download the rclone.exe file for Windows 64 from here and run it.
I am sorry if I can’t be more detailed here, feel free to contribute to this paragraph if there are any issues.
Configuring rclone on your Raspberry Pi for Dropbox
The remainder of this tutorial will be just as easy, although it might seem complicated first. But fear not, young homebrewer!
Go back to the Terminal window, which is connected to your Raspberry Pi.
The setup routine will now walk you through a dialog where you create a new remote (i.e., a synchronization service) with Dropbox.
Regardless of how many Dropbox folders you want to synchronize, you only need to setup up one “remote”. The folders are specified in the command line. If you want to later add other services like Google Drive, Amazon S3, or Backblaze, you will create an individual “remote” for each of them.
Enter
rclone config- Type “n” to create a new remote.
- Give the remote a name e.g. “dropbox_pictureframe”
- Select the number for Dropbox from the long list of possible services. At the time of writing, this number would be “9”, however, it seems to change with updated rclone revisions. So please check what the current right number is.

- When asked for Dropbox App Client ID and Dropbox App Client Secret, just leave it blank and press Enter.
- Say “n” to “Edit advanced config? (y/n)”
- Choose “n” as you are working on a remote or headless machine.
Now comes a tricky (but also straightforward) bit:
To authorize rclone to access your Dropbox account, you will need to run
rclone authorize "dropbox"in the Terminal window on the computer that you are using to ssh into your Raspberry Pi. This is why I showed you above how to install rclone on your macOS, Windows, or Linux computer.
A browser window will open asking you to grant permission to rclone for accessing Dropbox (this is what the German text below says)
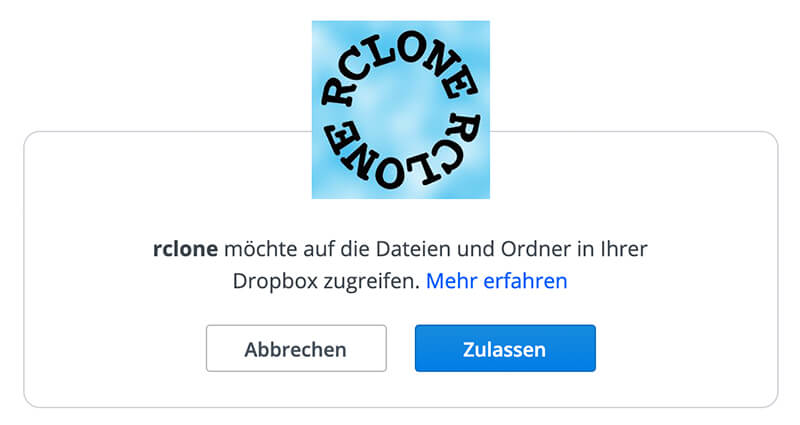
Confirm, and you will see this message:
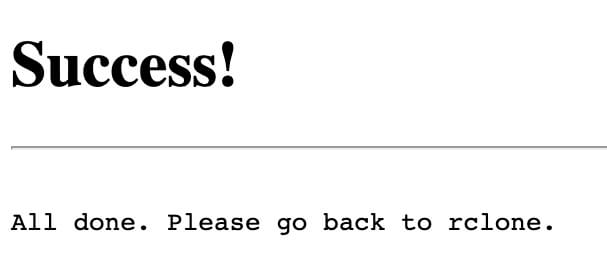
Immediately following the success message, the second Terminal window will show you a code. Copy this code and paste it into the (first) Terminal window that connects to the Raspberry Pi.

Finally, confirm everything with “y,” and you will see the name of your remote.
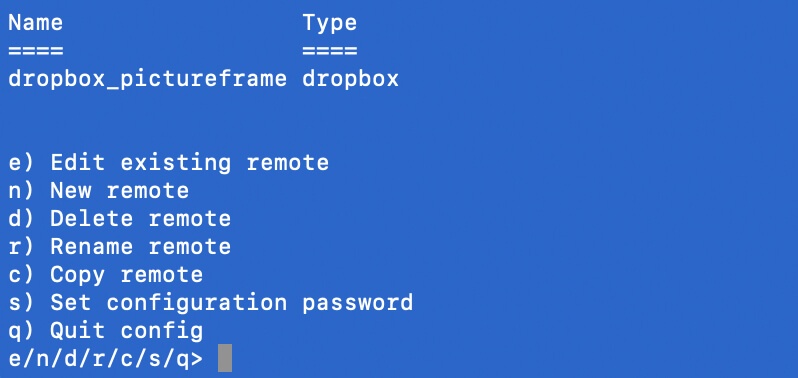
Hit “q” to exit the config routine.
Specifying the directory to keep in sync
Now that we have configured everything, it’s time for a test.
- In your Dropbox folder, create a new folder called “photos_on_dropbox” and put a few sample files in there.
- On your Raspberry Pi, create a folder within the Pictures folder called “photos_on_pi”.
Enter
rclone sync dropbox_pictureframe:photos_on_dropbox/ /home/pi/Pictures/photos_on_pi/ --dry-runThe extension “–dry-run” is a safety precaution to make sure that no Dropboxes will be harmed in the execution of this tutorial.
If the resulting line looks something like this
2020/05/04 19:07:54 NOTICE: Sync with testimage1.jpg: Not copying as --dry-runyou are probably safe to try the real thing:
rclone sync dropbox_pictureframe:photos_on_dropbox/ /home/pi/Pictures/photos_on_pi/Next, check if the files that you had put in your Dropbox also appear in your Pictures/photos_on_pi folder.
So, to recap, the syntax of the command line is:
rclone sync [your source, in this case "dropbox_pictureframe:photos_on_dropbox/"] [your destination, in this case "/home/pi/Pictures/photos_on_pi/"]That wasn’t too hard, was it?
The finishing touch with crontab
To automatically sync your folder every hour, we’ll add one line in crontab.
Enter
crontab -eand add this line at the end:
0 */1 * * * rclone sync dropbox_pictureframe:photos_on_dropbox/ /home/pi/Pictures/photos_on_pi/Save and close.
There doesn’t seem to be a way to trigger automatic cloning whenever a file in the Dropbox directory changes as this would require some sort of polling feature. But if you need your directory to be updated often, then just set the time in crontab to 15 minutes.
Conclusion
rclone finally brings Dropbox to the Raspberry Pi. Although you could quibble and call it a workaround, the result is as good as the real thing.
If you use it for your digital picture frame, you can maintain all your images on your standard computer and have them synced automatically with your Raspberry Pi.
BTW, if you use the image viewer Pi3D, it will automatically recognize whenever the image folder changes and reshuffle your catalog. You can even specify if you want to show your new images first.
What’s not to love?
Was this article helpful?
Thank you for your support and motivation.
Related Articles
- How to create a Dropbox-like file synchronization setup on the Raspberry Pi with Resilio Sync
- Using Syncthing to synchronize files between your Raspberry Pi and Mac/PC/Linux computers
- How to synchronize your Raspberry Pi digital picture frame with Google Drive using rclone
- How to synchronize your Raspberry Pi digital picture frame with your Google Photos albums using rclone