
Wolfgang has written about the iOS app PiHelper before and I would like to recommend a similar app for Android users. It’s called DashMQTT and is a five star rated app to create dashboards for your MQTT enabled IoT Smart Home devices, applications, and Home automation.

Since the image viewer Pi3D also listens to MQTT commands, DashMQTT is a great companion if you are looking for a no-cost remote control of your picture frame.
In this article, I’d like to show you how to use the DashMQTT app to trigger example commands for the Pi3D image viewer. You will quickly figure out for yourself, how to add any kind of MQTT/Pi3D commands that may be useful in your home.
All you need is the free DashMQTT app from the Google Play Store, an MQTT broker installed on your Raspberry Pi, and the great image viewer Pi3D PictureFrame.
This is a great alternative if you are not using Home Assistant or Amazon Alexa to control your digital picture frame for things like image smart lists, play/pause/back commands, and other useful Pi3D commands.
It’s free and doesn’t contain any advertisements. If you like it, the author would appreciate some positive feedback in the store.
Tested with: Raspberry Pi OS March 2021 version, Raspberry Pi 2, 3, and 4, Pi3D 2.43, PictureFrame 2021.03.20
About DashMQTT
“Warning: This app is for nerds only! If you don’t know what MQTT is, this app is likely not for you.” reads the greeting in the Google Play Store. But fear not, this is just a blunt attempt to appease the MQTT community for delivering a tool that helps to demystify this little message protocol and to make it available for a larger audience.
I will walk you through what it takes to use the MQTT protocol to send commands to your photo frame.
As the image viewer Pi3D, which runs the digital picture frame of many homebrewers, has plenty of options that can be remotely controlled, DashMQTT is great as an efficient remote control.
The remote control logic
DashMQTT will connect to the Mosquitto MQTT broker of your local digital picture frame and publish MQTT messages. These messages will then be received and interpreted by Pi3D.
This is similar to what is described in the article about using voice commands to apply smart filters to show only certain images based on the Exif date of the photos. Only this time, I won’t be using Home Assistant scripts os Amazon’s Alexa.
I will walk through through each step so that you should be done in a few minutes.
Installing the Mosquitto MQTT broker
I assume that you have installed your Raspberry Pi system and are using Pi3D as your image viewer.
First, we need to install the MQTT broker on your Raspberry Pi. You will find the full walk through on this topic here.
Here is the quick and easy version:
Copy this line and paste it in a Terminal window connected to your Pi.
sudo apt update && sudo apt upgrade -y && sudo apt install -y mosquitto mosquitto-clientsIf you don’t want to install an MQTT broker on your frame, or you want to communicate with your IoT remotely, you can use a provider like mqtt.eclipse.org, which is already set up. Eclipse is a public test MQTT broker service, so whatever you send and receive can be seen by everybody using this service. This might not sound too confidence-inspiring, but for testing purposes, it does its job.
Connecting Pi3D to MQTT
The next step is to enter the MQTT broker settings in Pi3D PictureFrame.
Open configuration.yaml in the “picframe_data/config” directory with a code editor.
Looks for these lines
mqtt:
  use_mqtt: False                # default=False. Set True true, to enable mqtt
  server: "your_mqtt_broker"     # No defaults for server
  port: 1883                     # default=8883 for tls, 1883 else (tls must be "" then !!!!!)
  login: ""                      # your mqtt user
  password: ""                   # password for mqtt user
  tls: ""                        # filename including path to your ca.crt. If not used, must be set to "" !!!!
  device_id: "picframe"
Set “use_mqtt” to “True” to make Pi3D listen to any MQTT messages.
use_mqtt: TrueEnter the IP of your digital picture frame here
server: 192.168.178.165or, alternatively, “localhost”
server: "localhost"You can copy the above values for port, login and password as they are.
Save and close the editor.
The DashMQTT setup
When you install and open MQTT Dash, there is a blank screen with little indication of what to do. I guess this is intentional by the app author to make sure only the initiated can gain access to the holy grail of MQTT!
This first page will hold a list of different MQTT brokers – you could have one to control the picture frame, one for the garage door, one for watering the greenhouse, etc. Once you’ve added a broker for the picture frame it will look like this:
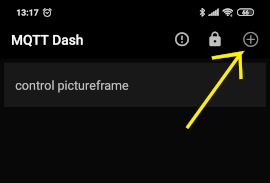
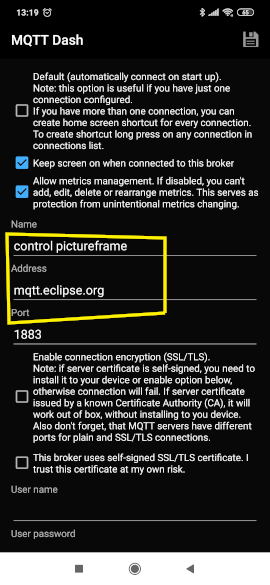
Click on the + and you will get a screen for setting up the broker details. There are lots of options but just set the name and address.
If you have the Mosquitto MQTT broker installed on your Raspberry Pi, just enter its IP number under “Address”. The default port is already correctly filled with “1883”.
There are several choices but I just used ‘text’ where I was sending a date or subdirectory name, or ‘switch/button’ for paused, delete, shuffle etc.
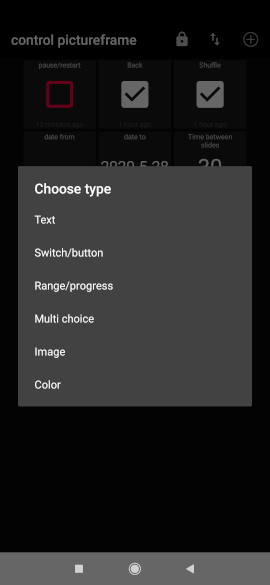
The info to fill in for each button is reasonably straightforward though with the switch buttons you can make the button style change, relevant for paused/not paused, for instance.
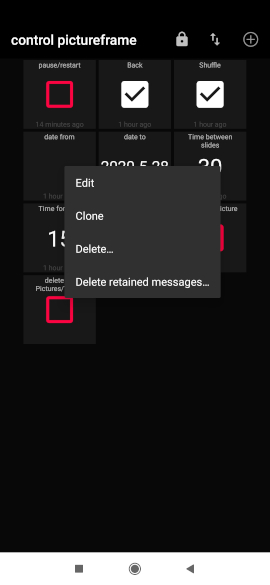
Once you’ve got a button of the right type set up you can ‘long press’ it to get a menu for cloning or editing which makes creating all the relevant buttons very quick.

It is possible to set up buttons to do multiple publish actions. For instance, if you wanted to show images from a specific date range you could clone one of the switch buttons then edit it using a topic that doesn’t do anything.
Then go to the bottom of the screen and select ON TAP and enter lines specifying the date_from and date_to.

If you want to change the order of the buttons on your menu, you need to press the padlock symbol at the top, which allows the buttons to be dragged to new positions. Toggle the padlock to return to normal behavior.
Examples of remote commands
Pi3D PictureFrame can receive the following commands via MQTT:
- display on/off: homeassistant/switch/picframe_display/set, ON,OFF
- paused on/off: homeassistant/switch/picframe_paused/set, ON,OFF
- shuffle on/off: homeassistant/switch/picframe_shuffle/set, ON,OFF
- back: homeassistant/button/picframe_back/set, ON
- next: homeassistant/button/picframe_next/set, ON
- name text on/off: homeassistant/switch/picframe_name_toggle/set, ON,OFF
- date text on/off: homeassistant/switch/picframe_date_toggle/set, ON,OFF
- location text on/off: homeassistant/switch/picframe_location_toggle/set, ON,OFF
- directory text on/off: homeassistant/switch/picframe_directory_toggle/set, ON,OFF
- title text on/off: homeassistant/switch/picframe_title_toggle/set, ON,OFF
- caption text on/off: homeassistant/switch/picframe_caption_toggle/set, ON,OFF
- all text off: homeassistant/switch/picframe_text_off/set, ON # yes that is confusing!
- text refresh: homeassistant/switch/picframe_text_refresh/set, ON
- delete: homeassistant/button/picframe_delete/set, ON
- directory: picframe/directory, string matching directory name
- date_from: picframe/date_from, string YYYY/MM/DD or number representing unix timestamp or zero length string to remove constraint
- date_to: picframe/date_to, string YYYY/MM/DD or number as above
- fade_time: picframe/fade_time, number
- time_delay: picframe/time_delay, number
- brightness: picframe/brightness, float 0.0 to 1.0
- location_filter: picframe/location_filter, string matching any part of geolocation description
- tags_filter: picframe/tags_filter, string matching tags
- stop: picframe/stop, message not used - just stops
The date needs to be received in the format “yyyy.mm.dd” but a “/” as separator is also understood. The channels are the ones listed above.
Smart filter on vacation photos
The example in the screenshot above is a custom command which instructs Pi3D to only show images that have been taken during a winter vacation in Lapland. Just specify both “date_from” and “date_to” and add two publishing commands:
app.publish("picframe/date_from", "2019/12/15", false, O);
app.publish("picframe/date_to", "2020/1/3", false, O);
The same is valid for your own buttons to only show images from today or other special events.
To reset the date enter “None” instead of the date. Just remember to send it to both “to” and “from”.
Jump to the previous photo
To instruct the picture frame to jump to the previous photo, enter
app.publish("homeassistant/switch/picframe_back/set", "ON", false, O);The last one is most useful when you want to show your household members a photo that you just see on the frame, but they take ages to run to you and so the photo has moved on. In that case, you can now go back!
Pause the picture frame
And to pause the picture frame:
app.publish("homeassistant/switch/picframe_paused/set", "ON", false, O);If you enter “OFF” as payload, playback will resume.
Conclusion
DashMQTT for Android provides a simple way to remote control the Pi3D image viewer that powers your digital picture frame.
Thanks to the anonymous author “czr”!
Was this article helpful?
Thank you for your support and motivation.
Related Articles
- How to use the free PiHelper iPhone app as a remote control for your Raspberry Pi picture frame
- How to quickly troubleshoot MQTT problems on your Raspberry Pi
- How to effortlessly select different image folders in Pi3D PictureFrame via mobile phone or voice
- Use your iPhone to turn your Raspberry Pi digital picture frame on and off