I have talked about the iOS app PiHelper in a previous article and explained how to turn the monitor of your photo frame on and off.
In this article, I’d like to show you a way how to use your iPhone as a remote control to trigger commands for the Pi3D image viewer.
All you need is the free PiHelper app from the AppStore, an MQTT broker installed on your Raspberry Pi, and the great image viewer Pi3D PictureFrame.
This is a great alternative if you are not using Home Assistant or Amazon Alexa to control your digital picture frame for things like image smart lists, play/pause/back commands or other useful Pi3D commands.
Update: While PiHelper is still a great app for frame maintenance and short commands, another app has come up which is better suited for commands: iOS Shortcuts. The advantage is that it has a simpler interface, it is voice-controlled, and you can use it even on an Apple Watch. You can read my article here.
Tested with: Raspberry Pi OS March 2021 version, Raspberry Pi 2, 3, and 4, Pi3D 2.43, PictureFrame 2021.03.20.
About PiHelper
Qian Sha is an expert in artificial intelligence object detection who probably wrote PiHelper when she was looking for a similar app and found that there was none. SimplePi used to be an alternative, but I kept experiencing crashes, so I abandoned it.
You can download PiHelper from the App Store for your iPhone and iPad. The app provides a overview of the current activities on the Pi like CPU load, memory usage, running processes, files and temperature.
But it also provides up to 15 customisable command shortcuts that are great for use as a remote control.
As the image viewer Pi3D, which runs the digital picture frame of many homebrewers, has plenty of options that can be remotely controlled, PiHelper is great as an efficient remote control.
If you are an Android user, you may want to check out my article on DashMQTT. This app allows you to do the same remote commands as shown here for PiHelper.
The remote control logic
PiHelper will open an ssh connection to your local digital picture frame. Once connected, PiHelper will publish MQTT messages with the help of Mosquitto, the MQTT broker. These messages will then be received and interpreted by Pi3D.
This is similar to what I described in the article about using voice commands to apply smart filters to show only certain images based on the Exif date of the photos. Only this time, we won’t be using Home Assistant scripts nor will we be whispering our wishes into Alexa’s ear.
I will walk through through each step so that you should be done in thirty minutes or even less.
Installing the Mosquitto MQTT broker
I assume that you have installed your Raspberry Pi system and are using Pi3D as your image viewer.
First, we need to install the MQTT broker on your Raspberry Pi. You will find the full walk through on this topic here.
Here is the quick and easy version:
Copy this line and paste it in a Terminal window connected to your Pi.
sudo apt update && sudo apt upgrade -y && sudo apt install -y mosquitto mosquitto-clientsConnecting Pi3D PictureFrame to MQTT
Enter the MQTT broker settings in Pi3D PictureFrame.
Open configuration.yaml in the “picframe_data/config” directory with a code editor.
Looks for these lines
mqtt:
  use_mqtt: True             # default=False. Set True true, to enable mqtt
  server: 192.268.178.136    # No defaults for server
  port: 1883                  # default=8883 for tls, 1883 else
  login: ""               # your mqtt user
  password: ""   # password for mqtt user
  tls: "" # filename including path to your ca.crt.
  device_id: 'picframe'       # default='picframe' unique id of device. change if there is more than one picture frame
Set “use_mqtt” to “True” to make Pi3D PictureFrame listen to any MQTT messages.
use_mqtt: TrueEnter the IP of your digital picture frame here
server: 192.268.178.136 # No defaults for serveror, alternatively, the Bonjour hostname with “.local”
server: "localhost"You can leave the default values for port, login and password as they are.
Save and close the editor.
Creating three short Python scripts
Before we move to the PiHelper setup, we need to take a minute to create three Python scripts that will be called by PiHelper to set the date smart lists.
Open a code editor (e.g. Sublime Text – do not use Microsoft Word or Apple Pages, always use a proper code editor as there are sometimes issues with hidden formatting characters)
Create the first file and call it “Pi3D_Smart_Filter_Date_Last_7_Days.py”. Paste this code into the editor:
#!/usr/bin/env python3

# this script sends an MQTT message to Pi3D which sets a smart filter to only show images from the last 7 days

import paho.mqtt.client as mqtt
from datetime import date
from datetime import timedelta

client = mqtt.Client()
#client.username_pw_set( "username" , "password" ) - uncomment if you are not sending anonymously
client.connect("pictureframe.local", 1883, 60) # server address here

today = date.today() - timedelta(days=7)
d7 = today.strftime("%Y:%m:%d")

client.publish("picframe/date_from", d7)
Save and exit. Create a second file called “Pi3D_Smart_Filter_Date_Last_30_Days.py” and paste this text.
#!/usr/bin/env python3

# this script sends a MQTT to Pi3D which sets a smart filter to only show images from the last 30 days

import paho.mqtt.client as mqtt
from datetime import date
from datetime import timedelta

client = mqtt.Client()
#client.username_pw_set( "username" , "password" ) - uncomment if you are not sending anonymously
client.connect("pictureframe.local", 1883, 60) # server address here

today = date.today() - timedelta(days=30)
d30 = today.strftime("%Y:%m:%d")

client.publish("picframe/date_from", d30)
Save and exit.
Create a third file called “Pi3D_Smart_Filter_Date_Today.py” and paste this text.
#!/usr/bin/env python3

# this script sends a MQTT to Pi3D which sets a smart filter to only show images from today

import paho.mqtt.client as mqtt
from datetime import date

client = mqtt.Client()
#client.username_pw_set( "username" , "password" ) - uncomment if you are not sending anonymously
client.connect("pictureframe.local", 1883, 60) # server address here

today = date.today()
d0 = today.strftime("%Y:%m:%d")

client.publish("picframe/date_from", d0)
Move these three files to your Raspberry Pi home directory “/home/pi”.
Setting up PiHelper
Take your iPhone/iPad and download PiHelper from the App Store. It’s doesn’t cost you anything and there is not even advertising.
Add the connection to your digital picture frame.
- Connection name: Picture Frame
- Host: your IP address or something like pictureframe.local
- Port: 22
- Choose “Password”
- Username: the name you log into your Pi with (probably “pi”)
- Password: the password you log into your Pi with
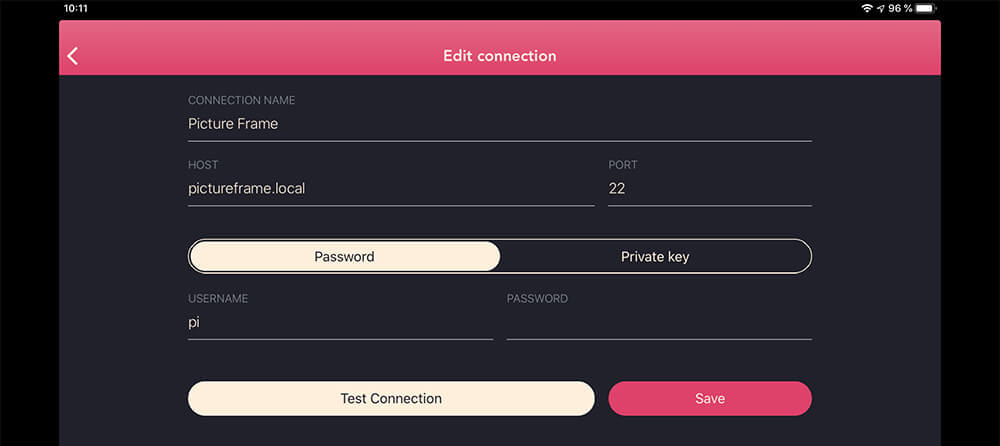
Test the connection and if successful save it.
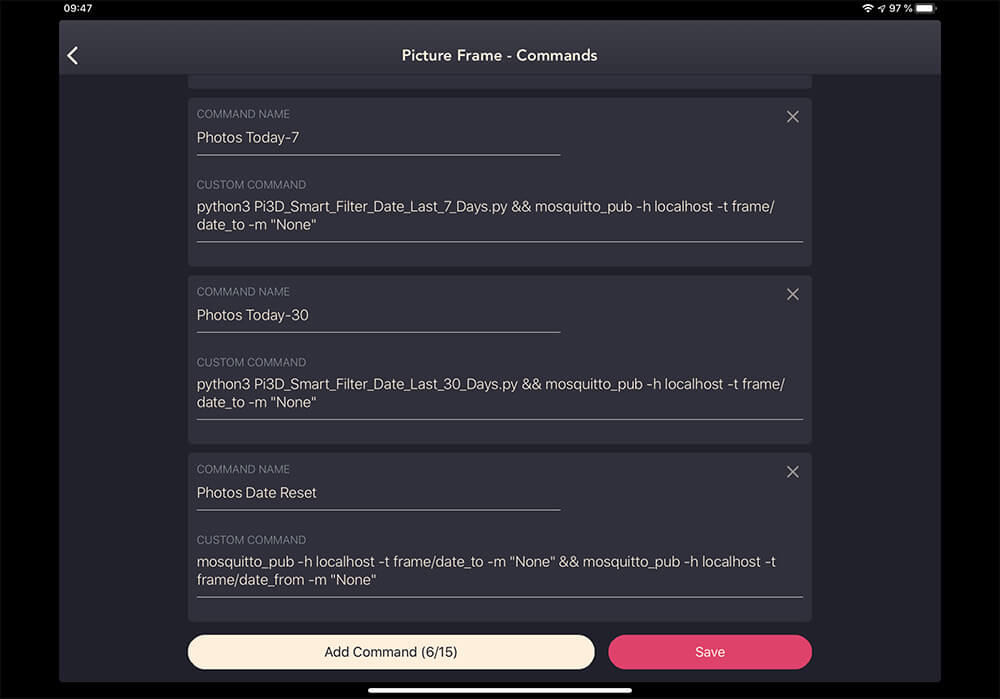
Add the remote commands
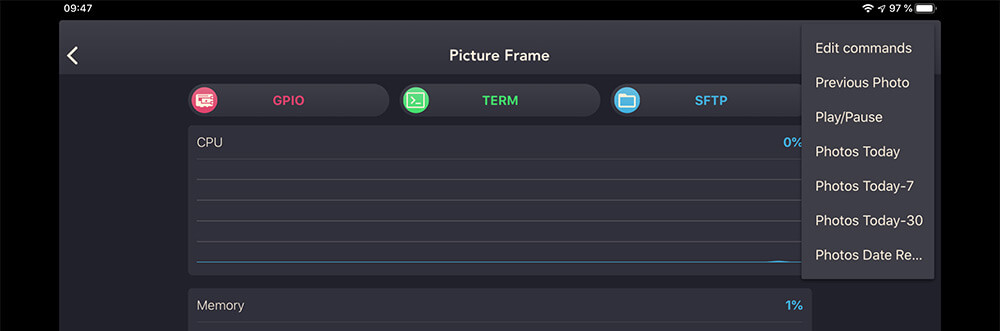
To access the command shortcuts, tap on the hamburger menu in the top right on “Edit command” and then “Add Command”.
You can add up to 15 commands.
These are the commands that we want Pi3D PictureFrame to receive:
- date_from: picframe/date_from, string YYYY/MM/DD or number representing unix timestamp or zero length string to remove constraint
- date_to: picframe/date_to, string YYYY/MM/DD or number as above
- paused on/off: homeassistant/switch/picframe_paused/set, ON,OFF
- back: homeassistant/switch/picframe_back/set, ON
We are going to create three date smart lists (show photos of today, last 7 days, last 30 days, and the reset command) as well as “Pause Playback” and “Go one photo back”.
The last one is most useful when you want to show your household members a photo that you just see on the frame, but they take ages to run to you and so the photo has moved on. In that case, you can now go back!
Enter the following commands:
Did you know that when you copy something on your Mac, you can paste it with your iPhone? Give it a try with these commands!
Go to the previous photo
Command Name: Previous Photo
Custom Command:
mosquitto_pub -h localhost -t homeassistant/switch/picframe_back/set -m "ON"Pause/Play photo playback (toggle)
Command Name: Previous Photo
Custom Command: Play/Pause
mosquitto_pub -h localhost -t homeassistant/switch/picframe_paused/set -m "ON"Show only photos from today
Command Name: Photos Today
Custom Command:
python3 Pi3D_Smart_Filter_Date_Today.py && mosquitto_pub -h localhost -t picframe/date_to -m "None"Show only photos from the last 7 days
Command Name: Photos Today-7
Custom Command:
python3 Pi3D_Smart_Filter_Date_Last_7_Days.py && mosquitto_pub -h localhost -t picframe/date_to -m "None"Show only photos from the last 30 days
Command Name: Photos Today-30
Custom Command:
python3 Pi3D_Smart_Filter_Date_Last_30_Days.py && mosquitto_pub -h localhost -t picframe/date_to -m "None"Reset the date filter
Command Name: Photos Date Reset
Custom Command:
mosquitto_pub -h localhost -t frame/date_to -m "None" && mosquitto_pub -h localhost -t picframe/date_from -m "None" Now you can remote control your picture frame by tapping on the Hamburger Menu top right and selecting a command.
Conclusion
Finally start Pi3D and try the various commands.
PiHelper provides a simple way to remote control the Pi3D image viewer that powers your digital picture frame. A great small app!
Thanks Qian Sha!
Was this article helpful?
Thank you for your support and motivation.
Related Articles
- How to use the DashMQTT Android app to remote control your Raspberry Pi photo frame
- Use your iPhone to turn your Raspberry Pi digital picture frame on and off
- How to automatically resize images to fit your digital picture frame
- Celebrate birthdays and anniversaries with auto-themed photos on your digital frame