
The wonderful imager viewer Pi3D PictureFrame has a functionality that allows the dynamic creation of smart lists. Combined with Amazon Alexa, this means that you can give a command like “Alexa, show only my photos from this week” and then this exactly happens until a new command is given.
In this article, I’ll show you how to do this.
If you just want to give the commands in Home Assistant and don’t need voice control, then just skip the part on connecting Home Assistant and Alexa.
Tested with: Raspberry Pi OS March 2021 version; Raspberry Pi 2, 3, and 4; Pi3D 2.43; PictureFrame 2021.03.20; 1080p and 4K displays.
The use of smartlists with Pi3D
In November 2019, the author of Pi3D, Paddy Gaunt, released a new version of the PictureFrame.py script which included intelligent smart lists based on the Exif data contained in image files.
Exif data capture technical, location and keyword information that are useful for filtering and analysing of images as well as providing copyright information.
Unless you explicitly remove them e.g. through image compression or photo software, they will be contained in the image file.
Exif data are most useful for creating dynamic smart lists for digital picture frames. In contrast to fixed playlists that you have to edit manually, an image smart list is defined by date, keywords or locations.
You can choose to only show pictures of the current week or month, or of your many skiing trips to Austria to wet your appetite for your next vacation.
Data discipline of Exif data
If you use just dates as smart filters, then there isn’t much that you need to do because the date is always recorded.
With locations it depends if you have taken the photo with a mobile phone which records it, or with a DSLR which typically does not unless you have a GPS device attached.
And if you want to filter on people you will either need to tag them manually in programs like Adobe Lightroom or allow facial recognition of your Google Photos or Apple Photos software. This is scarily simple.

I wrote a simple Python script to check which of your photos in your picture frame collection do not have Exif data which you can find here.
The setup that is used for talking to your photo frame
In my two articles “Control your digital picture frame with Home Assistant’s WiFi presence detection and MQTT” and “Voice control your digital photo frame with Amazon Echo and Home Assistant” I have described a setup with Home Assistant, the free Home Automation software, and Amazon Alexa. I have been using it since 2019 and it works very reliably. And it’s fun to use it!
There is also the possibility to use Node-RED, but I will focus on the Home Assistant solution here.
Although it may look like many small steps to set it up, it is actually not difficult at all, it won’t take you long, and I am sure you will love the overall result.
In this article, I will assume that you have finished the setup described in my above articles and will focus on the Amazon Alexa, Home Assistant, and Pi3D configuration to make your picture frame listen to the words of his or her master.
How it works – an overview
The logic goes like this:
- You give a command to Alexa,
- which triggers a script/routine in Home Assistant,
- which in turn publishes an MQTT message,
- which is relayed to Pi3D which is constantly listening on the /frame channel.
- Pi3D then applies this smart filter and restarts the photo playlist.
Sounds difficult? Just follow my step-by-step instructions and you will be up and running in no time.
I bet that you will start building your own voice routines for Pi3D fairly quickly. It still is a kind of magic to talk to your stuff, even in 2021.
Well with the current coronavirus, people in confinement probably start talking to their home devices more often anyway…
Setting up the scripts in Home Assistant
I will walk you through four different scripts: Show only the images of today, the last 7 days, the last 30 days, and a reset script.
We will start with “show only images of today”. The use case is, you have just come back from a family birthday, have uploaded your images to the frame, and would like to discuss them over dinner in the living room.
The date format that Pi3D can understand is “YYYY:MM:DD”, so we need to format the date string in Home Assistant accordingly. This is done with the “payload template”.
Go to “Configuration > Scripts”. Click on the orange “+” button in the bottom right and start a new script.
Smart filter “Today”
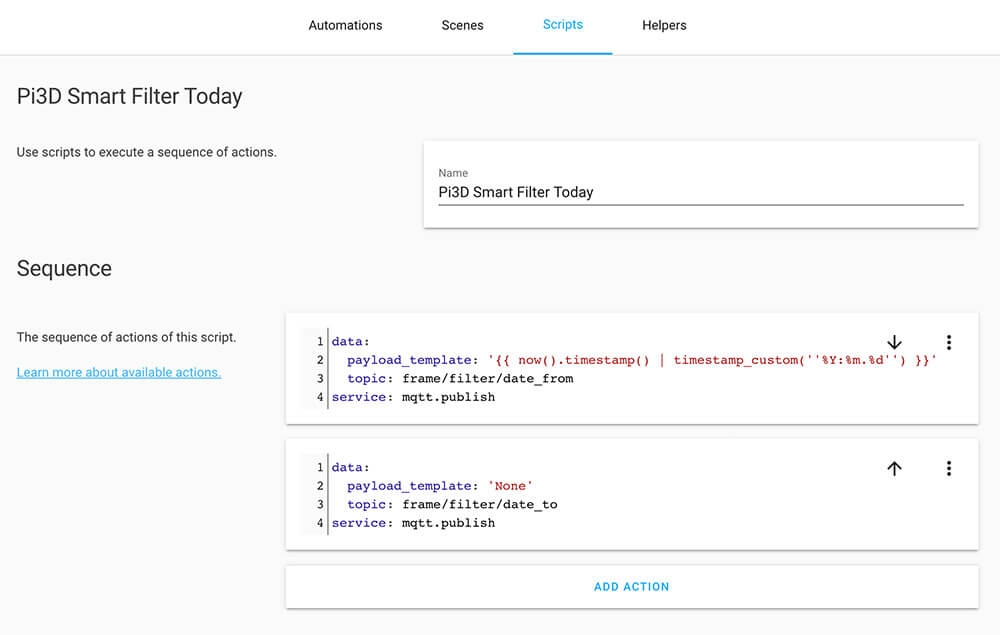
Call the script “Pi3D Smart Filter Today”.
Under Sequence to the right click on “Edit as YAML” (the button with the three dots) and paste this text in the box. This sends the parameters for date_to and date_from for today’s date.
data:
  payload_template: '{{ now().timestamp() | timestamp_custom(''%Y:%m:%d'') }}'
  topic: picframe/date_from
service: mqtt.publish
Add another action and paste this as YAML. We need this to reset any previous date commands.
data:
  payload: 'None'
  topic: picframe/date_to
service: mqtt.publish
This is how it looks like in Home Assistant:
Smart filter “Last 7 Days”
Make another script “Pi3D Smart Filter Last 7 Days”. This sends the parameters for date_to and date_from for today-7 days (expressed in seconds).
data:
  payload_template: '{{ (now().timestamp() - 604800) | timestamp_custom(''%Y:%m:%d'') }}'
  topic: picframe/date_from
service: mqtt.publish
Add another action and paste this as YAML.
data:
  payload: 'None'
  topic: picframe/date_to
service: mqtt.publish
Smart filter “Last 30 Days”
Make yet another script “Pi3D Smart Filter Last 30 Days”. This sends the parameters for date_to and date_from for today-30 days (expressed in seconds).
data:
  payload_template: '{{ (now().timestamp() - 2592000) | timestamp_custom(''%Y:%m:%d'') }}'
  topic: picframe/date_from
service: mqtt.publish
Add another action and paste this as YAML.
data:
  payload: 'None'
  topic: picframe/date_to
service: mqtt.publish
Smart filter “Reset”
Now we make the last script which resets the date filters. Create a new script and call it “Pi3D Smart Filter Date Reset”. This sends a reset message with date_to and date_from as ‘None’.
data:
  payload: 'None'
  topic: picframe/date_from
service: mqtt.publish
Add another action and paste this as YAML.
data:
  payload: 'None'
  topic: picframe/date_to
service: mqtt.publish
I recommend using the free software MQTT Explorer for checking that the messages are being sent and in the right format.
Receiving the smart filters in the Pi3D image viewer
Since Nov 2019, Pi3D has the functionality to listen to MQTT messages and to act on a change of parameters. This is quite a powerful functionality that allows full control over the playback with MQTT messages sent from all kinds of devices.
Set “use_mqtt” to “default=True” in the configuration.yaml file in /picframe_data/config to activate it. Also, add your MQTT broker server address. If you are using a locally installed broker, just add the IP address or the Bonjour hostname (“pictureframe.local”). If you don’t have a user and password, just leave the value empty.
mqtt:
  use_mqtt: True
  server: "localhost"
  port: 1883
  login: ""
  password: ""
For information of installing a local Mosquitto MQTT broker, see here.
Pi3D PictureFrame can receive the following parameters via MQTT messaging:
- display on/off: homeassistant/switch/picframe_display/set, ON,OFF
- paused on/off: homeassistant/switch/picframe_paused/set, ON,OFF
- shuffle on/off: homeassistant/switch/picframe_shuffle/set, ON,OFF
- back: homeassistant/switch/picframe_back/set, ON
- next: homeassistant/switch/picframe_next/set, ON
- name text on/off: homeassistant/switch/picframe_name_toggle/set, ON,OFF
- date text on/off: homeassistant/switch/picframe_date_toggle/set, ON,OFF
- location text on/off: homeassistant/switch/picframe_location_toggle/set, ON,OFF
- directory text on/off: homeassistant/switch/picframe_directory_toggle/set, ON,OFF
- title text on/off: homeassistant/switch/picframe_title_toggle/set, ON,OFF
- caption text on/off: homeassistant/switch/picframe_caption_toggle/set, ON,OFF
- all text off: homeassistant/switch/picframe_text_off/set, ON # yes that is confusing!
- text refresh: homeassistant/switch/picframe_text_refresh/set, ON
- delete: homeassistant/switch/picframe_delete/set, ON
- directory: picframe/directory, string matching directory name
- date_from: picframe/date_from, string YYYY/MM/DD or number representing unix timestamp or zero length string to remove constraint
- date_to: picframe/date_to, string YYYY/MM/DD or number as above
- fade_time: picframe/fade_time, number
- time_delay: picframe/time_delay, number
- brightness: picframe/brightness, float 0.0 to 1.0
- location_filter: picframe/location_filter, string matching any part of geolocation description
- tags_filter: picframe/tags_filter, string matching tags
- stop: picframe/stop, message not used - just stops
For our date smart filters, we only need the “date” items.
As soon as a date in the proper format is received by Pi3D to either picframe/date_to or picframe/date_from, the images are parsed, and a reselect is triggered. This means that a fresh image playlist based on the received date criteria is being shown.
Should your date selection not meet any images in your photos directory, a grey screen with the message “No images selected” is displayed.

Resetting the date selection requires the sending of “None” to either frame/date_to or frame/date_from, or both depending on what you have specified.
Testing the script
Take some new photos with your mobile phone and upload them together with older ones to your /Pictures folder on your frame. Take about ten photos from today and a hundred older pictures so that you can quickly spot if it works.
Test the script by manually triggering the script “Show only photos from today” in Home Assistant by clicking on the “play” icon in Configuration/Scripts.

Your frame should now only show images with an Exif date from today. Please note that the Exif data is not the file created or modified date but the genuine date and time when the photo was taken.
The Exif standard can be somewhat tricky. Every now and then (albeit rarely) I come across a jpg with ostensibly valid Exif data that are not properly read by the Python Exifread script. Let me know if you come across the same behavior with any of your files.
You can reset the time filter by triggering the script “Pi3D Smart Filter Date Reset”.
If this works on your frame, we can go to the last step and bring Alexa into play.
Connecting Alexa to Home Assistant
If you just want to use Home Assistant for the smart filter commands, you can skip this chapter. But if you would like to make it really magic, then add the Alexa commands. This is the easiest part of this tutorial!
For a more detailed article on this subject, I recommend reading “Voice control your digital photo frame with Amazon Echo and Home Assistant“.
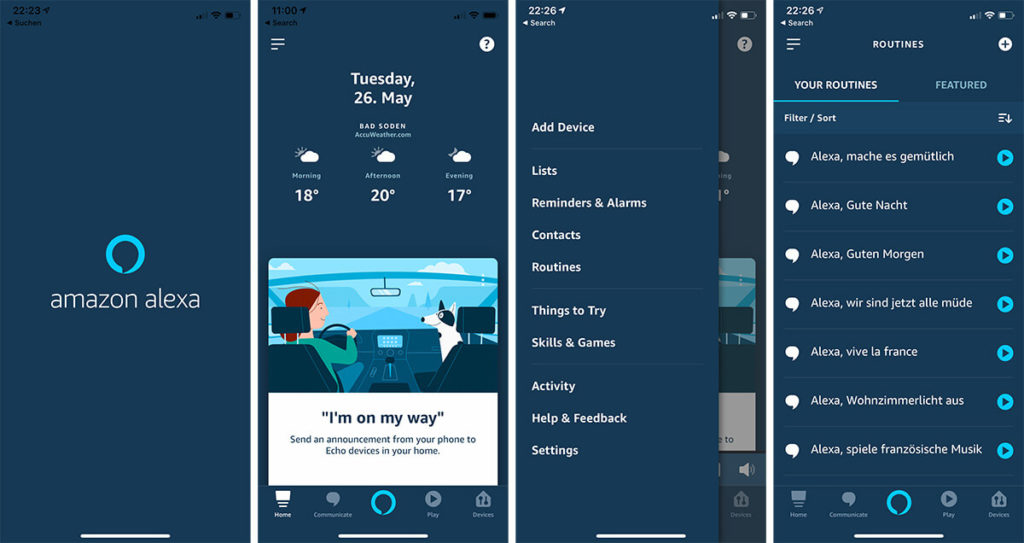
I assume that you have the Alexa app installed on your mobile phone. Let’s go through the steps:
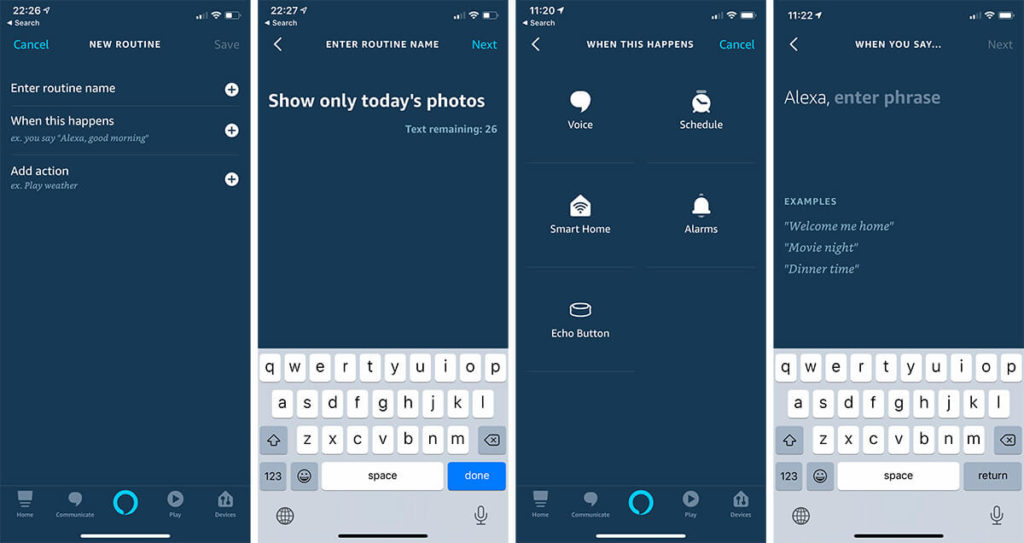
In the Alexa app, tap on the top left hamburger menu. Choose “Routines”. Tap on the “+” sign in the upper right to create a new routine.
Enter a routine name for your task, in this case “Show only today’s photos”. Click on “When this happens” and choose “Voice”. Enter the Alexa trigger phrase in your language and click “Next”.
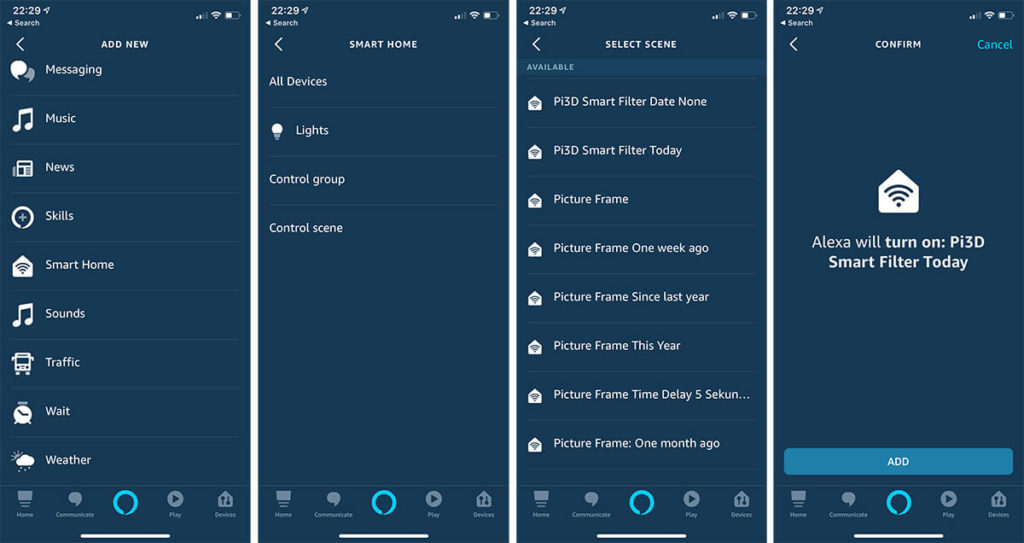
Click on “Add action” and choose “Smart Home” and “Control Scene”. What Alexa calls “Scene” is what is called a “Script” in Home Assistant. Choose the Scene/Script from Home Assistant and tap on “Add”. Finally, save your routine.
Wait a few seconds until the Amazon servers have digested your settings and test the routine by tapping on the “Play” sign on the right of your routine. Your command is now sent to Pi3D on your picture frame.
It will take a few moments for Pi3D to filter your images and to reshuffle your playlist but then it should only display the photos that correspond to your smart filter. Isn’t it great?
Conclusion
This article is the first in a series to use smart filtering in Pi3D PictureFrame with Home Assistant and Alexa voice control. I intend to add more based on location and people which might also be quite useful. As always, thanks to Paddy for his great work on Pi3D!
So stay tuned, subscribe to Article Updates in the footer, and keep on adding great photos to your digital picture frame.
Was this article helpful?
Thank you for your support and motivation.
Related Articles
- How to trigger a Home Assistant script through Alexa and make your Raspberry Pi picture frame do (just about) anything
- How to pause, go back or delete an image on your Raspberry Pi digital picture frame with a simple Alexa voice command
- Check the Exif data of your images to prepare your Raspberry Pi photo frame for smart playlists
- Voice control your Raspberry Pi digital photo frame with Amazon Echo and Home Assistant