In this article, I will explain how to Alexa-voice control your digital picture frame using Node-RED and the MQTT protocol. Node-RED is a programming tool for wiring together the Internet of Things hardware devices, APIs, and online services.
It is an alternative to using Home Assistant, which I have explained in this article.
The advantage of using Node-RED is that unlike Home Assistant, it can run on the same Raspberry Pi as your digital picture frame, it is much lighter and easier to set up, and it doesn’t require a subscription to the Nabu Casa online service.
In conjunction with the Amazon Alexa app, you can go much further than just voice controlling your digital picture frame. But in this article, I am going to focus on how to turn the display of your digital frame on and off using your voice.
Update, September 2026. Read this before you start. This article has aged worse than most on the site, and I have corrected what I can verify rather than quietly leaving it up.
- CloudMQTT is gone. The service announced its end of life and shut down; the “Cute Cat” plan link went with it. The broker section below now installs Mosquitto on the frame instead, which is what I would have recommended anyway.
- The Node-RED installer URL had moved. The
node-red/raspbian-deb-packagerepository was renamed tonode-red/linux-installers, so the old raw URL returns a 404. The new one is below.vcgencmd display_powerhas been retired and no longer switches a screen on or off on current Raspberry Pi OS. The Python script has been changed, but see the note beside it.sudo pip3 installis blocked since Bookworm; the script’s dependency now goes in a virtual environment.node-red-contrib-alexa-localis unmaintained. It works by emulating a Hue bridge on your network so that “Alexa, discover my devices” finds it, and Amazon has broken that more than once. I have not re-tested the discovery step on a current Echo, so treat the second half of this article as a design to follow rather than a recipe that is guaranteed to work.If you just want Alexa to control a frame today, the shortest road is Home Assistant, and on a Pi 4 or Pi 5 picframe3 puts the frame into Home Assistant by itself over MQTT discovery, with no scripts and no YAML.
Introducing Node-RED
Node-RED is a flow-based programming tool that initially emerged as a hobby project in IBM’s Emerging Technology Services group.
It began as a proof-of-concept for visualizing and manipulating mappings between MQTT topics and quickly grew into a general solution for connecting the Internet of Things hardware.
It is trendy in the Home Automation space and can be universally applied for controlling hardware of all sorts.
After it was open-sourced in 2013, more and more people discovered its “magic”.
And “magic” it is because “programming” Node-RED is a matter of dragging and connecting elements. It can be learned in no time, uses only modest system resources, and has a wide follower-ship that keeps developing add-ons to expand its usefulness to all kinds of areas.
Installing Node-RED on your Raspberry Pi
You need to have at least one Gen. 2 Echo model in your network for the device discovery to work.
The installation can be carried out on all Raspberry Pi models, including the Pi Zero, 2, 3, 4, and 5, and is very simple with a script provided by the Node-RED team. This script can also be used to upgrade an existing installation when a new release is available.
Connect to your Raspberry Pi via Terminal. As always, when you install new software, make sure that your installation is up to date with
sudo apt update && sudo apt upgrade -y
After completion, enter this line:
bash <(curl -sL https://raw.githubusercontent.com/node-red/linux-installers/master/deb/update-nodejs-and-nodered)
(That URL changed: the repository used to be called raspbian-deb-package and the old address now 404s. If you find the old one in an older tutorial, this is its replacement.)
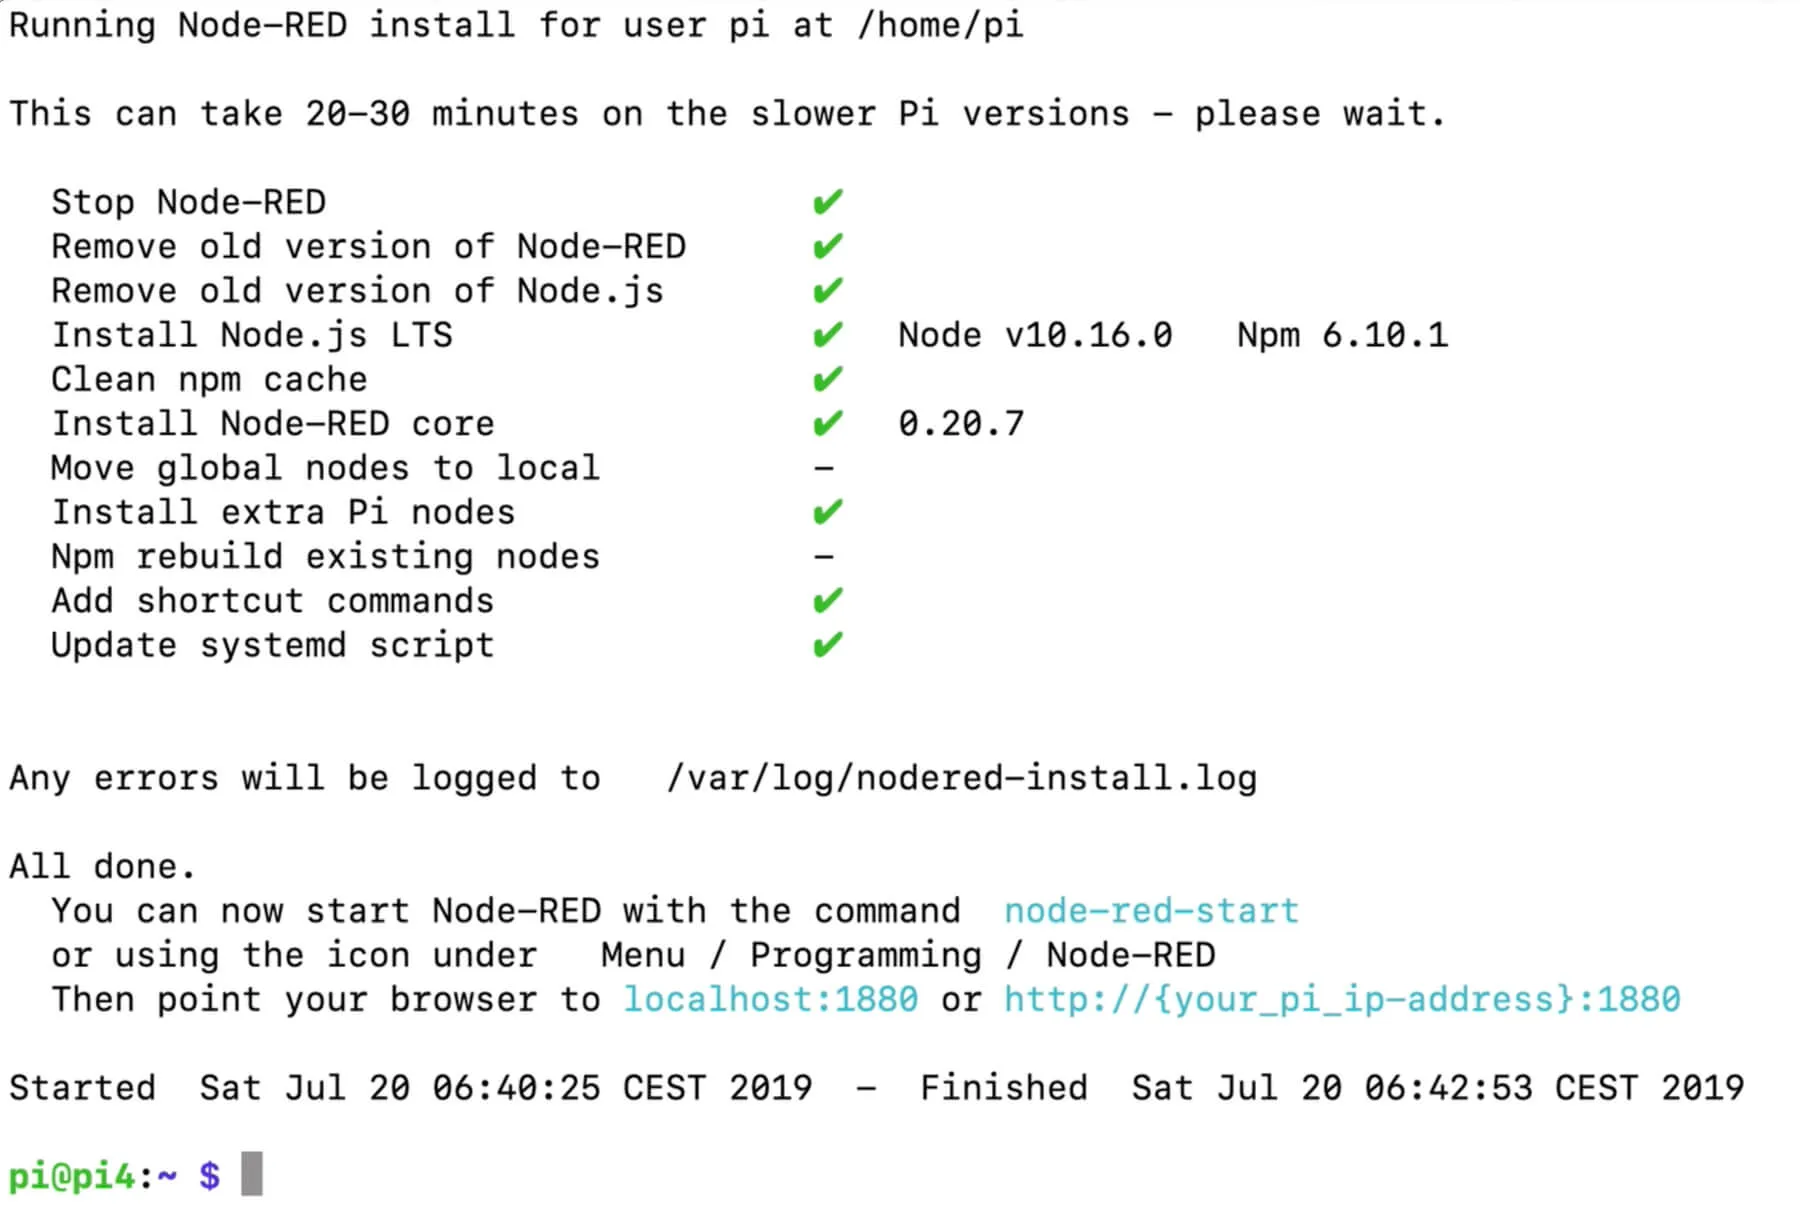
The Node-RED installation runs on auto-pilot
To launch Node-RED at boot, you will have to install it as a system service:
sudo systemctl enable nodered.service
Reboot your Pi.
Entering Node-RED
To access Node-RED, open a browser window of a computer in the same network and enter
http://<ip-address-of-your-raspberry-pi>:1880
so for example
http://192.168.132.49:1880
If you are entering this information directly in Chrome on your Pi, then simply type
http://localhost:1880
You will be greeted by a screen like this:
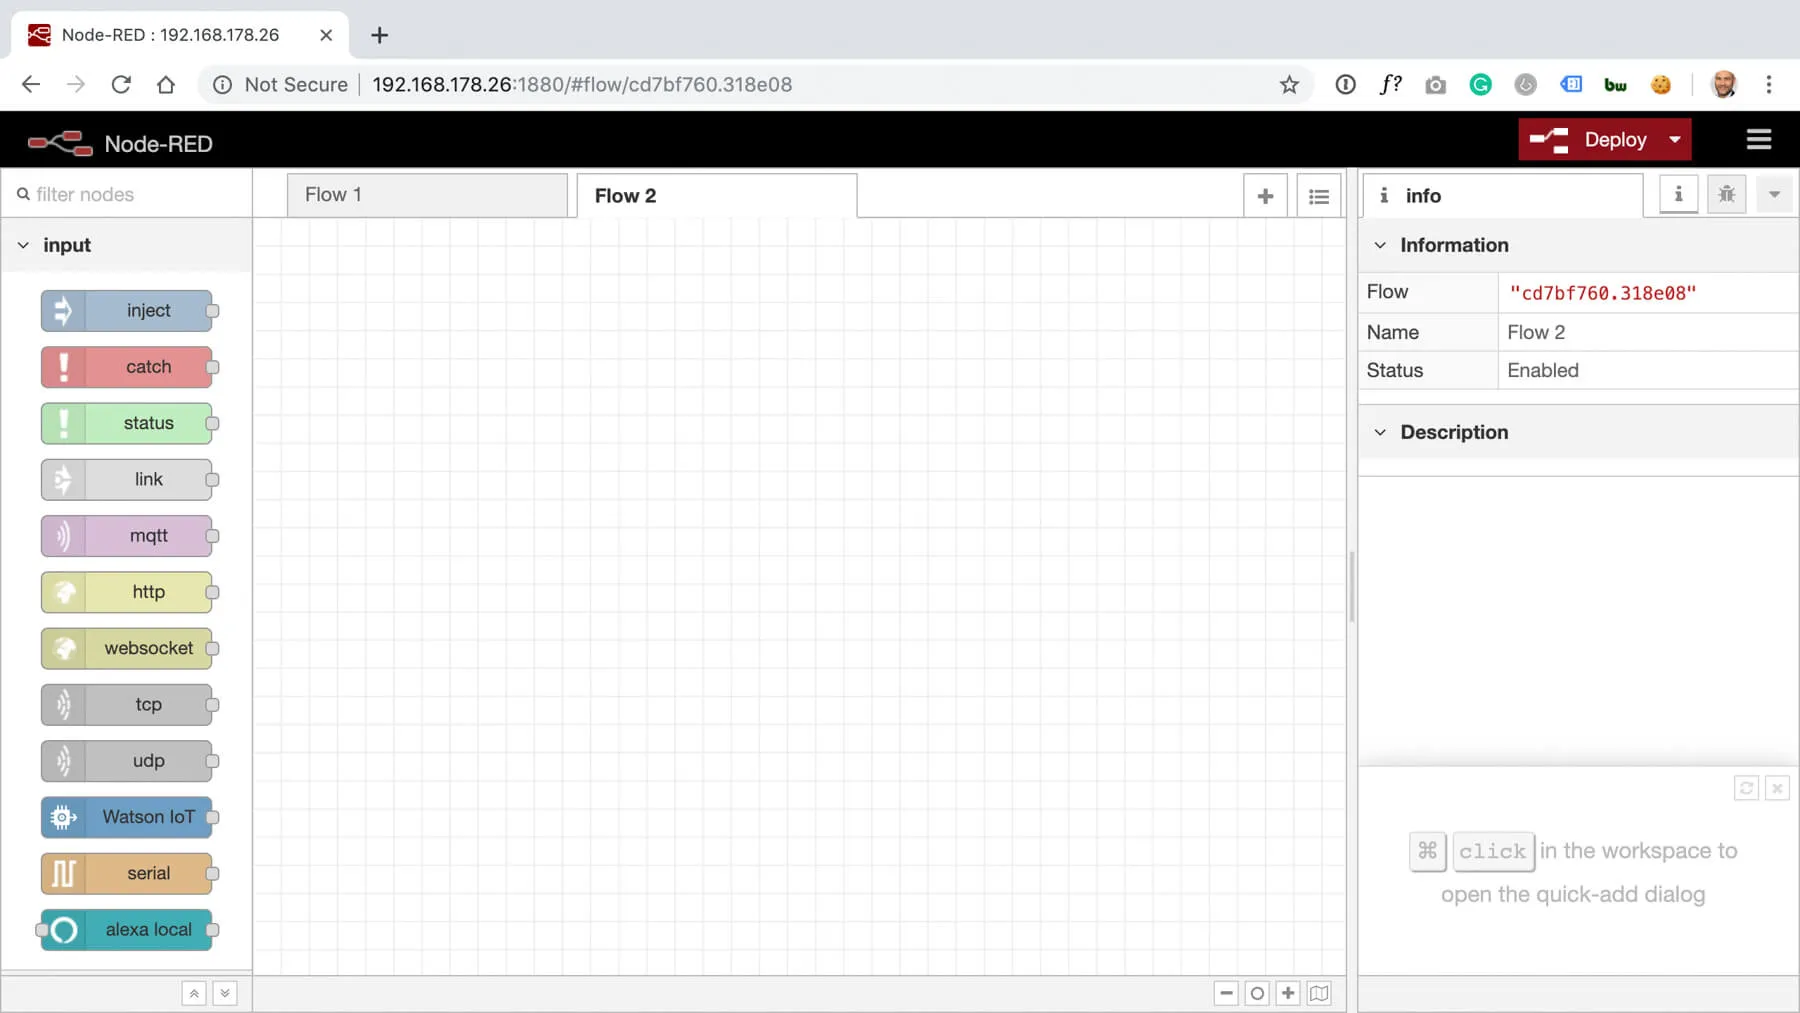
Say hello to Node-RED
By default, the Node-RED editor is not secured, and anyone who can access its IP address can access the editor and deploy changes. This may be ok for your home network, but I recommend you protect yourself by following this guide.
The underlying logic of Node-RED is this: The elements on the left are the Nodes. A combination of Nodes is a Sequence. When you have one or more Sequences in a tab, this is called a Flow.
Install add-on for Alexa voice control
We need to install one add-on in Node-RED to make our nodes show up as a local device in the Amazon Alexa app.
Click on the top right Hamburger Menu and select “Manage palette”.
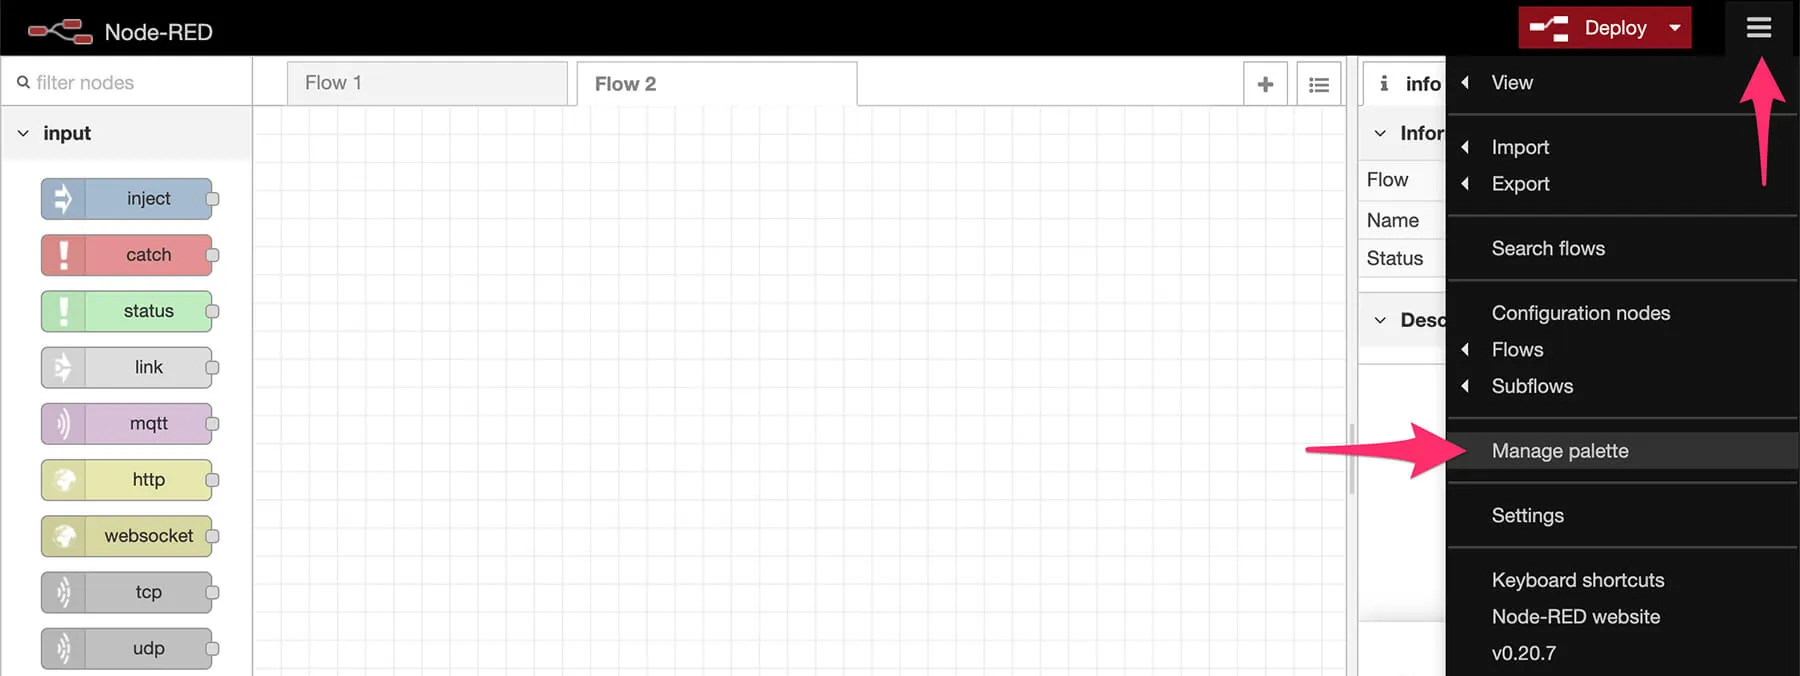
Click on the “Install” tab, search for “node-red-contrib-alexa-local”,
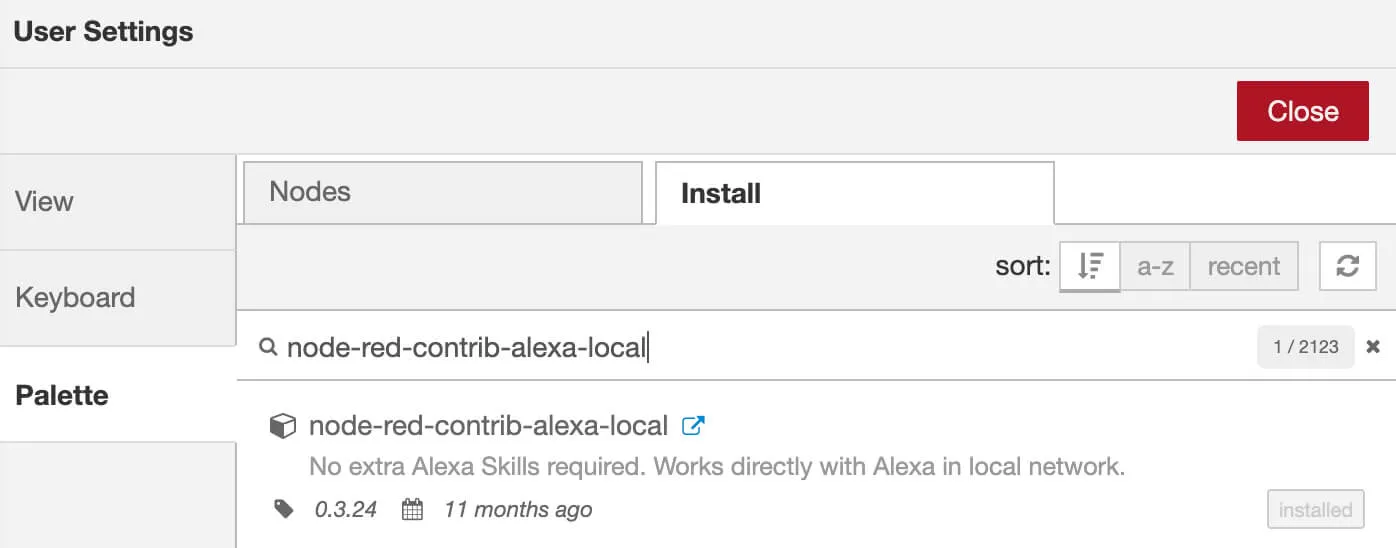
and select “install”.
For more information on this module, look here.
Setting up the MQTT broker
The communication between Alexa and your digital picture frame is based on the lightweight messaging protocol MQTT. This has become the de-facto standard for the communication between Internet-of-Things hardware.
The key terms in MQTT speak are “topic, message, publish, and subscribe”.
“Topic” is something you want to participate in, “publish” when you make a statement concerning a topic, and “subscribe” is when you want to receive all statements around a topic. The content of these communication activities is called “messages”.
An MQTT broker is like a post office where these messages are received and distributed.
The MQTT broker can be locally installed or accessed through an online service. This article originally used the free CloudMQTT service, which had a nice web interface for watching messages go past. CloudMQTT has since been discontinued, so that route is gone.
Install Mosquitto on the frame instead — it is one command, and it is more reliable than anything that depends on somebody else’s servers staying up:
sudo apt update && sudo apt install -y mosquitto mosquitto-clients
There is a longer walkthrough here if you want one. For watching messages while you debug, mosquitto_sub -h localhost -t '#' -v does the job the CloudMQTT web interface used to do.
Installing MQTT on the digital picture frame
It’s time to get the digital picture frame part ready to listen to MQTT messages.
Since Bookworm, Raspberry Pi OS refuses a system-wide pip install, so the library goes in a virtual environment. Enter in Terminal:
python3 -m venv ~/venv_mqtt
~/venv_mqtt/bin/pip install paho-mqtt
We need a Python script which turns the digital picture frame display on or off. It listens to the topic “frame/red/display” and turns the monitor on when the message is “on” and off when the message is “off”.
Create a new file and paste the below content in it. Name the file “red_monitor_mqtt.py”. (It was called red_monitor_cloudmqtt.py when this article used CloudMQTT.)
#!/usr/bin/env python3

import paho.mqtt.client as mqtt
import subprocess

# "vcgencmd display_power" has been retired and does nothing on the KMS
# graphics stack. On a Pi3D frame with a Wayland session, wlr-randr is the
# replacement -- run "wlr-randr" on its own first to see what your output
# is called.
DISPLAY_ON = ["wlr-randr", "--output", "HDMI-A-1", "--on"]
DISPLAY_OFF = ["wlr-randr", "--output", "HDMI-A-1", "--off"]

def hdmi_on():
    subprocess.call(DISPLAY_ON)

def hdmi_off():
    subprocess.call(DISPLAY_OFF)

def on_connect(client, userdata, flags, rc):
  print("Connected to MQTT broker")

def on_message(client, userdata, msg):
    print(msg.topic+" "+str(msg.qos)+" "+str(msg.payload))
    if msg.payload.decode() == "on":
        hdmi_on()
    elif msg.payload.decode() == "off":
        hdmi_off()
    else:
        pass

client = mqtt.Client(mqtt.CallbackAPIVersion.VERSION1)
# client.username_pw_set( "User" , "Password" )   # only if your broker asks for one
client.connect( "localhost", 1883, 60)
client.subscribe( "frame/red/display" , qos=0)
client.on_connect = on_connect
client.on_message = on_message
client.loop_forever()
Two things about that script, both changed in September 2026. mqtt.Client() on its own raises under paho-mqtt 2.x, which is what you get today — hence the CallbackAPIVersion.VERSION1 argument, which keeps the callback signatures in the script working as written. And the display commands are wlr-randr, not vcgencmd. I have not re-tested this script on a current Raspberry Pi OS. In particular, a wlr-randr call from a systemd service needs to find the Wayland session it is supposed to talk to, which the unit below does not arrange. On picframe3 the question does not arise: the frame switches its own panel, and you would publish to its picframe/picframe/cmd topic with display_on or display_off instead of running any command at all.
We want the script to be launched at boot and restarted should a network failure occur.
Enter
sudo nano /etc/systemd/system/mqtt-display.service
In the editor, paste this text, replacing pi with your own user name — Raspberry Pi OS no longer creates a default “pi” user, so it is whatever you typed into Raspberry Pi Imager:
[Unit]
Description=MQTT display control
After=multi-user.target
[Service]
Type=idle
User=pi
ExecStart=/home/pi/venv_mqtt/bin/python3 /home/pi/red_monitor_mqtt.py
Restart=always
RestartSec=60
[Install]
WantedBy=multi-user.target
Note the ExecStart path: it is the Python inside the virtual environment you created above, not /usr/bin/python3, because that is where paho-mqtt now lives.
Save and exit. Then enter in Terminal
sudo chmod 644 /etc/systemd/system/mqtt-display.service
sudo systemctl daemon-reload
sudo systemctl enable mqtt-display.service
Creating the sequences in Node-RED
We are now creating the two sequences in Node-RED that trigger the MQTT messages, which tell our Raspberry Pi to turn the screen on or off.
Go back to the Node-RED browser window by entering:
http://<ip-address-of-your-raspberry-pi>:1880
Locate the node “alexa local” and drag it to the left half. Then locate the node “mqtt out” under Output – the one with the speaker symbol on the right.
Combine the two nodes by drawing a line between them.
Double click on the “alexa local” node and enter “TDPF-display-on” under “Name”. Click “Done”.
Double click on the “mqtt out” node. Enter your broker — localhost and port 1883 if Mosquitto is running on the same Pi as Node-RED. Under the Security tab, enter a user name and password only if your broker asks for one.
Below the server, enter the “Topic” as “frame/red/display”. Select QoS (Quality of Service) as “0”. Leave the rest empty and click “Done”.
Create a second sequence with “alexa local” and “mqtt out” by dragging the elements below the first ones and combining them. Double click on the “alexa local” node and enter “TDPF-display-off” under “Name” and repeat the steps as above for the MQTT node.
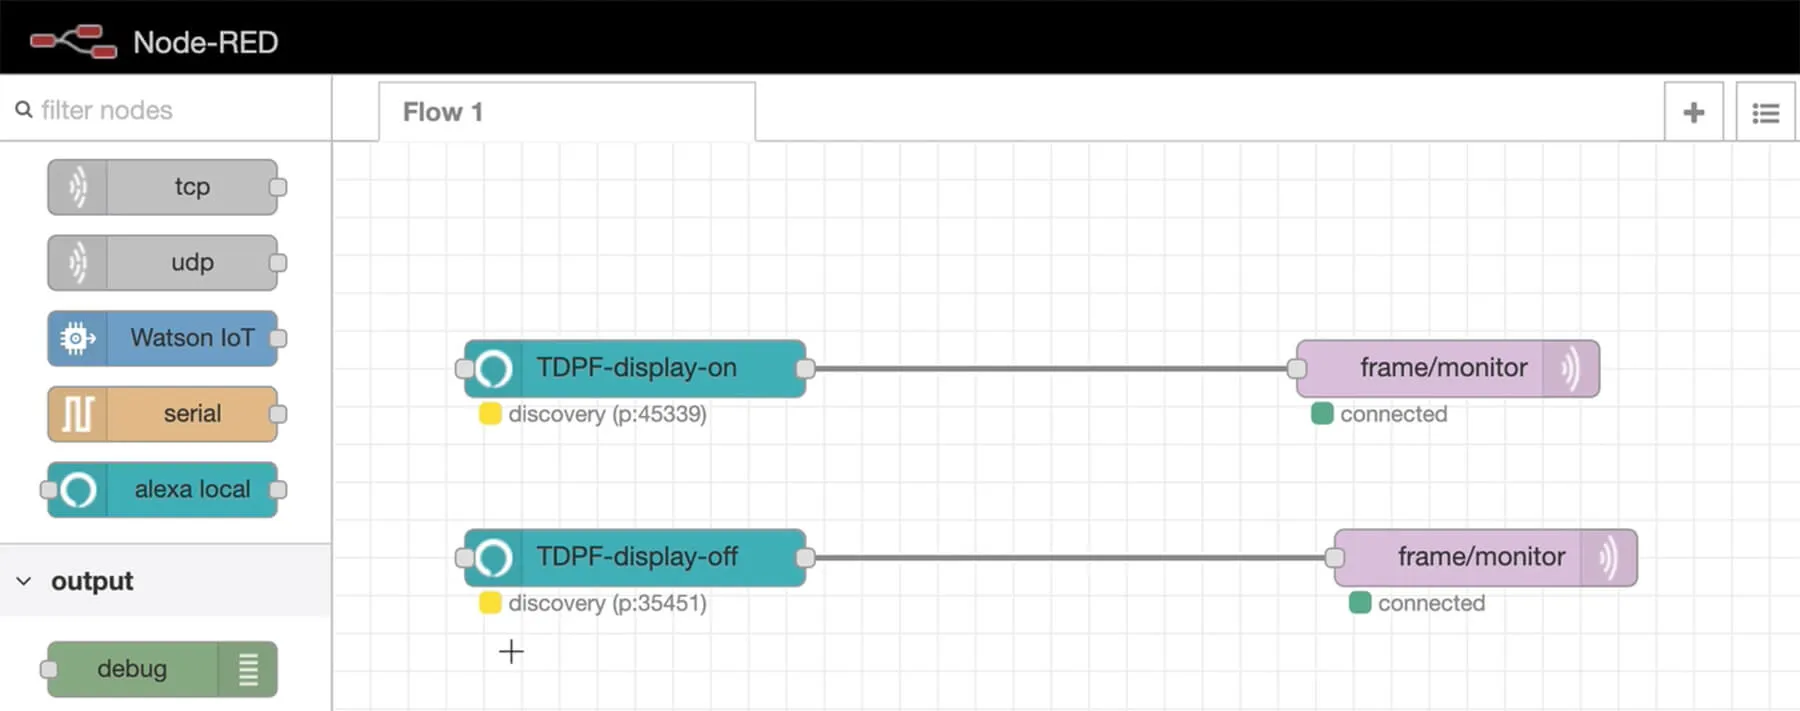
Sequencing nodes
Click on “deploy” in the top right corner. Now your flow (the content in the tab) becomes active.
Creating a routine in the Amazon Alexa app

Get your mobile phone and open the Amazon Alexa app. Tap on the hamburger menu in the top left corner.
Tap on “Add Device”, scroll to the bottom, tap “Other”, and “Discover devices”. Alternatively, you can say, “Alexa, discover my devices”.
This will take about a minute.
Tap on “Devices” on the bottom row and then “All Devices” in the top row. Tap “Choose device” to see if they have been found.
Tap on “Home” and on the hamburger menu again, then “Routines”. Create a new routine by tapping on the top right “+” sign. Tap on “When this happens” and then on “Voice”. Complete the sentence like “Picture Frame on”.
Then add an action, “Smart Home”, “Control Device”, scroll the list and look for “TDPF-display-on”. Select “Power” and set it to “On”. Tap “Next” and “Save”.
Repeat the same process with “TDPF-display-off”. But this time, select “Power” and set it to “Off”.
Wait a minute for the Amazon server to refresh and then test the routines by tapping on the play icon and see if the screen turns on or off.
If that works, speak your command to Alexa.
Conclusion
Although we went through a number of steps, the overall setup isn’t very hard.
And this is just one example of how you can use Node-RED in conjunction with Amazon Alexa to voice-control your photo frame.
You can let Alexa speak a message once a command has been executed or create new commands. You can also use it for home automation tasks, all on the same Raspberry Pi that is hidden behind your digital picture frame.
The Nov 2019 release of the Pi3D script features a number of commands that are ready for voice control with the MQTT protocol. So it makes a lot of sense to try this simple display on/off command and build on this setup going forward.
Was this article helpful?
Thank you for your support and motivation.