My clear recommendation for a Raspberry Pi image viewer for a digital picture frame is Pi3D PictureFrame written by Paddy Gaunt, Jeff Godfrey, and Helge Erbe. If you stumbled upon this page by accident and not sure what Pi3D is, get up to speed with this article.
Pi3D PictureFrame uses the full power of the graphics processor of the Raspberry Pi to create smooth blending effects which make the viewing experience unobtrusive and pleasant. In 2021 it also received a number of clever enhancements, like full integration in Home Assistant and very smart matting features.
Tested with: Raspberry Pi OS March 2021 version, Raspberry Pi 2, 3, and 4, Pi3D 2.44, PictureFrame 2021.04.02, 1080p and 4K displays.
The configuration.yaml file
PictureFrame is highly configurable to your needs. The information for the various parameters is contained in the configuration.yaml file in the picframe_data/config directory.
It is easy to be confused by the many possible options. This is why I have put together a complete overview of all parameters.
Some of these parameters can be altered with MQTT messages remotely. I have mentioned where this is possible and what channel and payload to send.
The file has four sections: viewer, model, mqtt, and http.
The order is based on the occurance within the configuration.yaml script.
Create blurred edges
Name of parameter
blur_amount: 12 # default=12, larger values than 12 will increase processing load quite a bitWhat this parameter does
This sets the blur amount to the effect described in the next parameter. A value of 1 will make it only slightly blurred, 12 will make it unrecognizable but often yields nice colors. Do not enter a high level than 12.
Recommended setting
10
Name of parameter
blur_zoom: 1.0 # default=1.0, must be >= 1.0 which expands the background to just fill the space around the imageWhat this parameter does
It expands the background to just fill the space around the image.
Recommended setting
Just leave this value at “1.0”, it will expand the background to just fill the space around the image just right. A larger value than 1 will zoom the blur effect.
Name of parameter
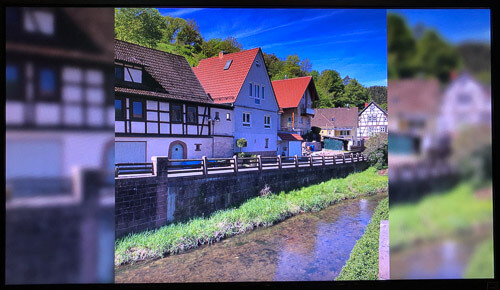
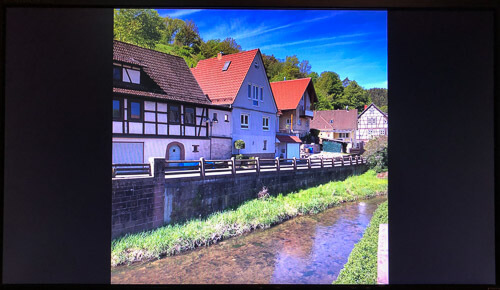
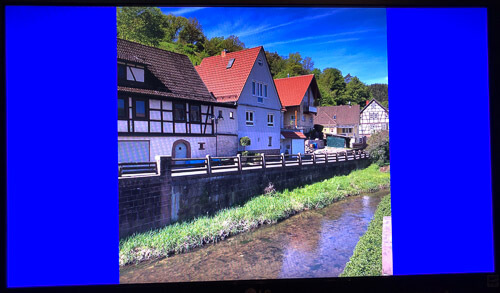
blur_edges: False # default=False, use blurred version of image to fill edges - will override FIT = FalseWhat this parameter does
This feature will create blurred edges to fill the screen that would otherwise remain black.
You have surely seen this effect when watching videos that have been filmed in portrait mode on smartphones. As the video playback is always in landscape mode, two-thirds of the screen is filled with a blurred version of the video.
With images, it is typically only the edges, and setting this value to “True” will create a smooth blur.
Recommended setting
If you have photos in completely different aspect ratios on your frame, then this setting can be very nice.
Examples:

Background color at edge
Name of parameter
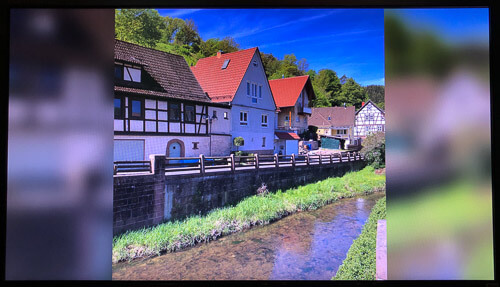
edge_alpha: 0.5 # default=0.5, background colour at edge. 1.0 would show reflection of imageWhat this parameter does
If the image doesn’t fit the screen, then Pi3D can mirror the original image, so there is no hard edge.
Setting this value to 1.0, it will appear, at first glance, as if the image exactly fits the frame. The effect can be quite stunning, and you often won’t even notice it, but sometimes it may be a bit odd.
“0.0” is a bar (define the color in “Background Color”), and everything in between will reduce the opacity of this mirrored edge.
Recommended setting
You should try a setting of “1.0” to see what the effect does, and if you don’t like it, you can always change it to “0.0”.
Example:


Frames per second
Name of parameter
fps: 20.0 # default=20.0What this parameter does
This changes the granularity of the blending. However, I couldn’t see any difference between 20 fps and 30 fps.
Recommended setting
I would leave it at 20 as visually, you won’t see a difference anyway and older Raspberry Pi models may struggle with the CPU load.
Background color
Name of parameter
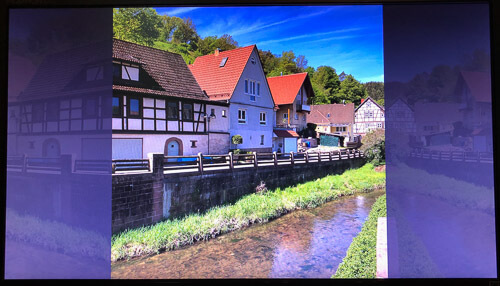
background: [0.2, 0.2, 0.3, 1.0] # default=[0.2, 0.2, 0.3, 1.0], RGBA to fill edges when fittingWhat this parameter does
An alternative to mirroring the gaps at the edges is to give the background another color that you can define in the RGBA color format. The first three numbers define the RGB color, the last one the opacity (Alpha).
Recommended setting
This is really a matter of individual taste. I would probably pick black (0, 0, 0, 1.0).
For an overview of decimal red, green, blue, and opacity color codes, have a look here.
Examples:

Transition effect
Name of parameter
blend_type: "blend" # default="blend", choices={"blend", "burn", "bump"}, type of blend the shader can doWhat this parameter does
This defines the transition effect. You have the choice between blend, burn, and bump. Have a go and see which transition you like best.
Recommended setting
Set it to “blend”. This will give you wonderful crossfading transitions.
Font File
Name of parameter
font_file: "~/picframe_data/data/fonts/NotoSans-Regular.ttf"What this parameter does
This is the font that is used to display the file names if you have activated this option. If you are using a language other than English that has a number of special characters like umlaute, accents, etc. and you are seeing weird characters displayed on the screen, changing the font file may be the solution.
Recommended setting
Leave the default.
Shader
Name of parameter
shader: "~/picframe_data/data/shaders/blend_new"What this parameter does
This defines which Pi3D shader file to use for the transitions.
Recommended setting
Leave the default.
Show image meta data from Exif and IPTC
Name of parameters
  show_text_fm: "%b %d, %Y"               # default "%b %d, %Y", format to show date over the image
  show_text_tm: 20.0                      # default=20.0, time to show text over image with file name
  show_text_sz: 40                        # default=40, text character size
  show_text: "title caption name date folder location"  # default="title caption name date folder location", show text, include combination of words: title, caption name, date, location, folder
  text_justify: "L"                       # text justification L, C or R
What these parameter do
This section allows you to show either the (IPTC) title, (IPTC) caption, name, (Exif) date, folder, and location, or any combination thereof. You find the name and date explained here, and the location here.
The first parameter refers to the date format. The second to how long the text overlay is shown. Keep it at max a few seconds shorter than your image display time. You can change the character size in line 3. “show_text” defines the information you want to display. If you leave it as “”, no information will be displayed. You can specify any display combination. With “text_justify” you can have the text left-/right-aligned or centered.
Recommended setting
Up to you! For some inspiration click on the above article links.
Fit image into the screen
Name of parameter
  fit: False    # default=False, True => scale image so all visible and leave 'gaps'
                #                False => crop image so no 'gaps'
What this parameter does
“True” means that the entire image fits onto the screen, and there will be gaps left (letter- or pillar boxing) if your image does not have the same aspect ratio as the monitor.
“False” means that the image is blown up to fill the screen, thereby cropping parts of the picture.
Recommended setting
False. I don’t like these pillar-boxes but I crop my images to the exact dimensions of the screen anyway, so I don’t use this feature.
Ken Burns
Name of parameter
kenburns: False # default=False, will set fit->False and blur_edges->FalseWhat this parameter does
Ken Burns is is a type of panning and zooming effect to create the impression of moving images. PictureFrame has a very smooth Ken Burns capability and it’s nice to look at if you like the effect.
Recommended setting
False
Screen Offset
Name of parameters
  display_x: 0    # offset from left of screen (can be negative)
  display_y: 0    # offset from top of screen (can be negative)
What these parameters do
For certain aspect ratios, you can fine tune the exact display position with these value. For an example, look here.
Recommended settings
No need to alter these value unless you have a very special installation.
Display Width and Height
Name of parameters
  display_w: null    # width of display surface (null->None will use max returned by hardware)
  display_h: null    # height of display surface
What these parameters do
For certain types of displays or frame arrangement, you can use them for custom adjustments.
Recommended settings
Mere mortals probably don’t want to touch those values.
Smart Matting
Name of parameters
  mat_images: 0.01                        # default=0.01, True, automatically mat all images. False, don't automatically mat any images. Real value, auto-mat all images with aspect ratio difference > than value
  mat_type: null                          # default=null, A string containing the mat types to choose from when matting images. It can consist of any or
                                          # all of 'float float_polaroid single_bevel double_bevel double_flat' (null or '' will use all mat types)
  outer_mat_color: null                   # default=null, Color of the outer mat as an RGB list. null will auto-select a reasonable color based on the image.
  inner_mat_color: null                   # default=null, Color of the inner mat as an RGB list. null will auto-select a reasonable color based on the image.
  outer_mat_border: 75                    # default=75, Minimum outer mat border in pixels
  inner_mat_border: 40                    # default=40, Minimum inner mat border in pixels (for styles that use it)
  outer_mat_use_texture: True             # default=True, True uses a texture for the outer mat. False creates a solid-color outer mat.
  inner_mat_use_texture: False            # default=False, True uses a texture for the inner mat. False creates a solid-color inner mat.
  mat_resource_folder: "~/picframe_data/data/mat" # Folder containing mat image files
What these parameters do
Matting is one of the great new features of PictureFrame 2021. I wrote an entire article on matting because I was so delighted.
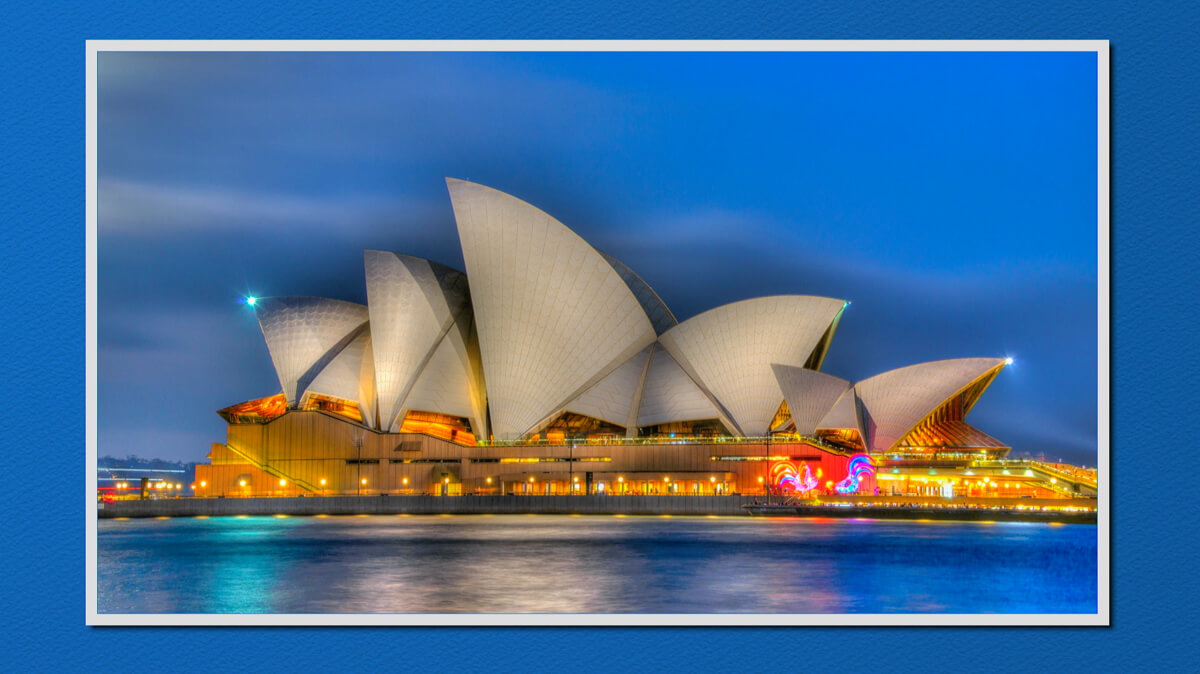
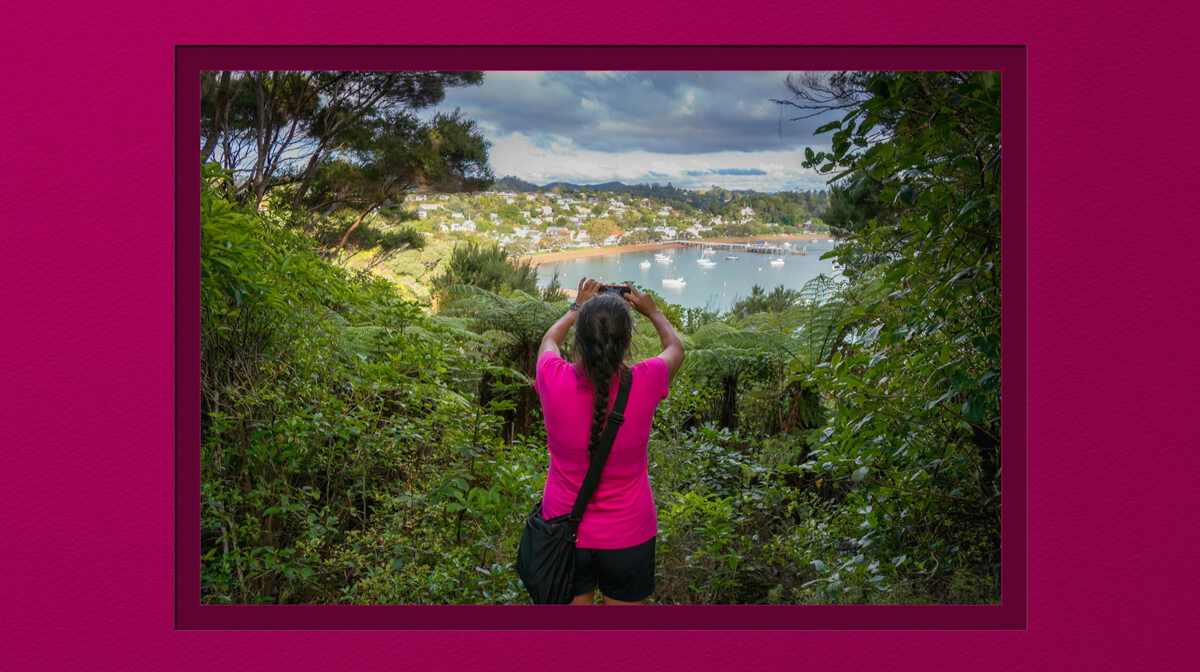
The above lines should be self explanatory. If you don’t want any mats, enter “mat_images: False”.
Recommended settings
As you like it. I use “mat_images: True” and “mat_type: null”
Main picture directory
Name of parameter
pic_dir: "~/Pictures" # default="~/Pictures", root folder for imagesWhat this parameter does
This is the main directory where your photos are located.
Recommended setting
“/home/pi/Pictures”
Deleted pictures directory
Name of parameter
deleted_pictures: "~/DeletedPictures" # move deleted pictures hereWhat this parameter does
PictureFrame allows you to remotely delete an image either via MQTT commands, Home Assistant, or Amazon Alexa. However, the files are not deleted but only moved to a different directory. Think of it as a “trash can” for your images.
Recommended setting
“/home/pi/DeletedPictures”
No images selected photo
no_files_img: "~/picframe_data/data/no_pictures.jpg" # image to show if none selectedWhat this parameter does
When you have no images in your Pictures folder, or you have set a smart filter like a date_from/date_to a combination that yields no photos that match your criteria, PictureFrame will display a placeholder image “No images selected”.

You can replace the default image with a customized version of yours. Just create a jpg file in the dimensions of 960 x 593 px, upload it to the picframe_data/data folder and enter the file name here.
Recommended setting
As you like it!
Subdirectory
Name of parameter
subdirectory: "" # default="", subdir of pic_dir - can be changed by MQTT"What this parameter does
This is the subdirectory of “/home/pi/Pictures” which you have specified above. You can use different subdirectories and change them via MQTT. That way, you can have a folder with art images and one with vacation photos and quickly change when you have dinner guests!
Recommended setting
Either leave empty or specify your most frequently used subdirectory, e.g. “nature”.
You can change this setting with an MQTT message to “picframe/directory” and the subdirectory as payload like “nature”. If you send an empty payload like “”, you will be back taken back to “pi/pictures”. More here.
Play recent images first after a reshuffle
Name of parameter
recent_n: 7 # default=7 (days), when shuffling file change date more recent than this number of days play before the restWhat this parameter does
Whenever you add or delete images to your pictures folder, or start PictureFrame, the playlist will be reshuffled.
“recent_n” will play the newest ones first (based on the Exif date). Set this number to “default=10” if you want to show the images from the last 10 days first or “0” if you want to turn this functionality off.
Recommended setting
I set it to “0”.
Times through before reshuffling
Name of parameter
reshuffle_num: 1 # default=1, times through before reshufflingWhat this parameter does
When PictureFrame is launched it looks at all the images in your folders and creates a random playlist.
If you want this list to be reshuffled every time a full image cycle has been completed, set it to “1”. If you’re going to repeat the same random playlist several times, set it to “x” with “x” being the number of times the same sequence is being shown.
According to Paddy, this is one of those examples where ‘random’ isn’t the best option. If you have 1,000 images in a slideshow then there is a 50% chance that one of the last 22 images before the shuffle will appear in the first 22 images after the shuffle. Much better to keep the sequence for several run-throughs, in which case there is a 0% chance that any of the last 978 images will appear in the first 22.
Recommended setting
I set it to “10”.
Time between images
Name of parameter
time_delay: 200.0 # default=200.0, time between consecutive slide starts - can be changed by MQTTWhat this parameter does
This defines how long an image is being displayed in seconds.
Recommended setting
200. I found this value to be ideal. It’s not too fast and it’s not too long. So just right.
You can change this setting with an MQTT message to “picframe/time_delay” and the value as payload.
Transition time
Name of parameter
fade_time: 10.0 # default=10.0, change time during which slides overlap - can be changed by MQTT"What this parameter does
This defines the length of transition from one photo to the other in seconds. Having this at 10 seconds creates a sort of suspense each time you watch an image change and will make you guess what comes next for a few seconds. It must be larger than 0.0
Recommended setting
“I set it to 10”. If you are using a 4K screen, a value of 3 seconds seems to be like a value of 10 with a smaller screen.
You can change this setting with an MQTT message to “picframe/fade_time” and the value as payload.
Shuffle playlist
Name of parameter
shuffle: True # default=True, shuffle on reloading image files - can be changed by MQTT"What this parameter does
This is the same as a music playlist. I guess you don’t want to see your photos in a static order, so “True” randomizes the playback sequence. If you want a particular order, see below.
Recommended setting
True
You can change this setting with an MQTT message to “homeassistant/switch/picframe_shuffle/set” and the value “ON” or “OFF” as payload.
Sorting
Name of parameter
  sort_cols: 'fname ASC' # default='fname ASC' can be any columns in the table
                         # with optional ASC or DESC separated by commas
                         # fname, last_modified, file_id, orientation, exif_datetime, f_number,
                         # exposure_time, iso, focal_length, make, model, lens, rating,
                         # latitude, longitude, width, height, title, caption, tags,
                         # is_portrait, location
What this parameter does
PictureFrame allows you to sort your image playback on all kinds of database fields either ascending or descending.
“fname” is the file name, the rest should be rather self-explanatory. Use “ASC” for ascending and “DESC” for descending order.
Recommended setting
Completely up to your use case.
Exif and IPTC data
Name of parameters
  image_attr: [                           # image attributes send by MQTT, Keys are taken from exifread library, "PICFRAME GPS" is special to retrieve GPS lon/lat, "PICFRAME LOCATION" is special to retrieve geo reverse (load_geoloc hast to be True)
    "PICFRAME GPS",
    "PICFRAME LOCATION",
    "EXIF FNumber",
    "EXIF ExposureTime",
    "EXIF ISOSpeedRatings",
    "EXIF FocalLength",
    "EXIF DateTimeOriginal",
    "Image Model",
    "IPTC Caption/Abstract",
    "IPTC Object Name",
    "IPTC Keywords"]
What these parameters do
This is the list of metadata that is being extracted from your images and stored in your local database.
Recommended setting
Nothing to see here, please keep on walking.
Geolocation
Name of parameters
  load_geoloc: False                      # get location information from open street map NB if you switch this on (recommended)
  geo_key: "this_needs_to@be_changed"     # then you **MUST** change the geo_key to something unique to you
                                          # i.e. use your email address
  locale: "en_US.utf8"                    # "locale -a" shows the installed locales which could used
  key_list: [
    ["tourism","amenity","isolated_dwelling"],
    ["suburb","village"],
    ["city","county"],
    ["region","state","province"],
    ["country"]]
What these parameter do
These lines activate the reverse geocoding module. Images that contain GPS metadata will be translated into places, streets, cities, and countries. You can display this information permanently or on-demand with an MQTT message.
“locale” defines the language used for the geo information for the name of countries and regions.
“key_list” is nothing that you should change.
Recommended settings
To turn on geolocation set “default=True” and enter a unique name like your email address. You can read all about this very powerful module here.
Database file
Name of parameter
db_file: "~/picframe_data/data/pictureframe.db3" # database used by PictureFrameWhat this parameter does
This is the location of the database file. If ever you encounter issues, it may be helpful to delete this file. It will be rebuilt during the next program launch.
Recommended setting
Leave it as it is.
Portrait Pairs
Name of parameter
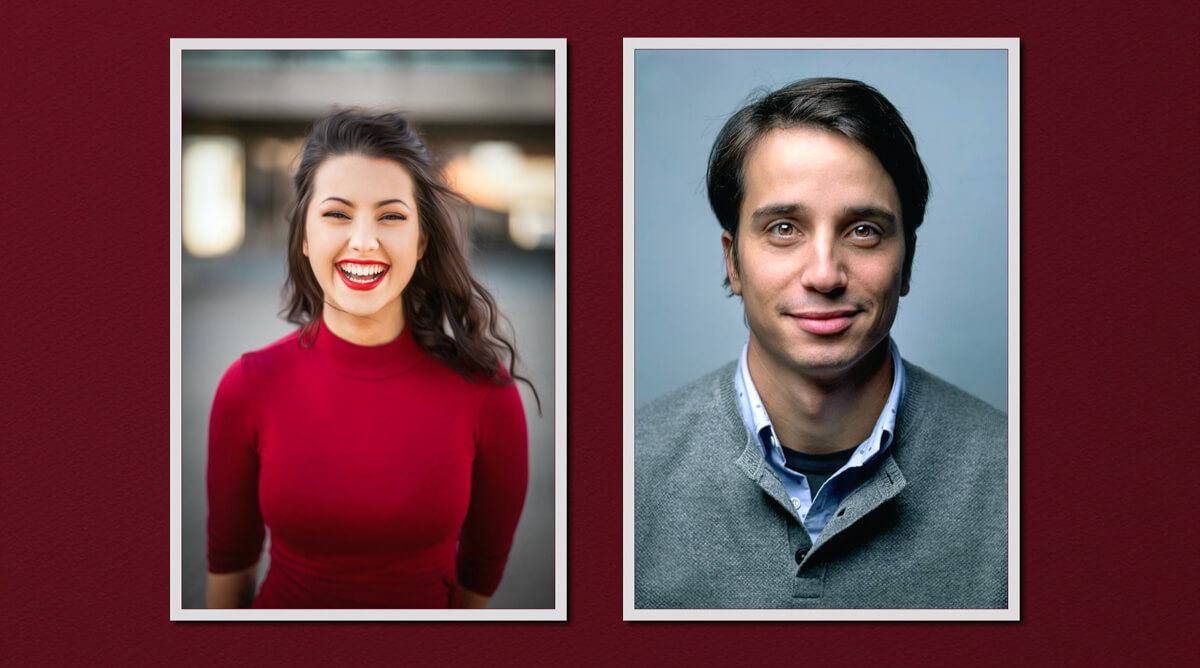
portrait_pairs: FalseWhat this parameter does
When your photo frame is hanging in landscape orientation but your photos are in portrait mode, you can display two photos next to each other.
Recommended setting
As you like it.
Log and Keyboard
Name of parameters
  log_level: "WARNING"  # default=WARNING, could beDEBUG, INFO, WARNING, ERROR, CRITICAL
  use_kbd: False        # default=False, just for debug or console start. Crashing when started with systemd
What these parameter do
This setting is included for debugging.
Recommended setting
Nothing to change here.
Using MQTT to remote control parameters
Name of parameters
mqtt:
  use_mqtt: False                 # default=False. Set True true, to enable mqtt
  server: "your_mqtt_broker"      # No defaults for server
  port: 8883                      # default=8883 for tls, 1883 else (tls must be "" then !!!!!)
  login: "name"                   # your mqtt user
  password: "your_password"       # password for mqtt user
  tls: "/path/to/your/ca.crt"     # filename including path to your ca.crt. If not used, must be set to "" !!!!
  device_id: "picframe"           # default="picframe" unique id of device. change if there is more than one PictureFrame
What these parameter do
This is one of my favorite features of PictureFrame: The ability to remote control certain parameters with MQTT messages. To use it you will either have an MQTT broker installed or use a cloud-based one like Eclipse of CloudMQTT. If that is the case, set it to “True” and enter your MQTT broker IP. Most of the time, you don’t need a login nor password.
The device is relevant if you have more than one picture frame that you want to control.
Recommended setting
Just enter the IP address of your MQTT broker and set “default=True” if you use this function. I recommend the installation of the Mosquitto MQTT broker on your digital picture frame instead of using a cloud-based service. The installation is one line only.
mqtt:
  use_mqtt: True
  server: "localhost"      # If you have Mosquitto installed on your digital frame
  port: 1883
  login: ""
  password: ""
  device_id: "picframe"
Light Webserver
Name of parameters
http:
  use_http: False                         # default=False. Set True to enable http NB THIS SERVER IS FOR LOCAL NETWORK AND SHOULD NOT BE EXPOSED TO EXTERNAL ACCESS
  path: "~/picframe_data/html"            # path to where html files are located
  port: 9000                              # port used to serve pages by http server < 1024 requires root which is *bad* idea
  use_ssl: False
  keyfile: "path/to/key.pem"              # private-key
  certfile: "path/to/cert.pem"            # server certificate
What these parameter do
PictureFrame 2021 now includes a light webserver which sends transfer the “currently playing” photo to Home Assistant.
Recommended setting
If you are not using the Home Assistant integration, you can leave it as “False”.
If you are using it, the setting below work fine for an unsecured connection.
http:
  use_http: True
  path: "~/picframe_data/html"
  port: 9000
  use_ssl: False
  keyfile: ""
  certfile: ""
Conclusion
I hope this list is useful to navigate the configuration.yaml file and to get exactly the effect you want from Pi3D PictureFrame.
If you have any questions, let me know!
Was this article helpful?
Thank you for your support and motivation.
Related Articles
- How to automatically resize images to fit your digital picture frame
- Personalizing Pi3D PictureFrame: How to localize your photo geodata in any language
- How to automatically remove duplicate images from your Pictures folder (2024 Edition)
- How to only show portrait photos on your Raspberry Pi photo frame