Do you want to email a picture from your phone to your digital picture frame at home? And allow friends & family to do the same?
Here is a simple solution using a free dedicated Google Gmail account and a Python script running on your digital picture frame.
Once installed, every person who has the email address of your frame and adds the secret hashtag in the subject line can send you images that will be automatically added to your photos repository.
Start here instead: the 2022 update. That article does the same job with a maintained tool rather than a hand-written script, and it is the one I keep current.
The reason is the “Allow less secure apps” step further down. I flagged in April 2022 that Google had announced it was going away. It is now gone — the setting has been removed from Google accounts entirely, so that step cannot be followed at all, and signing in to Gmail with your ordinary account password over IMAP is refused. What replaces it is an App Password on an account with 2-Step Verification switched on. I have corrected the step below to say so, but I have not re-run this old script against Gmail since, so if you want the route I know works, use the 2022 update.
Simple is as simple does
Regularly adding images to the collection on your digital picture frame is a crucial ingredient to enjoying the experience every day a bit more.
I have described a solution to share your digital picture frame image folder with family & friends using Resilio Sync. But sometimes even this is too much hassle, and you want an even simpler solution.
This is why it is helpful to have alternative ways to add images that are both fully automated and require no maintenance.
One approach is to send one or several images to a dedicated digital picture frame email account. The emails have to be marked with a secret hashtag, and only emails with a valid hashtag are scanned. The photos will then be downloaded and added to your frame – without you having to do a thing.
Following this scan, all emails are being moved to a “Processed” folder, including those that did not have a matching hashtag – keeping your inbox always tidy.
I chose not to delete emails but move them to another folder instead because it makes debugging easier should there be any issues. As Gmail grants 15 GB of storage quota, you are unlikely to run out of space.
The following instructions assume that you have read the article “How to set up your Raspberry Pi for your digital picture frame“.
Create a Gmail account and set it up for your frame
Go to Gmail and create a new Email account. Always remember to use a random, unique, and long password.
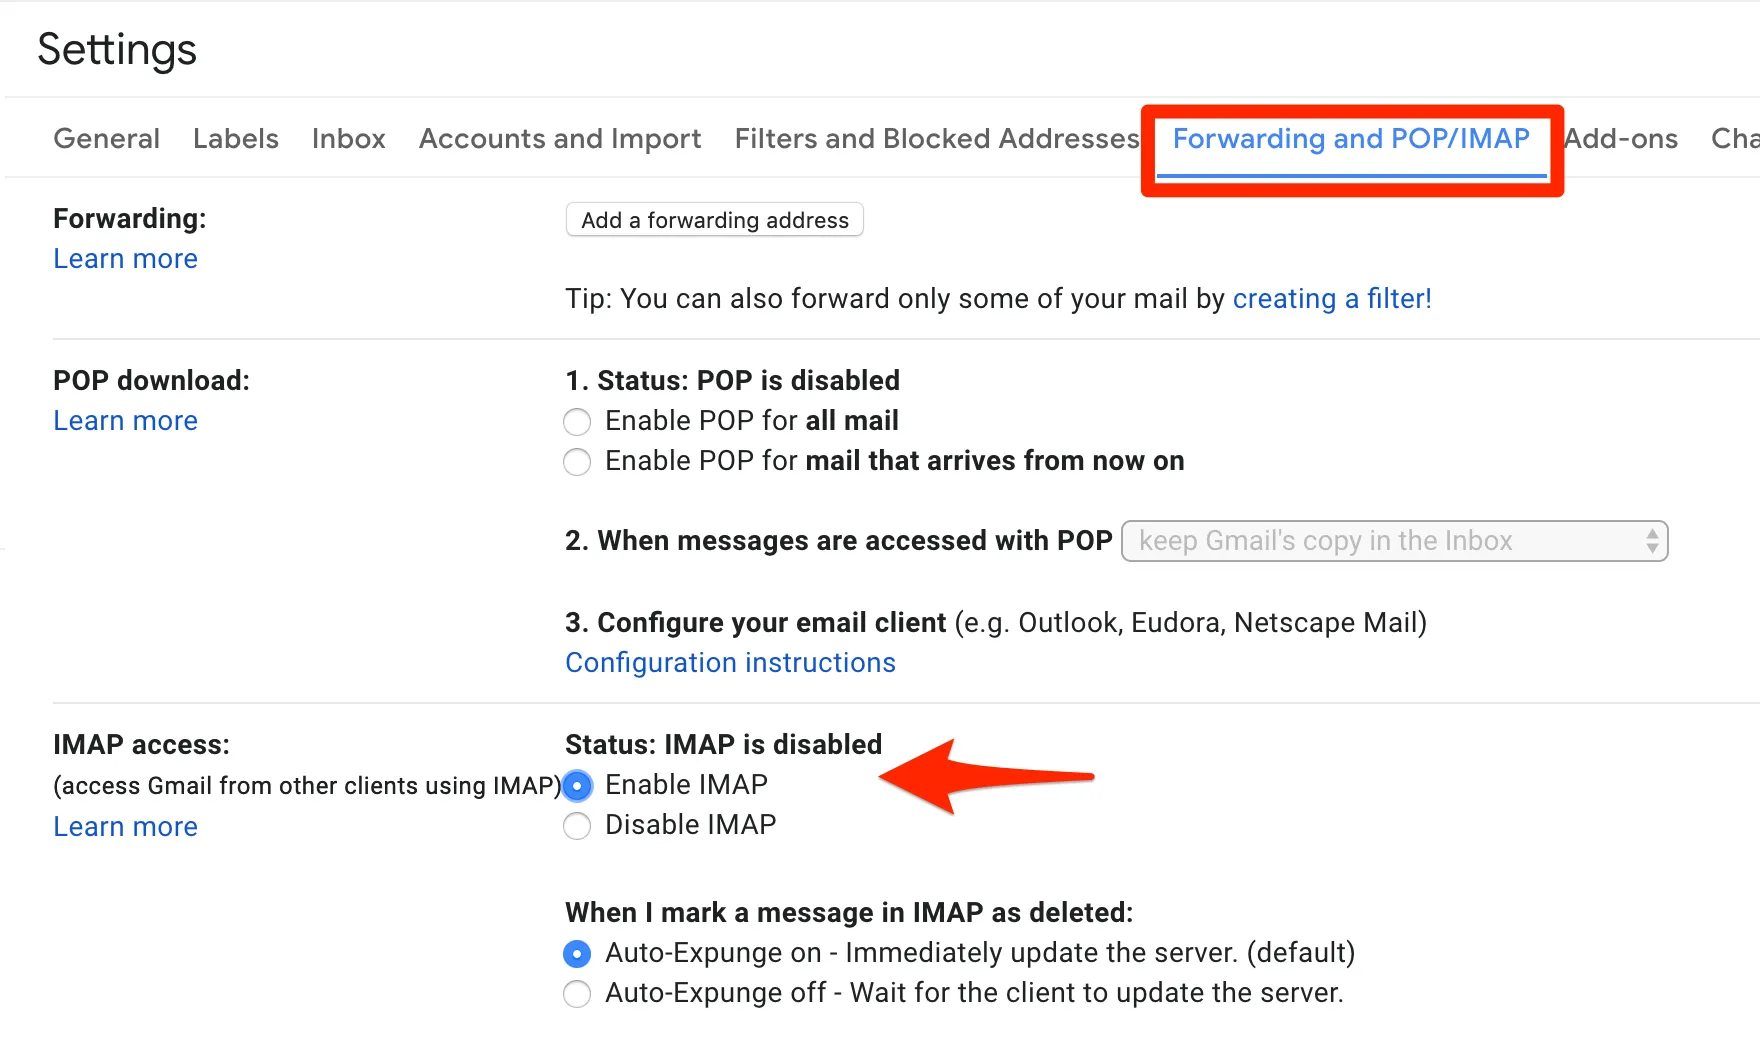
When you are done, log into your account. The first thing we need to do is to activate IMAP. Under the gearwheel, go to “Settings” and enable IMAP.
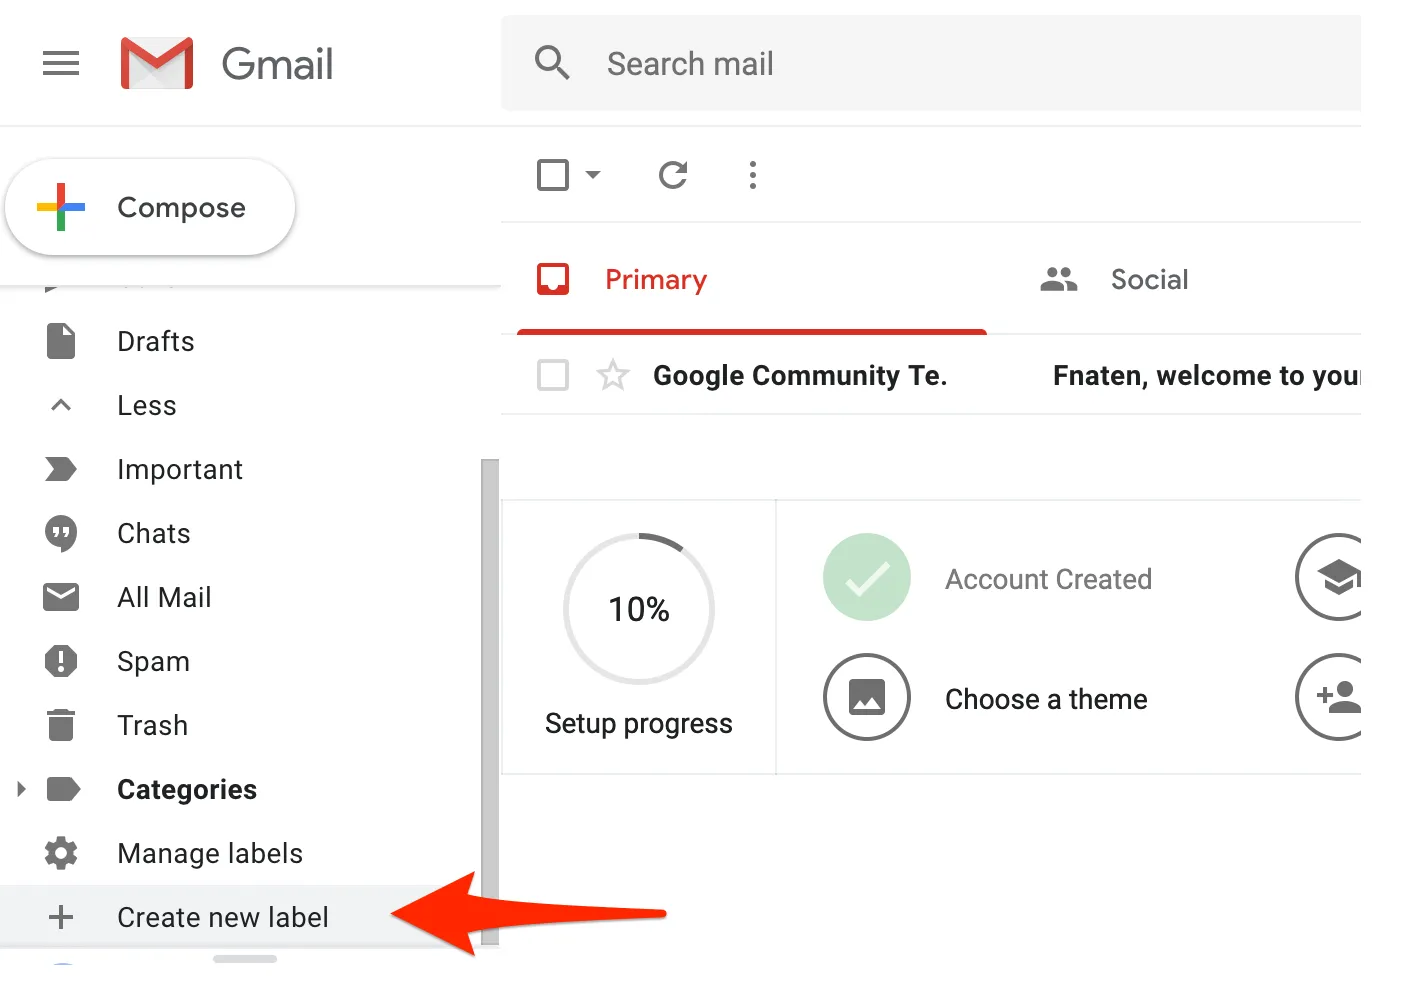
Next, create a label (this is what folders are called in Gmail) and call it “Processed”.
Third, give the Raspberry Pi a way to sign in.
This is the step that has changed. The screenshot below shows the old “Allow less secure apps” switch; Google has removed that setting, so there is nothing left to switch. Instead:
- Turn on 2-Step Verification on the account (Google Account → Security).
- Then create an App Password for it (Google Account → Security → App passwords). Google shows you a sixteen-character string once.
- Use that string, not your normal account password, as
passwdin the script below.
App Passwords only exist on accounts that have 2-Step Verification, which is why the order matters.
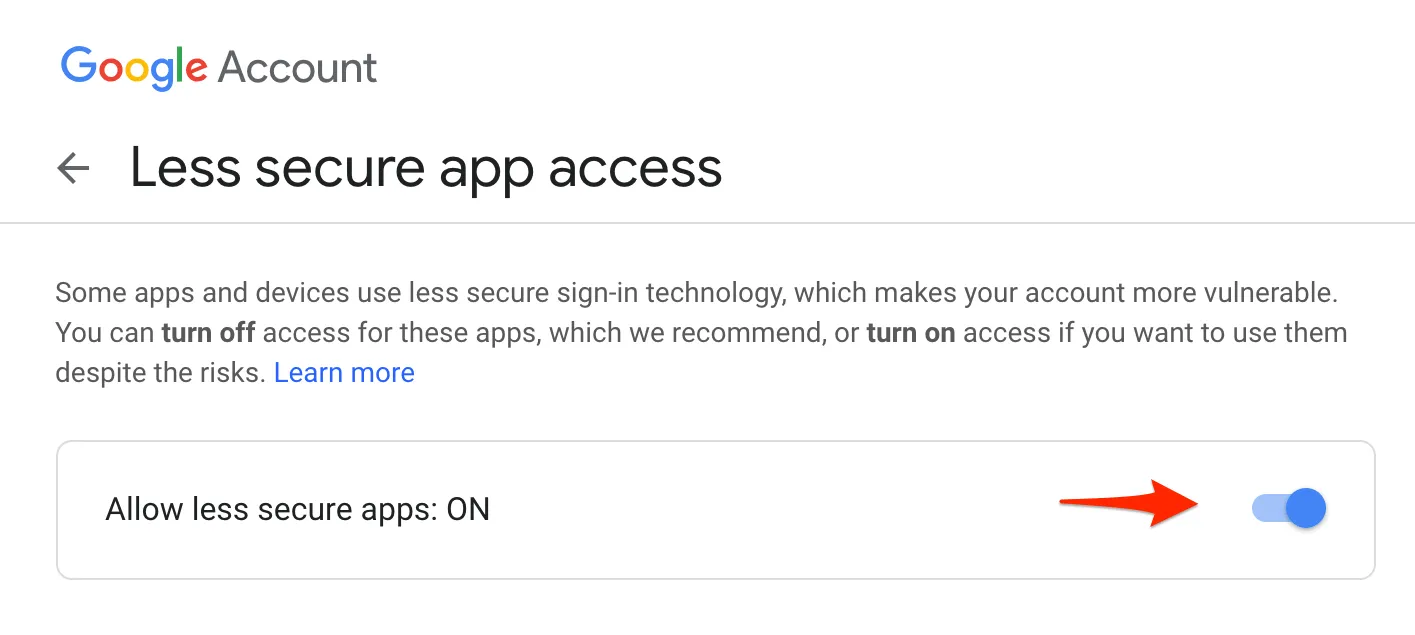
(Screenshot kept for the record. That setting no longer exists.)
And last, send an email from your new digital picture frame email account to your standard email address and reply. This seems to be helpful to show Google at least once that you are not a robot as your digital picture frame email will only receive emails in the future.
That’s it. You have now configured your digital picture frame’s email address.
The Python script to download the images
The Python script does the following:
It checks your Gmail account if you have any new emails. If there are new emails, it will verify if the subject line includes your secret hashtag like “#mypictures”. The hashtag can be anywhere in the subject line.
If new mails with the secret hashtag are being found, the script will check to see if there are any images and will download them into a folder called “attachments” in the Pi home directory. Several images can be included in one email, and all are downloaded.
Just tell your friends & family to send the photos with the highest resolution setting and to not resize them in the email program. That way, you will have the best photo quality in your digital picture frame.
Copy and paste the following code into a new Python file called get_images_from_emails.py.
#!/usr/bin/env python3
# read emails and detach attachment in attachments directory

import email
import getpass, imaplib
import os
import sys
import time

detach_dir = '.'
if 'attachments' not in os.listdir(detach_dir):
    os.mkdir('attachments')

userName = 'enter-your-gmail-account-name-here'
passwd = 'enter-your-16-character-app-password-here'

try:
    imapSession = imaplib.IMAP4_SSL('imap.gmail.com',993)
    typ, accountDetails = imapSession.login(userName, passwd)
    if typ != 'OK':
        print ('Not able to sign in!')
        raise Exception

    imapSession.select('Inbox')
    typ, data = imapSession.search(None, 'SUBJECT', '"#mypictures"')
    if typ != 'OK':
        print ('Error searching Inbox.')
        raise Exception

    # Iterating over all emails
    for msgId in data[0].split():
        typ, messageParts = imapSession.fetch(msgId, '(RFC822)')

        if typ != 'OK':
            print ('Error fetching mail.')
            raise Exception

        emailBody = messageParts[0][1]
        mail = email.message_from_bytes(emailBody)

        for part in mail.walk():

            if part.get_content_maintype() == 'multipart':

                continue
            if part.get('Content-Disposition') is None:

                continue

            fileName = part.get_filename()

            if bool(fileName):
                filePath = os.path.join(detach_dir, 'attachments', fileName)
                if not os.path.isfile(filePath) :
                    print (fileName)
                    print (filePath)
                    fp = open(filePath, 'wb')
                    fp.write(part.get_payload(decode=True))
                    fp.close()

    #MOVING EMAILS TO PROCESSED PART BEGINS HERE
    imapSession.select(mailbox='inbox', readonly=False)
    resp, items = imapSession.search(None, 'All')
    email_ids = items[0].split()
    for email in email_ids:
        latest_email_id = email

        #move to processed
        result = imapSession.store(latest_email_id, '+X-GM-LABELS', 'Processed')

        if result[0] == 'OK':
            #delete from inbox
            imapSession.store(latest_email_id, '+FLAGS', '\\Deleted')

    #END OF MOVING EMAILS TO PROCESSED

    imapSession.close()
    imapSession.logout()

except :
    print ('No attachments were downloaded')
A few notes:
Enter your Gmail account name (without “@gmail.com”) and your App Password in
userName = 'enter-your-gmail-account-name-here'
passwd = 'enter-your-16-character-app-password-here'
passwd is the App Password you generated above, not your Gmail password. Your Gmail password will be refused.
Change the download directory by modifying “attachments” in this line (e.g. ‘Pictures/show/gmail-import’)
os.mkdir('attachments')
and this line
filePath = os.path.join(detach_dir, 'attachments', fileName)
You can change your secret code word by editing
#mypictures
Make sure that you keep the single and double-quotes.
typ, data = imapSession.search(None, 'SUBJECT', '"#mypictures"')
Place the script into your Raspberry Pi home directory.
To call this script every hour, you have to modify your crontab file.
In Terminal enter
crontab -e
and add the following line in the editor:
0 * * * * /usr/bin/python3 $HOME/get_images_from_emails.py
Use absolute paths in crontab. cron runs with a minimal environment and does not start in your home directory, so the bare python3 get_images_from_emails.py this article used to show would simply not find the script.
Test your setup with a few emails (don’t forget the hashtag in the subject line) and see if it works as expected. You will find your images in the “attachments” folder in the Raspberry Pi home directory.
Conclusion
Are you ready for the next move?
To make this whole process of adding images even more convenient, newly arrived photos can be automatically verified and cropped to fit the aspect ratio of your digital picture frame. Then, they will be moved to a directory based on the EXIF date the photo was taken.
This automation will be the subject of a forthcoming article.
One more note, September 2026: on a Pi 4 or Pi 5 running picframe3, whatever folder the attachments land in is watched, so a photograph that arrives by email is on the wall within seconds of being written to disk — no rescan, no restart. Point the download directory at your picture folder and that is all there is to it. The 2026 build guide covers the rest of the setup.
Was this article helpful?
Thank you for your support and motivation.