
If you want to reduce the power consumption of your digital picture frame to a minimum, you can use motion sensors that only power the screen when a carbon-based life form (including your dog or cat) is detected.
In this article, I will show you how to add a passive infrared (PIR) sensor to your digital picture frame project, including the hardware and software you need.
I will also discuss some limitations of motion sensors so that you can decide if they suit your use case.
This article has been updated for Raspberry Pi OS Bookworm. Thank you to reader David, who ported the code to the latest version!
The key difference was turning the screen on/off, which has changed in Bookworm. See here for further background.
What is a motion sensor?
A motion sensor detects moving objects using different approaches and technologies. The most obvious example is a sliding door that opens when you approach. However, motion sensors are also used in hand dryers that sense your hand movement, home alarm systems, and many other devices you probably use daily.
There are active and passive motion sensors and tomographic, microwave, and ultrasonic sensors for different types of tasks and precision.
The most widely used type in home systems is the passive infrared (PIR) sensor. A PIR sensor is designed to detect the infrared radiation, i.e. the heat pattern, emitted naturally from a human body.
PIR sensors are a favorite among Raspberry Pi home brewers as they allow many exciting use cases.
If you are interested in learning more about the technology, you can read about it on the Adafruit website or watch Andreas Spiess’ video below.
Motion sensors in digital picture frames
The integration of motion sensors into digital picture frames is quite popular. This way, you can ensure that the screen is turned on only when a person is actually looking at the frame—or at least a person in the room who may be looking at the photos—or your dog who is looking for you.
Many off-the-shelf photo frames include motion sensors, like the Nixplay series, the Netgear Meural Canvas II, or the FRAMEN Player. Normally, they are easy to spot on the frame.
So let me show you how to add a PIR motion sensor to your do-it-yourself photo frame project.
The PIR infrared sensor
PIR motion sensors are very cheap, at around 3€/$. As they are such low-value items, they are often resold in packs of three or five. I would suggest that you pick a pack of three, as the sensors don’t seem to be of very high built quality and may be dead on arrival in some cases, if you believe the comments section on Amazon. Or people just got the wiring wrong.
I ordered a PIR sensor because a Canadian reader of this blog had issues with his instructions and asked for help. Given how cheap they are, I thought this would be a good opportunity to try and document the steps to get it going with a digital frame setup.
When it comes to choosing the right sensor for you, I recommend again one of Andreas’ videos, in which he also introduces recent new PIR sensor form factors.
I got myself the HC-SR501, which seems to be the basic pleasure model of PIRs. There are various manufacturers for the same thing. Mine was from DAOKI.
There are two types: a lengthy one, which is much smaller, and a square one. Both do the job. Which one you take depends on your hardware installation and the space that you have available.
When it arrived, I was surprised at how big the sensor, i.e., the white housing, actually was.
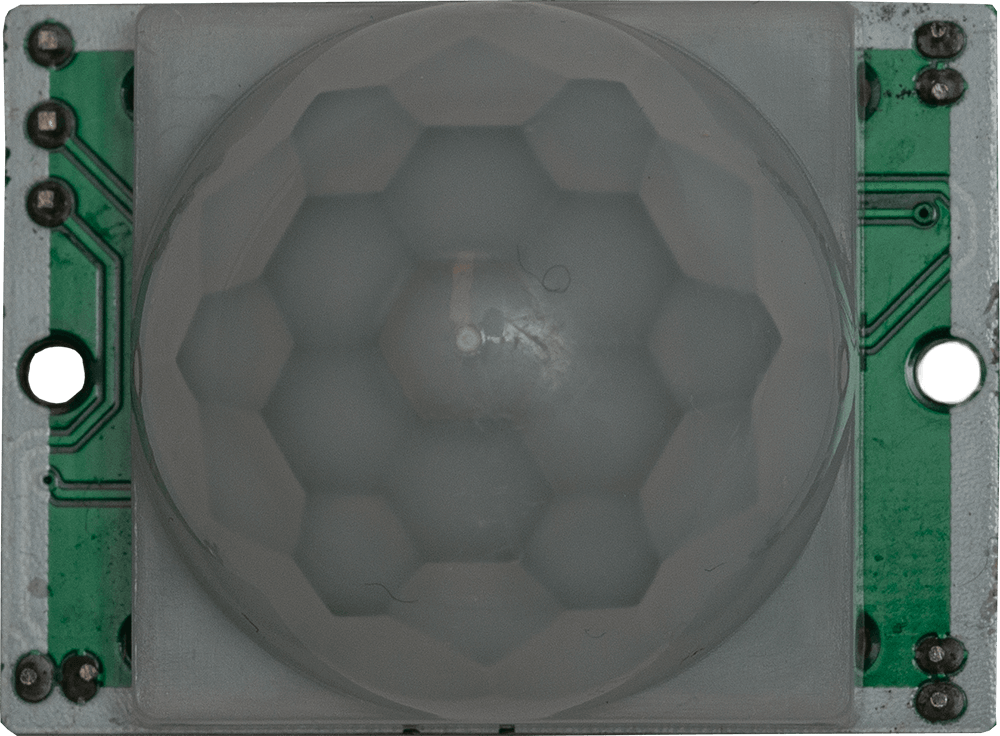
The white dome is over a square centimeter in size. The sensor itself is much smaller, but it needs the little dome to spread the infrared rays evenly in all directions.
If you want to integrate a PIR sensor into your photo frame, you should opt for the lengthy version, which has a much smaller dome.
What else do you need
You also need a cable called “Dupont Wire” with female connectors on both ends that you slide on the pins of both the Raspberry Pi and the PIR sensor.
This cable needs to be long enough to reach from where you choose to install the motion sensor, often in the middle of the bottom part of the frame, to where you have your Raspberry Pi installed. So don’t get it too short. You need three of them.
The PIR sensor is connected to the Raspberry Pi on the GPIO pins. These are the 2×20 pins on your Raspberry Pi board, no matter which full-size Pi version you have. If you have the Raspberry Pi Zero, you will need this.
The PIR sensor comes without a datasheet, but for the model I am using, you can download it here.
How to connect cables to the PIR sensor
The PIR sensor has three pins. On the HC SR-501 they are:
- VCC (5 Volt Power)
- OUT (Control Channel)
- GND (Ground)
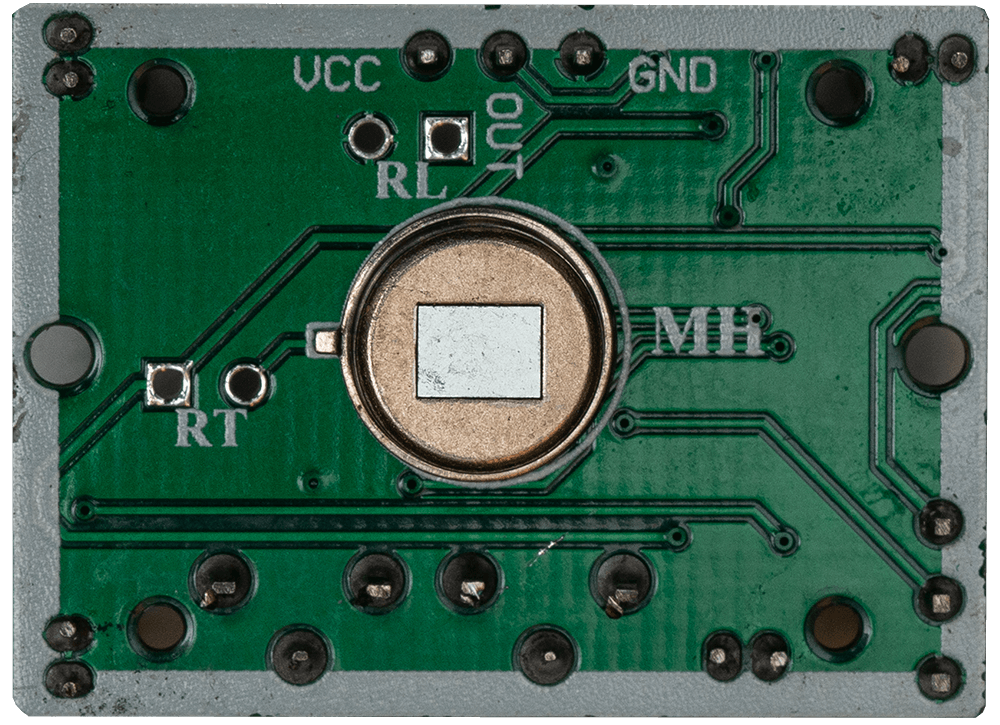
Important note: I have seen PIR sensors where this order was inverted, so always get a data sheet for your particular sensor or look closely at the circuit board. In my case, I had to take the dome off to see the labeling.
I read that if you get it backwards, you won’t damage the PIR sensor, but it won’t work, but I can’t vouch for this!:
Ideally, you have a black, a red, and a green-colored wire. Connect the black one to GROUND, the red to VCC, and the green one to OUT. These are the standard colors often used and will help you not mix up the pins.
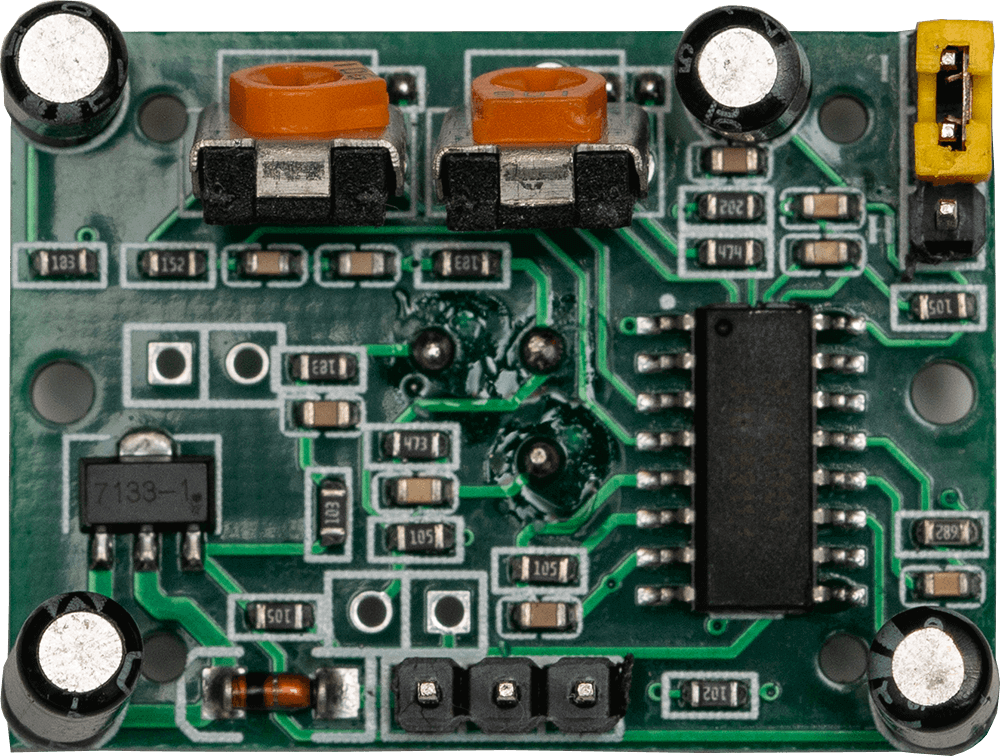
Two potentiometers on the sensor circuit board control the time delay and the sensitivity. Check on your data sheet which one is which.

In our case, the time delay will be controlled with our script but you may adjust the sensitivity settings according to your needs.
How to connect cables to the Raspberry Pi GPIO pins
The GPIO connectors are used for any non-USB or HDMI outside connection. They are great for attaching buttons, cameras, or LEDs to build robots, surveillance devices, and other kinds of gadgets.
Note: Reader René has pointed out that the GPIOs are addressed differently when using a Raspberry Pi 5. This article explains this more.
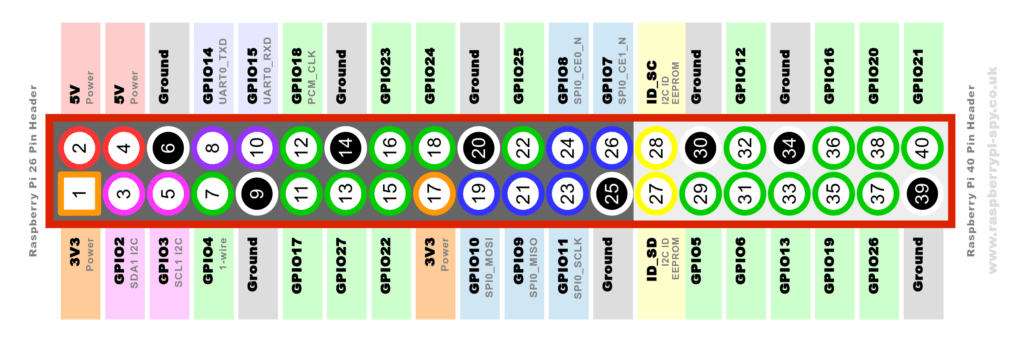
Matt Hawkins has an excellent photo on his website, which makes it very easy to understand:
If you want to read more about the GPIO pins, the official Raspberry Pi site has got you covered.
Power down your Raspberry Pi, remove the power supply, and attach the cables coming from the sensor like this:
Connect the red VCC cable to the 5 Volt power Pin 2, the black GROUND cable to ground Pin 6, and the green cable to the control Pin 11.
Power it up again and do a test run. Connect to your Pi via Terminal and enter
sudo nano testpir.pyCopy and paste the following lines into the editor window:
#!/usr/bin/python

import time
import datetime
from gpiozero import MotionSensor

pir = MotionSensor(17) #GPIO number here

while True:
    pir.wait_for_motion()
    if pir.motion_detected:
        print("Somebody is moving")
        print (datetime.datetime.now())
        time.sleep(0.1)
Hit CTRL+O to save the file and CTRL+X to exit.
Turn the PIR sensor away from you and enter
python3 testpir.pyNow wave your hand in front of the sensor.
The Terminal window should now display “Somebody is moving!” and the current time.
If everything works, hit CTRL-C to stop the script execution and skip the next paragraph.
Note: You may want to use the testpir.py script again later to fine-tune the PIR sensor’s sensitivity settings.
If it doesn’t work at first..
As always, there can be several reasons.
- Check the wire connections on the Raspberry Pi side.
- Check the pins on the PIR sensor. You may have a model where the Pins are inverted. In that case, swap the red and the black cable.
- Check the Python script. Is there any error message in the Terminal?
The Python script to turn your monitor on and off depending on human movement
We only need one simple Python script that will run in a loop.
First, install the Rpi.GPIO library into the virtual environment:
source venv_picframe/bin/activate

pip install RPi.GPIO
Create a new file with
sudo nano motionsensor.pyCopy and paste the following lines into the editor window:
#!/usr/bin/python

import sys
import time
import RPi.GPIO as io
import subprocess

io.setmode(io.BOARD)
DARK_DELAY = 360 #this is where you define after how many seconds you want the display to go dark when there is no motion detected
PIR_PIN=11 #if you connect to another pin, specify here

def main():
    io.setup(PIR_PIN, io.IN)
    turned_off = False
    last_motion_time = time.time()
    while True:
        if io.input(PIR_PIN):
            last_motion_time = time.time()
            sys.stdout.flush()
            if turned_off:
                turned_off = False
                turn_on()
        else:
            if not turned_off and time.time() > (last_motion_time + DARK_DELAY):
                turned_off = True
                turn_off()
            if not turned_off and time.time() > (last_motion_time + 1):
                time.sleep(.1)

def turn_on(display=":0.0", output="HDMI-A-1", mode="3840x2160"):
    try:
        command = f"DISPLAY={display} wlr-randr --output {output} --mode {mode} --on"
        subprocess.call(command, shell=True)
        print(f"Monitor {output} turned on successfully on display {display}.")
    except Exception as e:
        print(f"An error occurred: {e}")

def turn_off(display=":0.0", output="HDMI-A-1"):
    try:
        command = f"DISPLAY={display} wlr-randr --output {output} --off"
        subprocess.call(command, shell=True)
        print(f"Monitor {output} turned off successfully on display {display}.")
    except Exception as e:
        print(f"An error occurred: {e}")

if __name__ == '__main__':
    try:
        main()
    except KeyboardInterrupt:
        io.cleanup()
Hit CTRL+O to save the file and CTRL+X to exit.
Now start the script with
python3 motionsensor.pyand hopefully, it works!
Running the motion sensor script as a service
I recommend autostarting this script as a service with systemd rather than using crontab. You can read more about this approach in my article here.
Then, open a new file with
sudo nano /etc/systemd/system/motionsensor.serviceAn empty editor window will come up. Copy and paste this text into the window:
[Unit]
Description=MotionSensor Service
After=multi-user.target

[Service]
Type=idle

User=pi
ExecStart=/home/pi/venv_picframe/bin/python3 /home/pi/motionsensor.py

Restart=always
RestartSec=60

[Install]
WantedBy=multi-user.target
Save the file and change the permissions to make it readable by all.
sudo chmod 744 /etc/systemd/system/motionsensor.serviceAs the last step, you must tell the system that you have added this file and want to start the service every time your Raspberry Pi boots up.
sudo systemctl daemon-reload
sudo systemctl enable motionsensor.service
Reboot your Pi and check with
ps -ef | grep pythonif the process is running as expected.
Limitations of PIR sensor motion detectors
Although motion detectors are often called “presence detectors”, that’s not what they do. A PIR sensor motion detector requires movement (and heat).
If you enter your living room, sit on the couch and calmly read with a Kindle with only a gentle tapping of your fingers, a digital picture frame with a motion detector on the other side might forget that you are there.
But its usefulness depends on your particular use case.
For example, it makes a lot of sense for a Magic Mirror installation as you stand right in front it to read messages or calendar appointments.
But with a digital picture frame, this may not be so reliable, as you are often looking from a distance. But I may be completely wrong as the leading manufacturer of digital picture frames, Nixplay, includes them with all its frames, so there is customer demand for it. And whatever helps to lower the power consumption of electronic devices without making it inconvenient is great.
By the way, if you want to increase the precision of your sensors and reduce the number of false positives, you can combine two of them with an AND command.
Conclusion
So there you have it, a low-cost and easy-to-install motion sensor for your DIY photo frame. You may want to fine-tune the sensor sensitivity with the variable resistor to make it trigger the screen commands exactly as you want them.
Let me know what your experiences with motion sensors are!
Was this article helpful?
Thank you for your support and motivation.