
I was looking for a solution to repurpose an old laptop as a picture frame when I discovered this blog.
The article about building your own picture frame caught my attention and I dug deeper.
In this guest post, I will show you how I built the hardware and how I modified the image viewer software Pi3D to display the location where the photo was taken. I have over 30,000 pictures in my photo frame, so this feature is very convenient!
Note from the editor: When Victor wrote this article, Pi3D PictureFrame didn’t yet have the reverse geocoding features that were introduced in March 2021. The description below also works, but it got a lot easier with the latest Pi3D PictureFrame release.
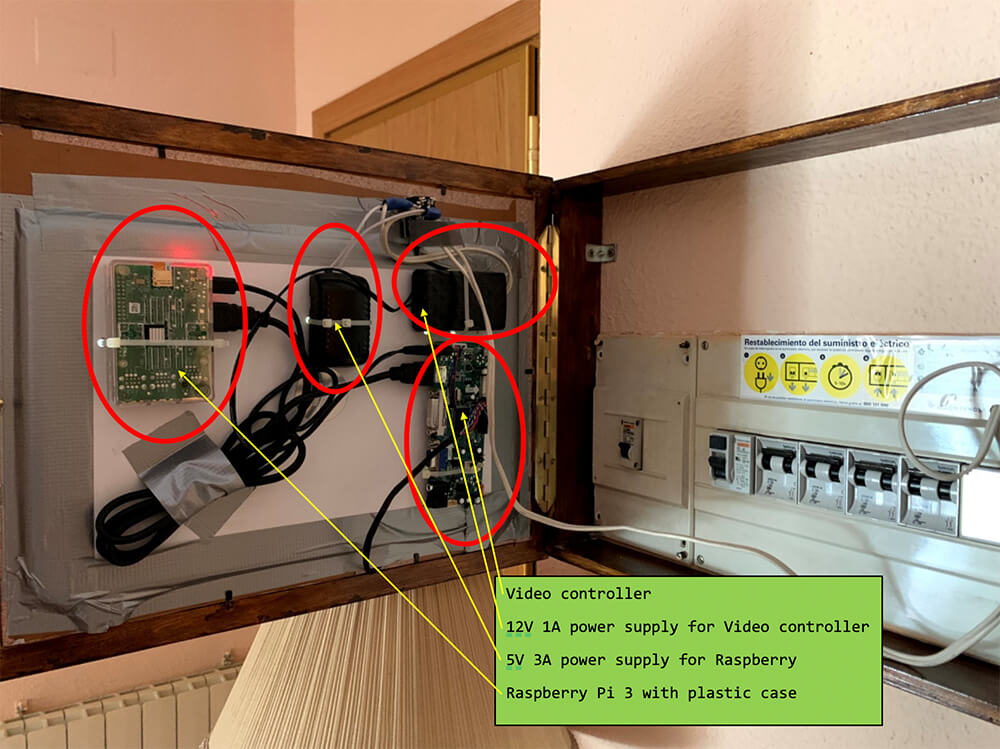
Hardware that I used
Tested with: Raspberry Pi 3, Raspberry Pi OS Buster
The hardware part is not too complicated. You may even have a lot of material lying around.
- I used an old LED/LCD panel from a laptop. I kept the whole laptop lid (contrary to removing the bare panel) as a convenient rigid frame/back support.
- Then I bought a screen controller for the panel. They are easy to find on eBay or Amazon. It is important to have the LCD panel reference number to find the right one. You also need a 12V/1A power supply for the controller.
- I used a Raspberry Pi 3 (but even the Pi 2 will work) with the usual 5V/3A power supply and a plastic case
- And finally, I found myself a frame to house all the elements.
In my case, I used the frame as a cover for the electrical switch panel.
An exciting feature in this configuration is that you have 220V readily available right behind your frame. There’s even a 12V AC source (used for the door buzzer), but I preferred to use 220V and commercial AC adaptors for the Raspberry Pi and panel.
So I killed two birds with one stone: I solved the “How to hide the power cable question“, and I found an excellent cover for an otherwise unsightly fuse box!
This is the setup:
In the end, I replaced the duct tape with a cleaner system, using brackets for wood wall panels.
Here is the front view:

Note the vintage power switch!
My Pi3D software modifications
After reading How I added crossfading slide transitions to my digital picture frame using Pi3D on this blog, I was convinced that using the Pi3d based PictureFrame.py script was the way to go. It offers smooth and nice transitions between photos, fills the gaps with a very nice blurred version of the photo, and has many other nice features.
But there were a couple of features that I wanted to have in my photo frame that was not covered by the PictureFrame: Geolocation, dealing with a large number of images (tens of thousands), and a restart from the last image.
Geolocation
I wanted to exploit the GPS tags embedded in photos that are stored as EXIF metadata. This would require: extracting the EXIF tags, converting them to decimal coordinates, and retrieving the geographical name, the so-called reverse geolocation.
You need to choose a suitable API/Web server. There are plenty available on the Internet, most of them are free of charge for domestic, low volume usage.
Since I was using Python, the Geopy wrapper library is a very convenient way to access several Geolocation services. You can find the full documentation here.
I found several providers but ended up using the GeoNames service to translate GPS coordinates into location names.
Stability with a large number of images
I have a big photo library with over 30,000 photos, which I keep in a network drive at home, using NAS and DLNA to access them from any device. So, they are not stored directly on the SD card of the Raspberry Pi.
I wanted my photo frame to read from that library, but the spot where the frame is (a fixed place as it has to cover the electrical switch panel) has very poor WiFi coverage. I certainly should solve that, but in the meantime, I needed to make the program more robust against network failures.
After all, the “trick” to make the program stable was to reset the inter photo timer right after the photo is securely loaded in graphic memory. This way, everything comes back in sync, and there is no race between the graphic engine and the file handling. The visible consequence is that some photos remain on screen longer than others, depending on random WiFi fluctuations, but that also adds a fun element.
You can, of course, sync your image folder between the photo frame and the NAS using a tool like rclone. This would avoid any WiFi issues slowing down the system.
Persistent file list
The Pi3D PictureFrame program creates a randomized playlist off all images list on startup and reads all EXIF data for the filter management via MQTT.
This is an excellent approach, but when the photo catalog is extensive, it can take a few minutes to start up, just building up the internal list. In fairness, this only happens after a fresh start of Pi3D, and there is no reason not to let it run for months without rebooting.
However, my Raspberry Pi 3 is not extremely stable. It could be the age, the power supply, or a corrupt SD card. So it has a tendency to crash, which results in a reboot and restarting the file list creation all over. Not only that, this way, but you also would never watch all the photos, as it only shows the first 1k or 2k, even with random shuffle (which is really “pseudo” random).
My solution was to make the internal file list persistent, writing it to a file that survives restarts. Another file keeps track of the last image shown plus some other data like time until re-checking the directories for changes. This way, when the program starts, it will immediately show the last image from a previous execution, provided the same config file name is used.
If you want to start over, just erase the config file, or use a different config file name, the program will automatically detect that and rebuild the list.
Mirror the photo of your picture frame
Using VNC, it is possible to mirror the Raspberry’s display on an iPad or similar and have a “satellite” photo frame.

Installing the software
The program, based on Paddy Gaunt’s Pi3D PictureFrame, is available on GitHub.
Install Pi3D with
sudo raspi-config nonint do_boot_behaviour B4 && sudo raspi-config nonint do_memory_split 128 && sudo raspi-configIn the raspi-config module, go to 7 Advanced Options > A8 GL Driver > Choose G1 (Legacy)
sudo pip3 install pi3d && wget https://github.com/pi3d/pi3d_demos/archive/master.zip && unzip master.zip && rm master.zip && mv pi3d_demos-master pi3d_demosGit-clone my Geolocation directly onto the Raspberry Pi.
mkdir FrameController && cd FrameController && git clone https://github.com/madvic2019/Raspberry-Photo-Frame.gitInstall Geopy:
sudo pip3 install geopyLaunch the program by typing
cd /FrameController/Raspberry-Photo-Frame
python3 FrameGeo.py
If you launch it without any argument it will start a slideshow with the images in the “examples” folder. You can disregard the “Error preparing geoname” messages in the Terminal.
If you want to add geolocation names you need to specify a GeoNames user name which you can get for free. Click on “login” to register a new account.

Wait for the email (mine was in the spam folder) and click on the activation button. Note your user name.
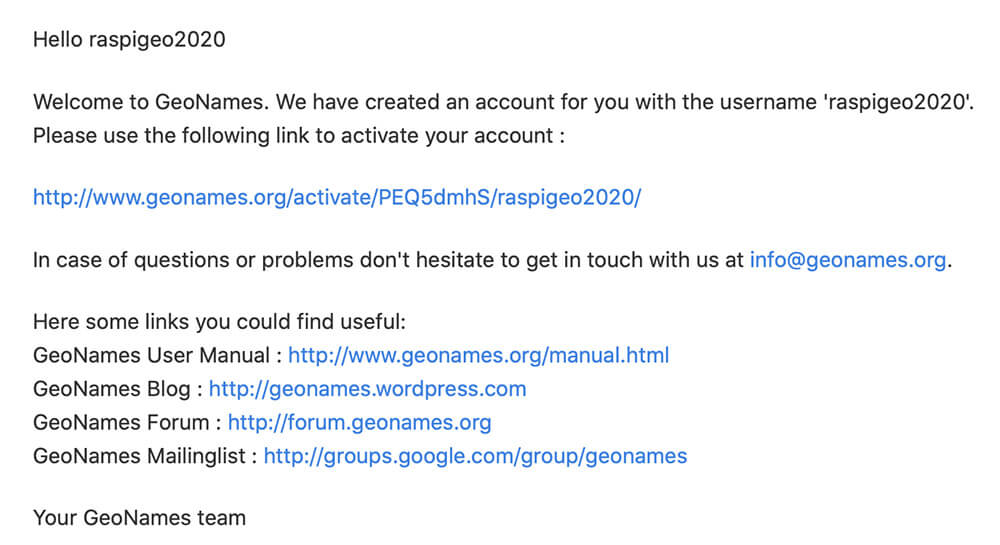
Go into your GeoNames account and activate placenames and webservices.

To test, enter
python3 Framegeo.py --geouser <your-GeoNames-user-name>The program has a lot of input options/parameters:
python3 FrameGeo.py [-h] [--config-file <file>] [--waittime <second>] [--shuffle True|False] [--geouser <user>] [--dir-check <seconds>] [ImagePath]So, for example
python3 FrameGeo.py --waittime 10 --shuffle True --geouser raspigeo2020 /home/pi/Pictures-h, --help show this help message and exit
--config-file CONFIG Configuration file holding list of image files (default /home/pi/.photo-frame)
--waittime <seconds> Amount of time to wait before showing the next image. (default 15 seconds)
--shuffle True|False Shuffle pictures list (Default True)
--geouser <username> User Name for GeoNames server (Default '', it won't retrieve geo names)
--dir-check <seconds> Interval between check directories (Default 3600 seconds)
ImagePath <path> Root directory where images will be found (default ./examples)The program has a hidden config file which memories the last image before the FrameGeo.py was stopped so it can resume at the same location. This is useful when you have thousands of images and want to see each of them first before the list is reshuffled.
After adding or removing images, you must delete this hidden file with
rm .photo-frame && rm .photo-frame.numConclusion
Building a digital photo frame is a hugely satisfying project. On this blog, you can find so many instructions that you can either just follow step-by-step, or build on, to create something unique just like you want it.
If you have any questions, please contact me through GitHub.
Was this article helpful?
Thank you for your support and motivation.
Related Articles
- How to show the place where your photo was taken with the Raspberry Pi digital picture frame geolocation feature
- How to automatically resize images to fit your digital picture frame
- Personalizing Pi3D PictureFrame: How to localize your photo geodata in any language
- How to automatically remove duplicate images from your Pictures folder (2024 Edition)