
Sometimes you experience issues with your digital picture frame and suspect that it may have something to do with your WiFi network’s signal quality.
Maybe you are currently experimenting with various locations for your digital picture frame. Still, before making the final decision, you want to check if the WiFi signal is good enough for the intended spot.
So have a look at wavemon, a tool that gives you lots of data to understand any WiFi issues better.
Wireless device monitoring with wavemon
wavemon is a wireless device monitoring software that allows you to watch signal and noise levels, packet statistics, device configuration, and network parameters of your wireless network hardware. It was written by Jan Morgenstern and is regularly maintained.
It allows you to display your WiFi signal strength in realtime.
Installation and start
You install wavemon with
sudo apt install wavemon -yAnd start it with
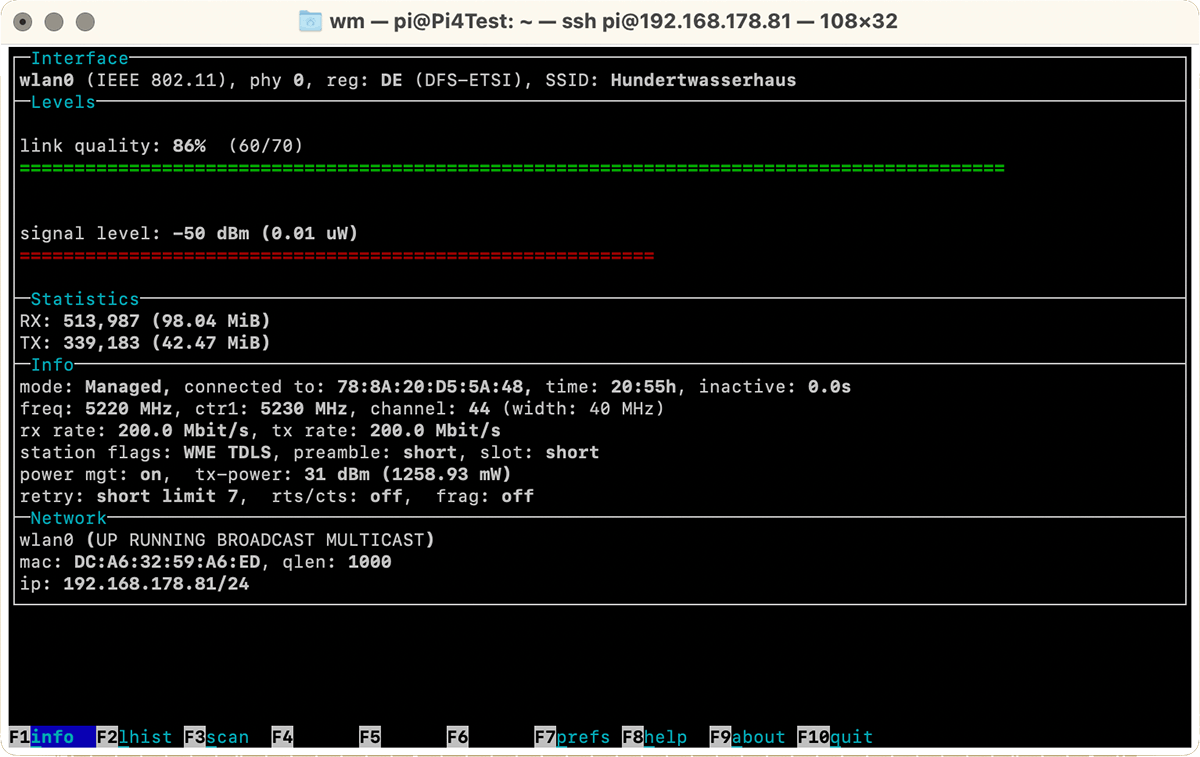
wavemonand a dashboard appears.
If you can’t see the function keys at the bottom, you need to make your Terminal window larger.
What the information means
Let’s quickly run through the data points that you want to look at to understand better the WiFi quality that your digital picture frame enjoys.
Signal strength
Basically, the higher the signal strength, the more reliable the connection and higher speeds are possible. The signal strength is specified as -dBm (decibels related to one milliwatt).
Values between 0 and -100 are possible, with more being better. So -51 dBm is a better signal strength than -60 dBm.
However, the value 0 is not realistic. Even -30 dBm is hard to reach, and you have to stand almost directly next to the access point.
Here is some guidance on how to read the results:
- 50 dBm is considered an excellent signal strength.
- 67 dBm is said to be the minimum signal strength for reliable and relatively fast packet delivery.
- 70 dBm is the minimum signal strength for reliable packet delivery.
- The minimum value for a basic connection is -80 dBm. However, packet delivery is no longer necessarily reliable.
- 90 dBm is already very close to the basic noise. Here a connection probably does not work anymore.
The values in the screenshot above in this article are from my digital frame in our living room. My Raspberry Pi 4 is in a Flirc case glued to the naked monitor in an aluminum frame up on the wall.
I was a bit anxious if this might deteriorate the WiFi signal quality too much, but after measuring with wavemon, a signal level of -50 dBm looked nothing to worry about.
Link quality
A network can be received with a very good signal strength but not so good link quality.
In simple terms, it means how much of the data you send and receive will make it to the destination in good condition.
The quality indicator includes data like Bit Error Rate (BER), i.e., the number of bit errors in received bits that have been altered due to noise, interference, distortion, or bit synchronization errors. Others are Signal-to-Noise and Distortion Ratio (SINAD).
It is measured in percentage or on a scale of up to 70. So you will see a value like “60/70”.
Unlike signal strength, it is somewhat harder to say which values are still considered to be ok.
But if the value is low and your signal strength is high, you may get interference from, e.g., kitchen appliances or other electronic devices. Moving them further away may improve the link quality.
Frequency
Another interesting indicator is the WiFi frequency.
This shows if your Raspberry Pi connects to the slower 2.4 GHz network, or the faster 5 GHz version, provided, of course, that your router offers both networks.
freq: 5220 MHz, ctr1: 5230 MHz, channel: 44 (width: 40 MHz)Alternatives
An equally good tool to measure WiFi performance is
iwconfigwhich gives you a snapshot of the Wifi quality as compared to the live data of wavemon.
wlan0     IEEE 802.11  ESSID:"Hundertwasserhaus"
          Mode:Managed  Frequency:5.22 GHz  Access Point: 78:8A:20:D5:5A:48
          Bit Rate=180 Mb/s   Tx-Power=31 dBm
          Retry short limit:7   RTS thr:off   Fragment thr:off
          Power Management:on
          Link Quality=61/70  Signal level=-49 dBm
          Rx invalid nwid:0  Rx invalid crypt:0  Rx invalid frag:0
          Tx excessive retries:49  Invalid misc:0   Missed beacon:0
Conclusion
If you have WiFi trouble, moving your Raspberry Pi just a little bit can make a big difference in WiFi performance.
With wavemon, you can observe your signal strength in real-time and optimize the frame’s placement within your home.
Was this article helpful?
Thank you for your support and motivation.
Related Articles
- Create your own digital picture frame access point when WiFi is unavailable (2025 Bookworm Edition)
- Why the 2.4 GHz WiFi band is faster and more stable for your digital picture frame than 5 GHz
- How to fix an unreliable WiFi connection on your Raspberry Pi picture frame
- Three ways to change your wifi password and SSID on a headless Raspberry Pi locally and remotely