
When you have many photos on your digital picture frame, you probably sometimes look at an image and wonder “where was this taken”?
But even if you don’t have the location, knowing the date when the picture was taken typically leads to the geography.
In this article, I will show you how you can trigger the display of the date within the image viewer Pi3D either via your smartphone or with Alexa.
Shortly after I had finished writing this article, the location feature was added to this group of text overlays. Be sure to head over to How to show the place where your photo was taken with the Raspberry Pi digital picture frame geolocation feature once you finished this post.
Using MQTT commands to show the date or file name
A great feature of Pi3D is that you can remote control the script with MQTT commands which can be triggered from your phone, your Home Assistant setup or your computer.
I have written extensively about Pi3D and MQTT on this blog and if you haven’t used it yet, you may want to have a look at some of these articles.
Paddy, the author of Pi3D, has recently updated the list of MQTT commands which now includes the display of text.
You can find the full list of Pi3D’s MQTT commands here.
The new sections are:
name text on/off: homeassistant/switch/picframe_name_toggle/set, ON,OFF
date text on/off: homeassistant/switch/picframe_date_toggle/set, ON,OFF
location text on/off: homeassistant/switch/picframe_location_toggle/set, ON,OFF
directory text on/off: homeassistant/switch/picframe_directory_toggle/set, ON,OFF
title text on/off: homeassistant/switch/picframe_title_toggle/set, ON,OFF
caption text on/off: homeassistant/switch/picframe_caption_toggle/set, ON,OFF
all text off: homeassistant/switch/picframe_text_off/set, ON # yes that is confusing!
text refresh: homeassistant/switch/picframe_text_refresh/set, ON
I will show you below the examples for the display of the date but with the above commands, you will know how to show the file name as well.
Using iOS Shortcuts & Co. to make the date appear
I have explained in this article how to send MQTT commands to your picture frame from your iPhone or your Apple Watch.
If you have an Android phone, you can use DashMQTT.
As I am on the iOS platform, I will explain the command for iOS Shortcuts.
At the very basic, this command turns on the date for every image:
mosquitto_pub -h localhost -t homeassistant/switch/picframe_date_toggle/set -m ONAfter about a third of your "time_delay” variable (the number of seconds each photo is displayed set in your configuration.yaml) the display will fade again. This is the default value.
Using this command will turn on the date display for every image. As the contrast of white fonts may not be very easy to read on bright images, Paddy added a shaded bar in the background.
Note: In the latest Pi3D PictureFrame 2021 version the bar has been replaced by some more discrete automatic background darkening.

Change the date format or language
If you want to change the date format, open configuration.yaml and look for this line.
show_text_fm: "%e. %B %Y" # default "%b %d, %Y", format to show date over the imageIn the example above, the date would be shown as “14. October 2020” with “%d” obviously being the day, “%B” the full month, and “%Y” the year in 4 digits. For a full list of date variable options, look here.
If you want to change the language of the date, you first have to make sure that your local language has been installed.
Type
sudo dpkg-reconfigure localesto open the Raspberry Pi config menu and select your local language. Where possible, pick the “UTF-8” variant.
The second step is to change the local in the configuration.yaml file. Look for this line
locale: "de_DE.UTF-8" # "locale -a" shows the installed locales which could usedand insert your local language in “default”. The example above, will give you the date in German.

Please note: If the date shown is not the Exif date that you expect, then your Exif data may be corrupted. You can’t see this as the file opens and shows as normal. Out of 1,000 old photos, I had it in over 300 files, most of them older. What I did was to export them from Adobe Lightroom again, and then everything was clean. You can probably do the same with the photo software that you are using. You can verify the state of your Exif date with this simple script.
Create a shortcut to only show the date for one image
If you just want to show the date for the one image that you are currently looking at, you will need to send a “frame/text_off” command. This command will turn off the display of both date and filename.
To combine the two commands, so that the data is only shown once for one image, you can trigger the display, introduce a wait time, and then trigger the off command.
In iOS Shortcuts, you would first add the command for sending the first MQTT command.
Add a delay of 10 seconds.
And as the third step, send the command to stop showing any text.
This is how it looks on my picture frame:
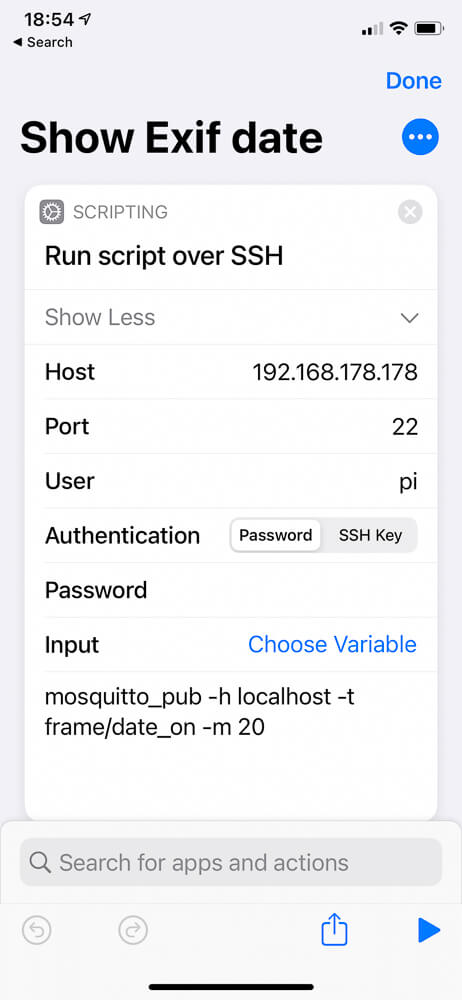


You don’t necessarily need the payload but iOS Shortcuts was complaining about sending an MQTT message without payload, so I added “Seconds” in the first command and “off” in the second.
Ask Siri to trigger this command
Now that you have created a shortcut, you can activate with “Hey, Siri”. This will then trigger the three actions above.
Conclusion
Thanks to Paddy, for continually extending the functionality of the Pi3D image viewer!
Showing the date and/or file name on demand is a really useful feature especially if you have a large photo collection on your digital picture frame. And now it’s easy to do!
Was this article helpful?
Thank you for your support and motivation.
Related Articles
- How to show the place where your photo was taken with the Raspberry Pi digital picture frame geolocation feature
- How to automatically resize images to fit your digital picture frame
- Personalizing Pi3D PictureFrame: How to localize your photo geodata in any language
- How to automatically remove duplicate images from your Pictures folder (2024 Edition)