
After getting my digital photo frame up and running, I had a new goal. I wanted the frame to behave like a standalone appliance, not just a computer running a slideshow. I also wanted it to use less power. Leaving a monitor on all day makes no sense since there is not always someone around to see it.
The requirements were simple. The frame should turn on when someone is nearby. And at night it should stay off completely. That led me to the next phase of the project: adding a passive-infrared (PIR) motion sensor and automating monitor control.
I leaned heavily on ChatGPT to help wire the sensor and configure the Raspberry Pi, which made implementation much smoother.
This motion-sensor addition quickly became my favorite part of the build; suddenly the frame felt aware, and far smarter than a mere slideshow.
Why Motion Detection
The frame sits in my home office. On some days I walk past it constantly, and on others (if I’m out, for example) not at all. Most of the time no one is standing in front of it, so keeping the screen on all day didn’t make sense. Turning it off when there’s no motion saves energy and extends the life of the monitor.
When someone walks in, the display wakes up and starts showing photos again. It feels natural, almost like the frame is aware of you.
I also wanted time-based rules. There’s no need for the screen to come on in the middle of the night, even if motion is detected. Motion alone wasn’t enough — I needed both motion and time of day to control how the display behaved.
The Hardware
I used a standard PIR motion sensor connected to the Raspberry Pi’s GPIO pins. The most common sensor you’ll see in tutorials is the HC-SR501; a popular, inexpensive module with a dome-shaped lens, adjustable sensitivity, and a built-in timer. It’s great for general Arduino and ESP8266 projects, but it’s physically large and its analog-style behavior can be a bit inconsistent for small enclosures.
I did some basic research using YouTube. This video was particularly helpful:
After watching a few YouTube videos comparing different PIR designs, I decided to use the Panasonic EKMC1603111 instead. It’s much smaller and designed specifically for reliable digital output with very low noise, which makes it perfect for something like a photo frame where false triggers can be annoying. It also has a built-in filtering window that smooths out its detection cycle without the extra knobs and adjustments found on the HC-SR501.
I bought two from DigiKey for $9.30 each (I plan to build a second frame for the living room). With shipping and taxes, the total came to about $27.
These sensors are simple to integrate. When they detect movement, they pull their output line low, and the Raspberry Pi can read that immediately and react by turning the monitor on or off.
Connecting the sensor to the Raspberry Pi
The sensor is quite small and has three pins on the back, each connecting directly to the Raspberry Pi’s GPIO header. I used Dupont jumper wires for prototyping. They work, but they can pull out easily, so I may eventually solder the connections once the frame is fully assembled.
The EKMC1603111 is an open-collector, active-low PIR sensor, which means it pulls its output line low when motion is detected and relies on a pull-up resistor the rest of the time. The Raspberry Pi’s internal pull-ups make this wiring simple.
The three pins on the sensor are:
- Pin 1: OUT (left) – open-collector output
- Pin 2: VDD (middle) – 3.0–6.0 V power input
- Pin 3: GND (right) – ground
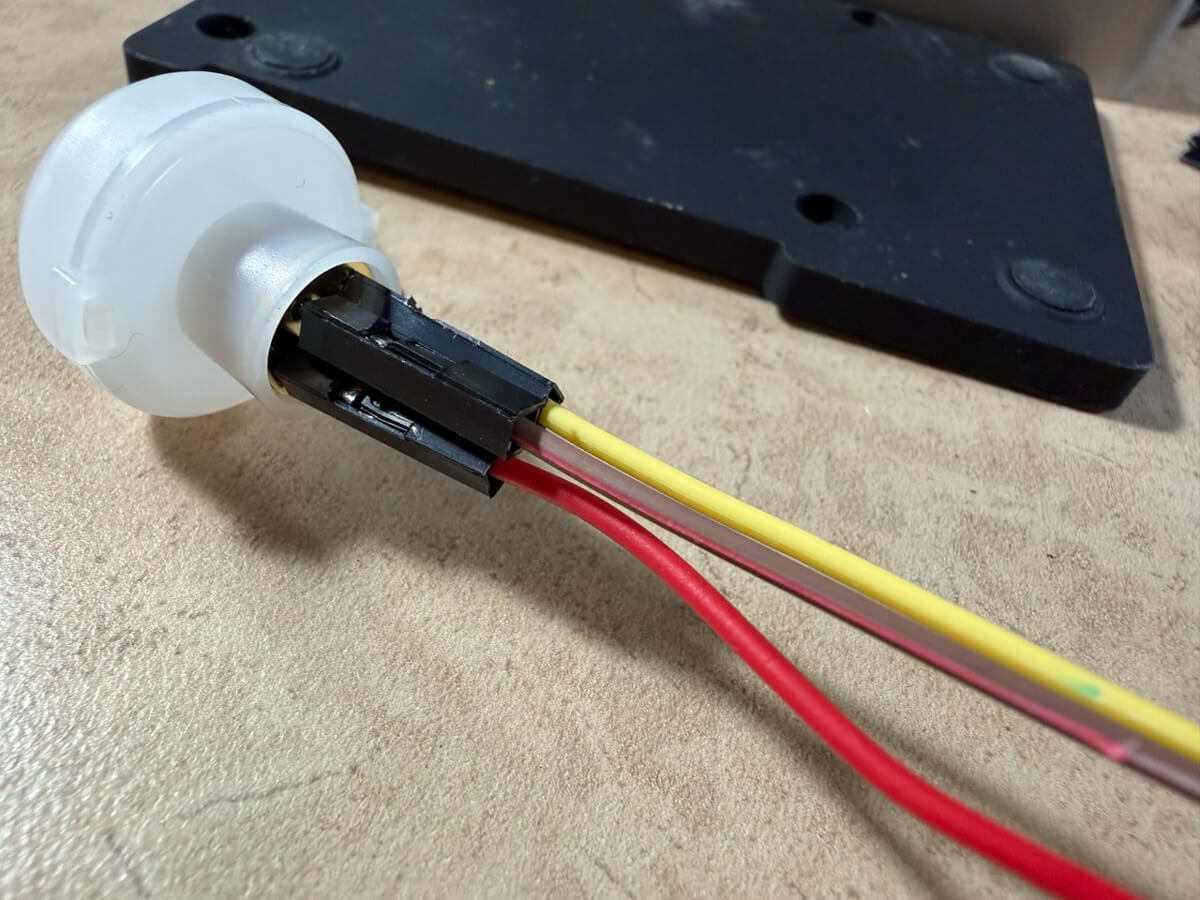
I wired mine as follows (using the wire colors shown in the photos):
- OUT → GPIO4 (physical pin 7) — yellow
- VDD → 3.3V (physical pin 1) — red
- GND → GND (physical pin 6) — brown


Testing the sensor
- Once everything was wired up, I wrote a small Python script (with help from ChatGPT) to verify that the sensor was behaving correctly.
My first test script simply read the raw GPIO pin state in a loop:
#!/usr/bin/env python3
from gpiozero import InputDevice
import time

# Use GPIO4 (BCM numbering)
pir = InputDevice(4, pull_up=True)

print("PIR test started. Waiting for motion...")

while True:
    if pir.is_active:
        print("Motion detected!")
    else:
        print("No motion")
    time.sleep(0.5)
This worked, but not in a way that matched how the Panasonic sensor actually behaves. These sensors hold their output active for a short built-in “on” window, typically a couple of seconds. During that time the script repeatedly printed “Motion detected!”, which made it look like the sensor was stuck even though it was really just the same detection window being held high.
I wrote a second test script that detects changes in the pin state instead of sampling it continuously. This version also includes a warm-up period — these Panasonic PaPIR sensors need about 30 seconds to stabilize after power-on:
#!/usr/bin/env python3
from gpiozero import InputDevice
import time

PIN = 4  # EKMC1603111 OUT wired to GPIO4

# Sensor is open-drain, active LOW -> use pull_up=True
pir = InputDevice(PIN, pull_up=True)

print("Warming up sensor for 30 seconds...")
time.sleep(30)  # allow PaPIRs to stabilize

last = pir.is_active
print("Starting. Initial state:", "MOTION" if last else "no motion")

try:
    while True:
        current = pir.is_active
        if current != last:
            last = current
            if current:
                print(time.strftime("%H:%M:%S"), "Motion detected")
            else:
                print(time.strftime("%H:%M:%S"), "No motion")
        time.sleep(0.05)
except KeyboardInterrupt:
    pass
This behaved exactly as expected. After the warm-up, I’d see a single “Motion detected” event when I moved, and a single “No motion” a second or two after I stopped. It was a quick way to confirm that the wiring and basic logic were correct before moving on to the full automation script.
The Software
Once the test scripts were working, I moved on to the real logic in a Python script called motion_display.py. This script continuously monitors the PIR sensor and controls the monitor using DDC/CI commands.
The behavior is simple:
- When motion is detected, the monitor turns on.
- If there’s no motion for 30 minutes, it turns off.
- Between 9:00 pm and 7:00 am, the display stays off regardless of motion.
Controlling the monitor turned out to be trickier than detecting motion. I’m using ddcutil to send DDC/CI commands to the display’s power control (VCP code D6). Not every monitor handles these commands the same way, and behavior can vary depending on the Raspberry Pi OS version, so your results may differ a bit.
The script also logs its activity — when motion is detected, when the display turns on or off, and regular heartbeat messages — which made it easier to test and fine-tune the timing.
#!/usr/bin/env python3
import time
import subprocess
from datetime import datetime, time as dtime

from gpiozero import InputDevice

# --- CONFIG ---

PIR_PIN = 4                  # EKMC1603111 OUT -> GPIO4 (BCM)
IDLE_TIMEOUT = 30 * 60       # 30 minutes in seconds (set to 60 for testing)
NIGHT_START = dtime(21, 0)   # 21:00 (9pm)
NIGHT_END = dtime(7, 0)      # 07:00 (7am)
HEARTBEAT_INTERVAL = 10 * 60   # seconds between heartbeat logs (10 minutes)

DDC_BUS = "20"               # from `ddcutil detect`
POWER_OFF = "04"             # D6=04 -> off/standby
POWER_ON = "01"              # D6=01 -> on

# --- PIR SETUP ---

# EKMC1603111: open-drain, "no motion" = line high via pull-up, "motion" = active low
pir = InputDevice(PIR_PIN, pull_up=True)

display_on = True  # tracked state


def is_night(now=None):
    """Return True if current time is in the 'night' window."""
    if now is None:
        now = datetime.now().time()

    # Night period crosses midnight: 21:00 -> 07:00
    if NIGHT_START <= now or now < NIGHT_END:
        return True
    return False


def ddc_set_power(on: bool):
    """Send power command to the monitor via ddcutil."""
    value = POWER_ON if on else POWER_OFF
    try:
        # No sudo here: run this script with sudo instead.
        subprocess.run(
            ["ddcutil", "setvcp", "D6", value, "--bus", DDC_BUS, "--noverify"],
            check=True,
            stdout=subprocess.DEVNULL,
            stderr=subprocess.DEVNULL,
        )
        # When turning on, give the monitor a moment to wake
        if on:
            time.sleep(2)
    except subprocess.CalledProcessError as e:
        print(f"[{datetime.now().strftime('%H:%M:%S')}] ddcutil error: {e}")


def set_display(on: bool):
    """Track display state and send DDC command when it changes."""
    global display_on
    if on == display_on:
        return

    print(f"[{datetime.now().strftime('%H:%M:%S')}] Setting display {'ON' if on else 'OFF'}")
    ddc_set_power(on)
    display_on = on


def main():
    global display_on

    print("Warming up PIR sensor for 30 seconds...")
    time.sleep(30)

    last_motion_time = time.time()
    display_on = True
    set_display(True)

    now = datetime.now()
    print(f"[{now.strftime('%H:%M:%S')}] Motion Detection started")
    print("Motion display controller running.")
    print(f"Idle timeout: {IDLE_TIMEOUT} seconds")
    print(f"Night mode: {NIGHT_START.strftime('%H:%M')}–{NIGHT_END.strftime('%H:%M')} (display forced OFF)")

    try:
        last_heartbeat = time.time()
        while True:
            now = datetime.now()
            night = is_night(now.time())

            motion = pir.is_active  # True when sensor sees motion (active low internally, but gpiozero handles that)


            # Heartbeat log
            if now.timestamp() - last_heartbeat > HEARTBEAT_INTERVAL:
                print(f"[{now.strftime('%H:%M:%S')}] Heartbeat: service running, display is {'ON' if display_on else 'OFF'}")
                last_heartbeat = now.timestamp()

            if night:
                # At night, force display off, ignore motion
                if display_on:
                    print(f"[{now.strftime('%H:%M:%S')}] Night mode active, turning display OFF")
                    set_display(False)
            else:
                # Daytime behavior
                if motion:
                    last_motion_time = time.time()
                    # print(f"[{now.strftime('%H:%M:%S')}] DEBUG: Motion detected")
                    if not display_on:
                        print(f"[{now.strftime('%H:%M:%S')}] Motion detected, turning display ON")
                        set_display(True)
                else:
                    # No motion right now; check idle timeout
                    # print(f"[{now.strftime('%H:%M:%S')}] DEBUG: No motion detected")
                    if display_on and (time.time() - last_motion_time) > IDLE_TIMEOUT:
                        print(f"[{now.strftime('%H:%M:%S')}] Idle timeout reached, turning display OFF")
                        set_display(False)

            time.sleep(2)
    except KeyboardInterrupt:
        print("Exiting...")
    finally:
        # Up to you: leave it on or off when you stop the script manually.
        # Here we leave it ON so the frame isn't mysteriously dark.
        set_display(True)


if __name__ == "__main__":
    main()
Running It Automatically
To make the script run reliably and behave like part of the system, I created a systemd service called motion_display.service. Systemd handles starting the script at boot, restarting it if it crashes, and keeping everything running in the background:
[Unit]
Description=Motion based display power control
After=multi-user.target picframe.service
Wants=picframe.service

[Service]
Type=simple
User=root
Group=root
WorkingDirectory=/home/pi
ExecStart=/usr/bin/python3 -u /home/pi/motion_display.py
Restart=on-failure
RestartSec=3
Environment=PYTHONUNBUFFERED=1

[Install]
WantedBy=multi-user.target
The script runs as root because ddcutil requires elevated privileges to communicate with the monitor’s DDC/CI interface. Once the service is installed, running sudo systemctl enable motion_display.service and sudo systemctl start motion_display.service makes it start automatically at boot.
Combined with PicFrame, the Pi now behaves like a standalone appliance. It boots, starts PicFrame, starts the motion controller, and quietly manages the display without any manual steps.
The Result
The effect was immediate. The display now wakes up when someone walks by and shuts off after a period of inactivity. At night it stays completely dark, even if I walk past it, which feels much more natural in a dark room.
The frame also uses noticeably less power. The monitor is off far more often than it’s on, and with fewer hours of backlight use and heat, it should last longer as well.
Most importantly, the frame now feels like a complete product rather than a computer looping photos. It reacts to its surroundings and behaves with a kind of intent — and that small bit of “smartness” adds a lot of delight.
What’s Next
I still have a few ideas for future tweaks. I may add some lightweight logging to see how often the sensor triggers throughout the day, and I’ve thought about experimenting with brightness adjustments based on ambient light. Those can come later, though — for now I’m happy with how the frame behaves. It fits into daily life quietly and naturally.
This project started because I wanted to see more of my photos, but the motion sensor made the whole thing feel like a real appliance. It’s simple, reliable, and surprisingly smart, which is a pretty satisfying outcome.
Was this article helpful?
Thank you for your support and motivation.